How to Use Green Screen in iMovie: A Step-by-Step Guide
Master green screen effects in iMovie with this step-by-step guide, including filming tips and editing tricks for seamless background replacement.
You have recorded a video against a green screen and want to replace the background with something more dynamic. Maybe you're working on a school project or creating content for social media, and you’re wondering how to use green screen in iMovie to achieve a professional look.
This guide walks you through everything you need to confidently apply green screen effects in iMovie—whether you're on iPhone, iPad, or Mac. You’ll learn step-by-step workflows tailored to your device, practical filming tips to get clean shots, and solutions to common issues that might arise during editing. By the end, you will be able to seamlessly composite your videos and explore creative uses for green screen effects.
Key takeaways
- Use iMovie’s "Green/Blue Screen" effect located in the video overlay menu to replace your green background.
- Ensure even, bright lighting on the green screen to avoid shadows and color spill.
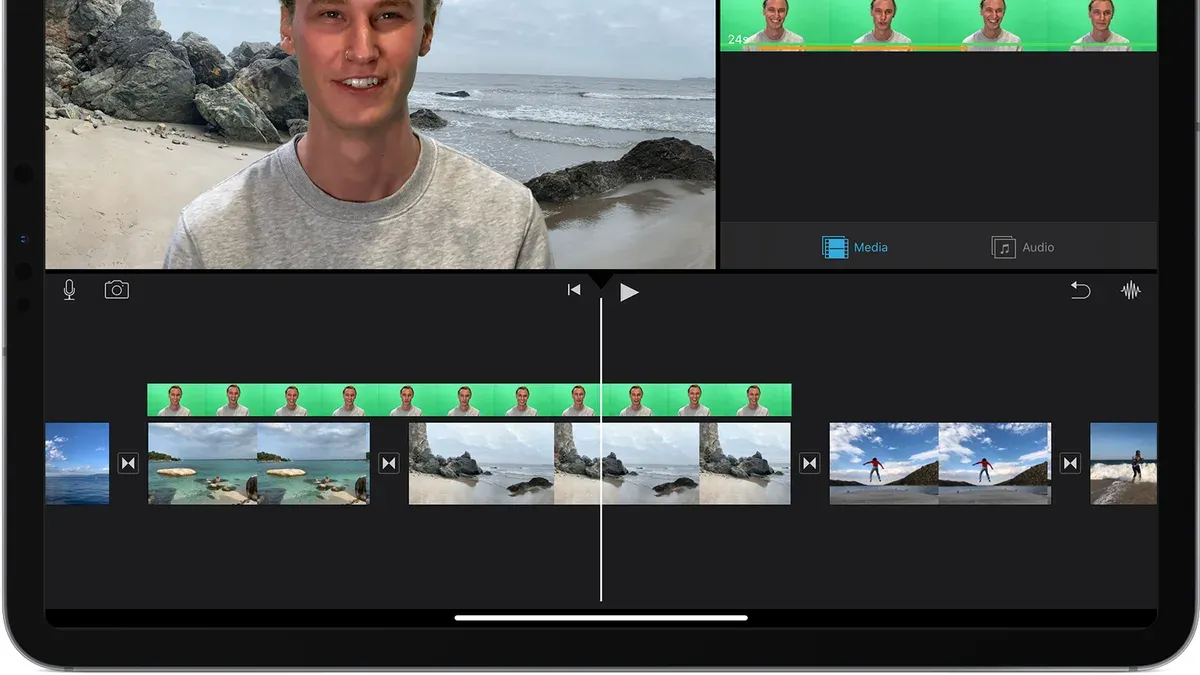
- On iPhone and iPad, add the green screen clip above your background clip in the timeline before enabling the effect.
- Trim and position clips carefully to maintain smooth transitions between foreground and background.
- Watch out for wardrobe or props reflecting green, which can cause parts of your subject to disappear.
Before you start: What you need for green screen videos
Creating effective green screen videos requires the right equipment and setup before you open iMovie. First, you need a solid green backdrop made from materials like fabric, vinyl, or painted walls. The surface should be smooth and free of wrinkles or creases to ensure even color. Good lighting is essential: use at least two soft light sources positioned to minimize shadows and spread light evenly across the green screen. Avoid harsh lighting or hotspots that cause uneven brightness.
Your camera can be an iPhone, iPad, or the built-in camera on a Mac. Make sure your device records in a resolution that matches your project settings in iMovie for best results. Additionally, update to the latest version of iMovie available on your device, as newer versions have improved chroma keying tools that make green screen effects smoother and easier to apply.
In iMovie, green screen effects work through chroma keying, which detects the green color in your footage and replaces it with another video or image. This process requires a clean and consistent green background to function properly. For users looking for advanced features like fine color adjustment or multiple keying layers, alternative software such as Movavi Video Editor offers more specialized tools but with a steeper learning curve and cost.
- Set up your green screen backdrop ensuring it is flat and evenly colored; you should see a uniform green surface without wrinkles or shadows.
- Arrange two or more soft lights on either side to illuminate the green screen evenly; the green should appear consistent in brightness across the entire backdrop.
- Position your camera to capture your subject in front of the green screen, ensuring the green fills the background without shadows or color spill on your subject; preview the shot to verify this.
- Check that you have the latest iMovie version installed on your device by visiting the App Store (iPhone/iPad) or Mac App Store; the app should indicate it is up to date.
- Record a short test clip with your setup and import it into iMovie to verify the green screen effect can be applied smoothly without leftover green patches or spill.
How to use green screen in iMovie on iPhone and iPad
- Open iMovie and start a new project by tapping the "+" icon, then choose "Movie." You should see your video library where you can select both your green screen footage and the background clip.
- Import the background clip first by tapping it and then selecting "Create Movie" at the bottom. This sets your background layer in the timeline.
- To add your green screen clip, tap the "+" icon above the timeline, select "Video," then find and tap your green screen footage. Instead of adding it normally, tap the three dots (...) next to the clip and choose "Green/Blue Screen." Your green screen clip will overlay on the background with the green color keyed out.
- Adjust the green screen effect by tapping the overlay clip in the timeline to select it. Then tap the gear icon to open settings. Here, use "Softness" to smooth edges and "Strength" or "Color Sensitivity" (depending on iMovie version) to refine how the green is removed. Increase softness if edges look harsh; adjust strength if some green remains visible.
- If your green screen footage was filmed on iPhone or iPad, make sure it is well-lit and the green background is evenly lit to avoid shadows that can cause uneven keying. Using the native camera app or a third-party app that records in high resolution helps maintain detail for better keying.
- To remove the green screen effect, select the overlay clip, tap the gear icon, and toggle off "Green/Blue Screen." The clip will appear with the green background intact, allowing you to replace the overlay or make other edits.
After applying the green screen effect, preview your video by playing it in the timeline. The background clip should be visible through the keyed-out green areas of your overlay clip. If edges appear jagged or some green remains, revisit the softness and color sensitivity adjustments to improve the effect.
Using these steps on iPhone or iPad ensures you can confidently layer and edit green screen footage with iMovie’s intuitive interface tailored for touch devices.
How to use green screen in iMovie on Mac
Applying green screen effects in iMovie on Mac offers more precise control compared to iOS versions, allowing you to fine-tune chroma key settings and layer multiple clips for advanced compositions. The process begins with importing your background and green screen clips into the iMovie project timeline. Unlike iPhone and iPad, iMovie on Mac lets you access detailed overlay controls through the Video Overlay Settings panel.
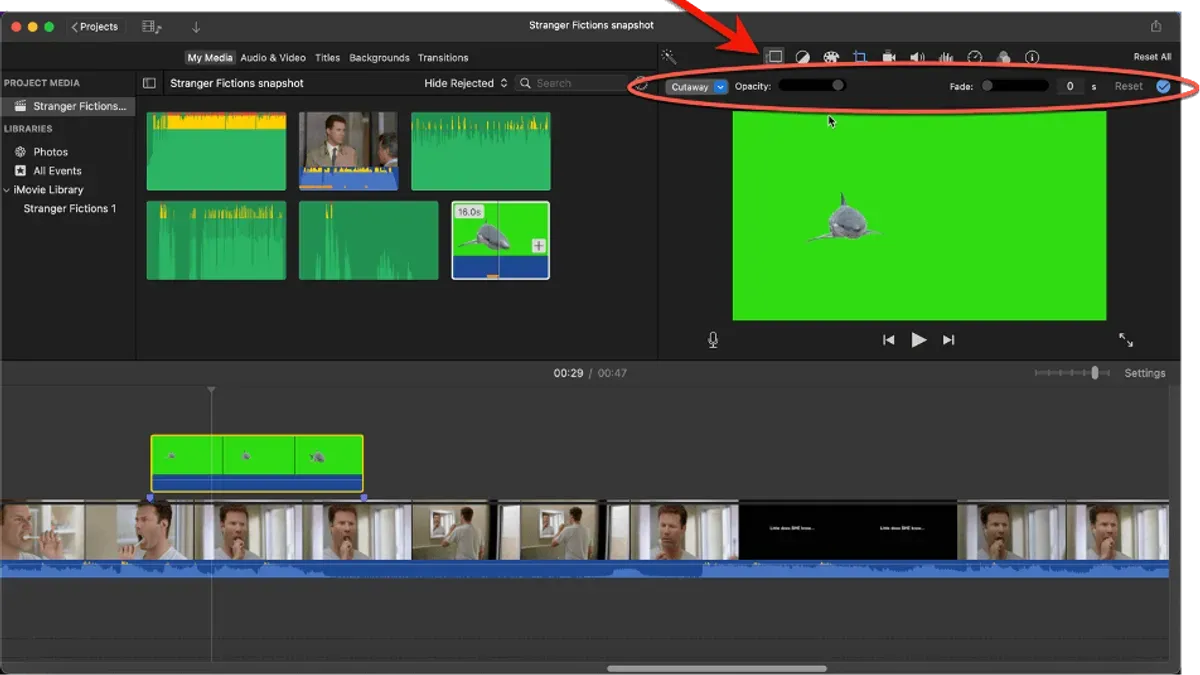
- Import your background and green screen clips into iMovie and place the background clip on the primary timeline track. Once done, drag your green screen clip above the background clip; it should automatically create an overlay.
- Click the overlay clip to select it, then open the Video Overlay Settings by clicking the overlay button above the preview window. Choose "Green/Blue Screen" from the overlay style dropdown. You should see the green background become transparent, revealing the clip below.
- Use the "Softness" slider to smooth edges and reduce harsh outlines around your subject. Adjust "Crop" settings to remove unwanted green areas or frame your subject tightly. These fine-tuning options are more granular than those found on iOS.
- To improve keying accuracy, use the color sampling tool by clicking the eyedropper icon and selecting the green color directly from your clip. This step can remove color variations that cause flickering or shadows.
- For complex scenes, you can stack multiple green screen clips by adding additional overlay layers, each set to "Green/Blue Screen." This allows effects like foreground elements interacting with different backgrounds or layered composites.
- When your edits are complete, export your video by clicking the Share button in the top-right corner and selecting your desired resolution and format. The final video will include all green screen effects as previewed.
Overall, iMovie on Mac offers enhanced green screen editing tools, including detailed edge softness controls, color sampling, and multiple overlay layers, providing a more flexible workflow compared to the simpler iOS interface.
How to film with a green screen for best results
Using the right green screen material and setup forms the foundation for successful keying in iMovie. Choose a smooth, wrinkle-free fabric or professional green screen paper with a consistent, vibrant green color. Stretch and secure the backdrop tightly to avoid creases, which cause uneven color spots that can confuse the chroma key effect.
Lighting plays a critical role in avoiding shadows and uneven color across your green screen. Use soft, diffused lighting sources positioned to illuminate the background evenly. For example, placing two softbox lights at 45-degree angles on either side of the screen reduces shadows and hotspots. Uneven lighting often leads to patchy keying where parts of the background remain visible or spill onto the subject.
Camera settings and framing also affect green screen effectiveness. Set your camera or iPhone to manual exposure if possible to maintain consistent brightness. Avoid automatic white balance changes during filming, as these can shift the green tone. Frame your subject so they are comfortably separated from the screen by at least 3 feet, which minimizes color spill and shadows on the person or object.
Common mistakes include filming too close to the green screen, causing shadows and color spill, or using a green screen with wrinkles and uneven lighting. For instance, footage filmed with a wrinkled backdrop and a single overhead lamp often results in uneven chroma keying and patchy edges around the subject. In contrast, footage shot with smooth fabric, two balanced soft lights, and a well-separated subject produces a clean, easy-to-key result in iMovie.
- Set up a smooth, wrinkle-free green screen fabric tightly stretched on a frame or wall. You should see a consistent, bright green color with no folds or spots.
- Position two soft, diffused lights at 45-degree angles to evenly light the green screen. Check that shadows and bright spots are minimized.
- Place your subject at least 3 feet in front of the green screen to reduce shadows and color spill.
- Set your camera or device to manual exposure and lock white balance to keep lighting consistent throughout filming.
- Record test footage and review for even green background and no shadows on the subject. Adjust lighting or distance if shadows or uneven colors appear.
How to put video in green screen using iMovie
To effectively insert and replace backgrounds behind your green screen footage in iMovie, you need to layer your clips correctly in the timeline. This process involves placing your background clip first, then adding the green screen clip above it, followed by adjusting timing and positioning for a seamless look.
- Add the background clip to the timeline: Drag your chosen background video or image into the iMovie timeline. You should see this clip appear as the base layer, filling the viewer window completely.
- Add the green screen clip above the background: Drag your green screen footage directly on top of the background clip in the timeline. When you release it, a menu will appear—select Green/Blue Screen. The green background should immediately disappear, revealing your underlying background.
- Adjust clip timing: Trim both clips so their durations match. Drag the edges of each clip in the timeline to ensure your subject appears on the background for the entire desired length without gaps or abrupt cuts.
- Position and resize the green screen clip: Click the green screen clip in the viewer. Use the cropping tools (Crop to Fill or Ken Burns) if needed to remove unwanted edges or adjust framing. Then, drag the clip or use the transform controls to resize or reposition your subject to fit naturally within the background scene.
- Fine-tune the green screen effect: With the green screen clip selected, open the Video Overlay Settings. Adjust the softness slider to smooth edges and reduce harsh outlines around your subject. Make small changes and preview the result in the viewer to maintain a natural look.
By following these steps, you'll layer your clips correctly, fit your subject into the scene, and ensure timing synchronization for a polished green screen video. Screenshots within iMovie show the timeline layering and overlay settings, helping you verify each step visually.
Troubleshooting common green screen issues in iMovie
Green screen editing in iMovie can sometimes present challenges that affect the final quality of your video. Common issues include jagged or transparent edges around your subject, shadows or unevenly lit green backgrounds, failure of the green screen effect to apply, and performance lags during editing. Addressing these problems systematically will help you achieve cleaner, more professional results.
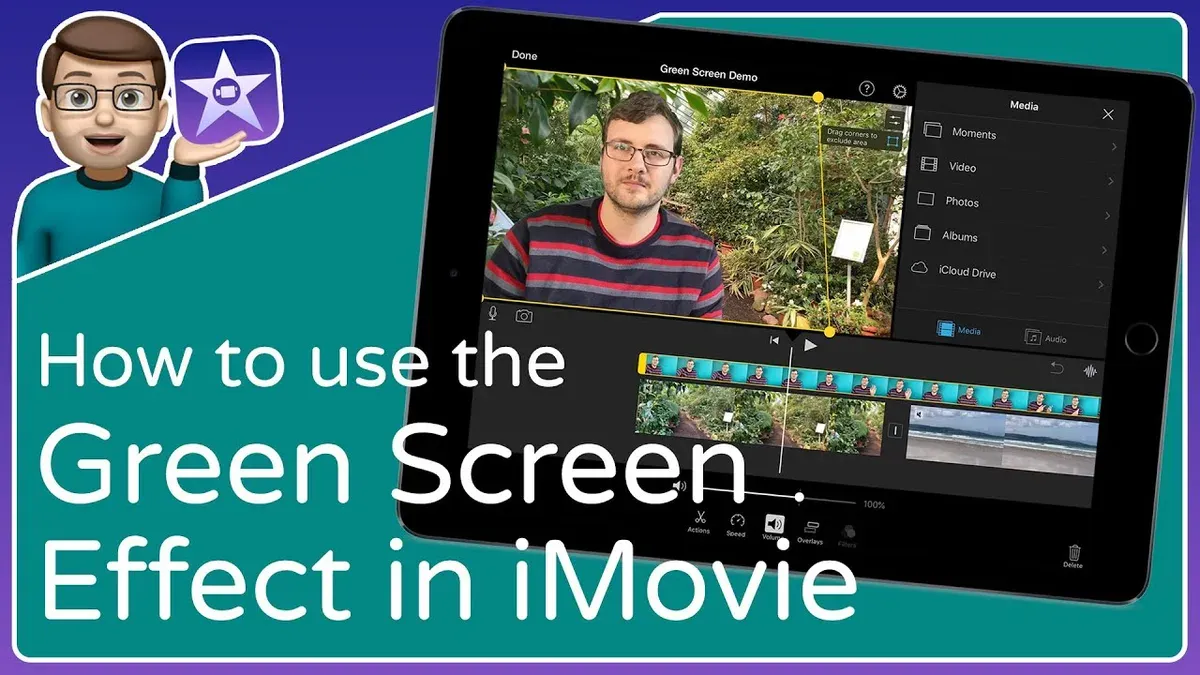
Fix jagged or transparent edges
Jagged edges often result from insufficiently distinct colors between your subject and the green background. To fix this, select your green screen clip in the timeline, then open the Video Overlay Settings by clicking the overlay button above the preview. Adjust the "Clean Up" slider to smooth edges and reduce transparency. Increase it gradually until the edges look sharp but natural. If edges remain problematic, check that your green screen footage is well-lit and avoid shadows on the subject.
Handle shadows and uneven backgrounds
Shadows or color variations on your green screen make it difficult for iMovie to create a clean key. If you notice dark patches or inconsistent transparency, try re-lighting your scene evenly during filming. In post-production, you can try slightly adjusting the "Clean Up" slider, but heavy shadows may not fully resolve. Consider reshooting if uneven lighting creates persistent issues.
Green screen effect won’t apply or clips won’t layer
If iMovie does not let you apply the green screen effect or refuses to layer clips, ensure your background clip is placed first in the timeline and the green screen clip above it. Select the green screen clip, then click the overlay menu and choose "Green/Blue Screen." If the option is greyed out, check that both clips are compatible video formats and that your iMovie version is up to date. Restarting iMovie can also resolve temporary glitches.
Improve performance during green screen editing
Green screen editing can be resource-intensive, especially on older devices. If iMovie lags or stutters, try closing other apps to free system resources. Lower playback quality by clicking the Settings button in the preview window and selecting "Better Performance." Avoid running background processes like backups or downloads while editing. Exporting your project in smaller segments can also reduce strain.
- Select your green screen clip and open Video Overlay Settings. Adjust the "Clean Up" slider to smooth edges; edges should become less jagged and more natural.
- Examine your clip for shadows or uneven green lighting. If present, reshoot with more even lighting or adjust the "Clean Up" slider slightly.
- Ensure clips are correctly layered: background clip below, green screen clip above. Select the green screen clip, click overlay menu, and choose "Green/Blue Screen." Confirm the option is active.
- Update iMovie to the latest version and restart the app if green screen effects won’t apply.
- Close other applications and lower playback quality via the preview settings if editing performance is poor.
How to add green screen to video: creative uses beyond basics
Once comfortable with basic green screen effects, you can explore combining chroma keying with other iMovie tools to create dynamic videos. For example, layering text overlays on top of your keyed footage can add context or branding, while transitions like dissolves and wipes help blend scenes smoothly. This approach enhances storytelling and visual appeal.
Green screen is also powerful for virtual presentations or product demos. By placing yourself in front of custom backgrounds or interactive graphics, you can simulate professional studio environments or showcase products in different settings. This technique is popular among educators and marketers who want engaging, polished videos without expensive equipment.
For more complex projects, layering multiple green screen clips within one timeline lets you build scenes with various elements interacting. You might have a foreground subject keyed over one background, with additional objects or effects added as separate clips. Adjusting clip order and fine-tuning the chroma key controls ensures all layers blend naturally.
A practical example involves a user creating a cooking tutorial where they appear in front of a kitchen background, while a close-up shot of the dish is layered in the corner as a picture-in-picture effect. They used text to highlight ingredients and smooth transitions between steps. The result was an engaging, professional-looking video made entirely in iMovie.
- Import your main green screen footage and place it on the timeline; you should see your subject keyed over the default background.
- Add a background clip on the timeline below your green screen layer; the keyed subject will now appear over this new background.
- Drag additional green screen clips above or beside your primary clips to create layered effects; adjust their position and timing for interaction.
- Use the "Titles" menu to add text overlays; position and customize them to complement your footage without obstructing key visuals.
- Apply transitions from the "Transitions" tab between clips to create smooth scene changes; preview playback to confirm seamless blending.
- Export your project to review the combined effects in the finished video, ensuring all layers and overlays appear as intended.
Frequently asked questions
How to use green screen in movavi?
In Movavi, start by adding your background and green screen clips to the timeline. Select the green screen clip, then open the Chroma Key tool from the editing menu. Enable Chroma Key and use the color picker to select the green background color, adjusting the similarity and smoothness sliders to refine the effect. Finally, position and scale your clips as needed before exporting.
How to use green screen on imovie on ipad?
On iPad, open iMovie and create a new project. Add the background clip first to the timeline, then tap the plus button to add your green screen video. Choose the “Green/Blue Screen” option from the overlay menu. Adjust the positioning and cropping, then preview to ensure the green screen effect is clean before saving.
How to green screen a video?
To green screen a video, film your subject in front of a well-lit green background, avoiding shadows and wrinkles. Import the footage into a video editor that supports chroma keying, like iMovie or Movavi. Use the chroma key or green screen feature to remove the green background and replace it with the desired backdrop. Fine-tune the effect by adjusting tolerance and edge settings.
How to use green screen on imovie?
In iMovie, add your background clip to the timeline first. Then add the green screen clip above it and select the overlay settings. Choose “Green/Blue Screen” to remove the green background automatically. Adjust the clip’s size and position as needed and check for any green edges or shadows to fix with lighting or reshooting.
How to use green screen in Movavi?
Using green screen in Movavi involves importing both your background and green screen footage. Place the background on the timeline first, then drag the green screen clip above it. Select the green screen clip, open the Chroma Key feature, and enable it. Use the color picker to select green, then adjust the tolerance and edge softness for a seamless result.
What This Guide Does Not Cover
This guide focuses on iMovie’s built-in green screen features and does not cover advanced chroma key software or professional-level compositing. If your green screen footage has poor lighting or visible shadows, the final result may still show imperfections even after editing in iMovie. For more complex effects, including fine-tuned masking or color spill removal, consider dedicated software like Final Cut Pro or Adobe After Effects. Additionally, third-party tools such as Movavi offer different workflows and features that are not addressed here.
For the best outcome, start with well-lit, evenly colored green screen footage and use iMovie’s simple but effective tools to create clean composites. The single most useful next step is to practice applying green screen effects on a short clip in iMovie, focusing on adjusting the "Green/Blue Screen" effect slider under the video overlay settings to fine-tune the transparency. This hands-on approach helps you understand how lighting and background colors influence the result and prepares you to create more polished videos.
See also: How to Add Background Music in iMovie: A Step-by-Step Guide · How to Crop a Video in iMovie: Step-by-Step Guide for iPhone, iPad, and Mac · How to Make Slow Motion Video in iMovie: A Step-by-Step Guide