
How to Make an Animated GIF in Keynote: Step-by-Step Tutorial
Create smooth, high-quality animated GIFs from your Keynote presentations with this clear step-by-step tutorial.
You have a Keynote presentation with smooth animations and want to turn part of it into an animated GIF. Maybe you want to share a looping visual on social media, embed a dynamic image in OneNote, or use a custom GIF on your keyboard. Knowing how to make an animated GIF in Keynote opens these creative possibilities without relying on third-party software.
This article guides you step-by-step through designing your animation in Keynote, exporting it as a video, and converting that video into a high-quality animated GIF. You’ll also learn practical tips for embedding GIFs in apps like OneNote and using them in keyboard shortcuts or other creative projects. Each stage breaks down the process clearly so you can create smooth, customized GIFs tailored to your needs.
Key takeaways
- Design your animation with Keynote’s Build Order and timing tools for smooth motion.
- Export your slide as a QuickTime video using File > Export To > Movie.
- Convert the exported video to GIF using tools like Preview or online converters.
- Embed GIFs in OneNote by inserting them as images to maintain animation.
- Create GIFs sized and formatted for keyboard use with attention to frame rate and file size.
Before you start: What you need to create an animated GIF in Keynote
To create animated GIFs using Keynote, you will need a Mac computer with Keynote installed. It is recommended to use the latest version of Keynote available from the Mac App Store to ensure compatibility with the newest features and export options. Keynote requires macOS Big Sur or later to run smoothly, with at least 4GB of RAM and a recent processor for optimal animation performance.
You should have a basic familiarity with Keynote’s interface, including how to navigate slides, apply and customize animations, and use the build order panel. Understanding how animations work in Keynote will help you create smooth, visually appealing GIFs. If you are new to these features, consider reviewing Keynote’s built-in help resources or Apple’s official tutorials before proceeding.
Exporting animated GIFs directly from Keynote is not currently supported, so you will need to export your animation as a video file first. For this step, QuickTime Player, which comes pre-installed on macOS, is a useful tool for trimming or previewing your video. Alternatively, third-party GIF converters like GIF Brewery or online services can convert the exported video to a GIF format.
It is important to understand the difference between GIFs and video exports: GIFs are image files that support animation but have limited color depth and no sound, while video files support better quality and audio but are larger and less universally supported for quick sharing in some platforms.
- Confirm your Mac meets the minimum system requirements: macOS Big Sur or newer, 4GB RAM, Keynote installed (latest version from Mac App Store). You should see Keynote launch without errors.
- Open Keynote and familiarize yourself with the animation tools: apply builds and transitions to test slides. When done, you should see animations preview smoothly within Keynote.
- Ensure QuickTime Player is available on your Mac by searching for it in Spotlight. Opening a video file should play without issues.
- Download and install any third-party GIF converter if you prefer not to use online services. Launch the app to confirm it opens correctly.
- Review the difference between GIF and video files by exporting a short animation as both a.mov and converting it to.gif. Compare visual quality and file size to understand trade-offs.
How to make an animated GIF in Keynote: Designing your animation
Start by selecting the slide where you want your animation. Use Keynote’s Build In, Action, and Build Out animations to control how objects appear, move, and disappear. To add an animation, select an object, click the Animate button in the toolbar, then choose the desired build type from the sidebar. When applied correctly, you should see a preview of the animation on the slide itself.
For smooth text animations, use subtle builds like Fade and Move In or Appear with durations around 0.5 to 1.5 seconds. Avoid overly complex or fast animations, as these may not translate well into GIF format. You can create engaging text GIFs by animating each line or word separately with slight delays, ensuring a clear and readable flow.
Looping animations work best by repeating key actions in sequence. To create a loop, duplicate slides or use Magic Move transitions, which smoothly morph objects between slides. Magic Move requires consistent object names and positions across slides to function correctly and produces fluid transitions ideal for GIFs. Set transition durations between 1 and 2 seconds for optimal smoothness.
- Select the object you want to animate and click Animate in the toolbar. You should see animation options appear in the sidebar.
- Choose a build type: Build In to introduce the object, Action to animate it while on the slide, or Build Out to remove it. The animation preview will appear on the slide.
- Adjust the duration slider to control the speed; aim for 0.5–1.5 seconds for smooth effects.
- For text animations, animate lines or words sequentially using the Build Order pane to set delays. The slide preview should show a staggered text appearance.
- To create looping effects, duplicate the slide and apply Magic Move between slides with consistent object names. The transition preview will display smooth morphing.
Comparing animation smoothness, Magic Move transitions typically produce more fluid GIFs than simple build animations. Experiment with timings and preview frequently to ensure your animation looks natural before exporting.
How to export your Keynote animation as a video
Keynote does not support direct export to GIF format, so the first step in creating an animated GIF is to export your animation as a video. This video file can then be converted into a GIF using dedicated software or online tools. Exporting as a video preserves the smooth timing and effects you designed in your presentation.
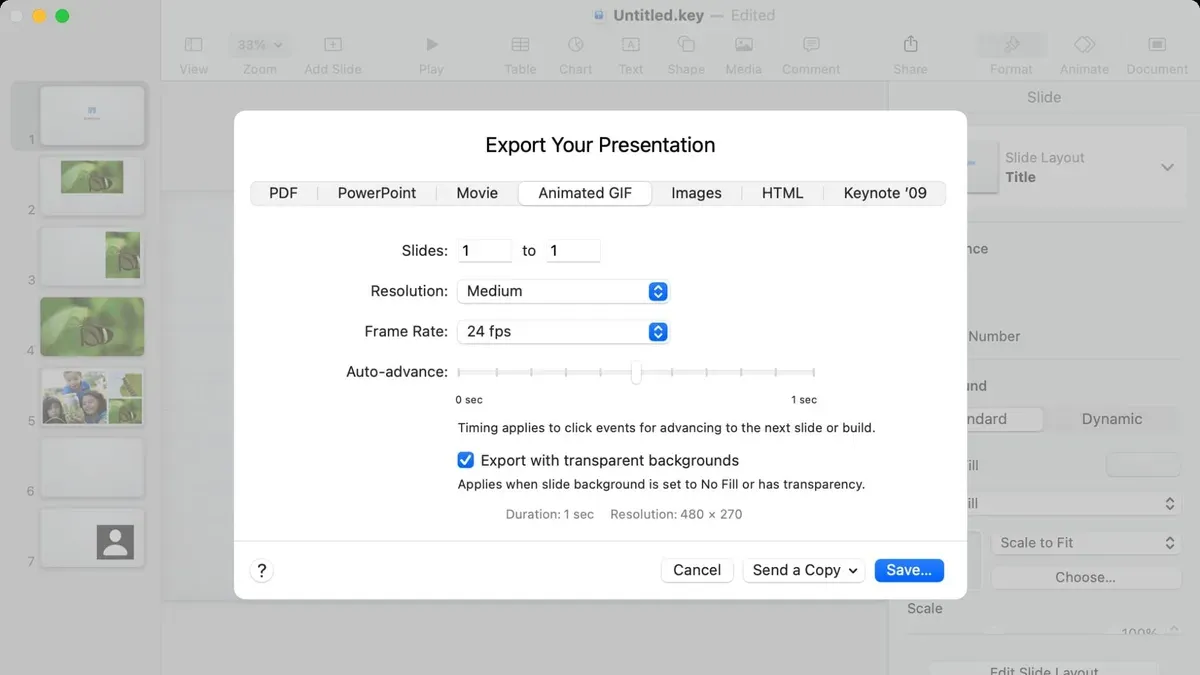
- Open your Keynote presentation and navigate to the slide or slideshow that contains your animation. You should see your animations play correctly in the preview.
- Go to the File menu and select Export To, then choose Movie. This opens the export settings dialog.
- In the Export Your Presentation window, choose whether to export the Current Slide or Slideshow. The slideshow option exports all slides with animations in order.
- Set the playback option to Self-Playing if you want animations to play automatically with the correct timing.
- Choose a resolution that balances quality and file size. For smooth GIFs, 720p or 1080p is usually sufficient. Higher resolutions increase file size but rarely improve GIF quality significantly.
- Set the frame rate to 30 frames per second (fps) for fluid animation. Lower frame rates may cause choppiness in your final GIF.
- Select the video format: MOV is the default QuickTime format and widely compatible, while MP4 offers smaller file sizes with similar quality. MP4 is recommended if you plan to upload or share the video before conversion.
- Click Next, choose a save location, and then click Export. Keynote will render your animation into a video file.
Example: Exporting a 10-second animation at 1080p and 30fps as an MP4 typically results in a file size around 20–40 MB, depending on content complexity. This file size is manageable for GIF conversion, and the higher resolution helps maintain clarity when scaled down.
Using video export as a workaround is necessary because Keynote lacks a direct GIF export function. This method keeps your animations intact and allows you more control over frame rate and resolution, which are key factors affecting the smoothness and quality of your final GIF.
How to convert your Keynote video into an animated GIF
Once you have your Keynote animation exported as a video file, converting it into an animated GIF is your next step. Basic tools like macOS Preview and QuickTime Player offer simple ways to create GIFs, though they provide limited control over settings such as frame rate and color optimization.
- Open your video in QuickTime Player. Use the "Edit" menu to trim the clip to the desired length. You should see the trimmed section ready for export.
- Export the trimmed video as an image sequence using QuickTime's "Export As" option, selecting "Image Sequence". This generates a series of PNG or JPEG files in a folder.
- Open Preview, go to "File" > "Open" and select all images from the sequence. You will see all frames loaded as individual pages.
- Go to "File" > "Export as PDF" or use "Export" to save as GIF. Note that Preview’s GIF export is basic and often produces large files with limited color control.
For finer control and better optimization, third-party apps or online converters like GIF Brewery or EZGIF are recommended. These tools let you adjust frame rate, looping options, color palettes, and compress file size effectively. For example, GIF Brewery allows you to set frame rates between 10 and 30 fps and choose between 256 or fewer colors to balance quality and file size.
Online converters like EZGIF provide quick access to optimize GIFs by resizing, cropping, and adjusting frame delays. They also display estimated file sizes before finalizing the export, helping you decide the best balance for your use case. A video converted with QuickTime and Preview may produce a GIF over 10 MB with less smooth playback, whereas using GIF Brewery or EZGIF can reduce the size to under 5 MB with comparable visual quality.
How to put a GIF in OneNote and embed animated GIFs effectively
Embedding animated GIFs in OneNote allows you to add dynamic visuals to your notes, enhancing clarity and engagement. To insert a GIF on OneNote for Mac or Windows, follow these steps carefully to ensure the animation plays correctly.
- Open your OneNote notebook and navigate to the desired page where you want to insert the GIF.
- Click on the Insert tab in the toolbar, then select Pictures > From File (Windows) or Insert > Pictures > Picture from File (Mac).
- Browse to locate your saved animated GIF file and click Insert. The image will appear on your page.
- Click away from the image; the GIF should start animating automatically within OneNote. If it remains static, click on the image to trigger the animation.
- Resize or move the GIF as needed by dragging its corners or edges. The animation continues to play smoothly during these adjustments.
If your GIF does not animate, make sure you are not in the Draw mode or have disabled animations in OneNote settings. Additionally, some older versions of OneNote or certain platform-specific limitations may prevent GIFs from animating properly.
Using GIFs instead of static images in your notes improves visual communication, especially for demonstrating processes or emphasizing key points. For example, a short note-taking GIF that highlights steps in a workflow or a handwritten note animation can make your digital notes more interactive and memorable.
Successful embedding relies on using optimized GIFs with reasonable file sizes to avoid slowing down OneNote. Screenshots of OneNote pages with embedded GIFs typically show smooth looping animations without any user intervention beyond insertion.
How to make a GIF for keyboard use and other creative applications
When creating GIFs for keyboard apps like iMessage or Slack, optimizing dimensions and file size is key to smooth performance. Start by resizing your GIF to around 300x300 pixels or smaller, which fits well within most keyboard sticker and emoji limits. Keeping the file size under 1 MB helps ensure quick loading and playback on mobile devices without lag.
To create thematic animations such as looping music notes, design a simple sequence in Keynote using subtle motion effects and loop it seamlessly. Export your animation as a video, then convert it to a GIF using your preferred tool, making sure to select settings that preserve smooth looping and reduce color depth if needed to shrink file size.
After creating your GIF, import it into your keyboard or messaging app. For iMessage, add it to your Photos app and access it via the #images section on the iOS keyboard. For Slack, upload the GIF directly in the message field or add it to your workspace's custom emoji list. Test playback across devices to confirm the animation loops smoothly without stutter or excessive loading time.
- Resize your GIF to approximately 300x300 pixels or smaller. You should see a compact image that fits neatly on keyboard screens.
- Optimize file size below 1 MB by adjusting frame rate or color palette. The GIF plays back quickly without delay.
- Create a smooth loop animation, such as music notes gently rising or spinning. The animation repeats seamlessly.
- Export and convert your Keynote animation to GIF format with looping enabled. The file is ready for keyboard app import.
- Import the GIF into your keyboard or messaging app following its specific method. The GIF appears in your sticker or emoji selection.
- Test the GIF on multiple devices to ensure consistent playback and smooth animation. The GIF loads quickly and repeats without glitches.
How to animate a GIF and create GIF animation from Keynote content
Keynote’s animation system and GIF animation operate on fundamentally different principles. In Keynote, animations like Build In, Action, and Build Out rely on timeline-based transitions and timing controls that are smooth and precise within the presentation environment. However, once exported as a GIF, these animations become a sequence of frames played in a loop without the fine control over easing or interaction that Keynote provides.
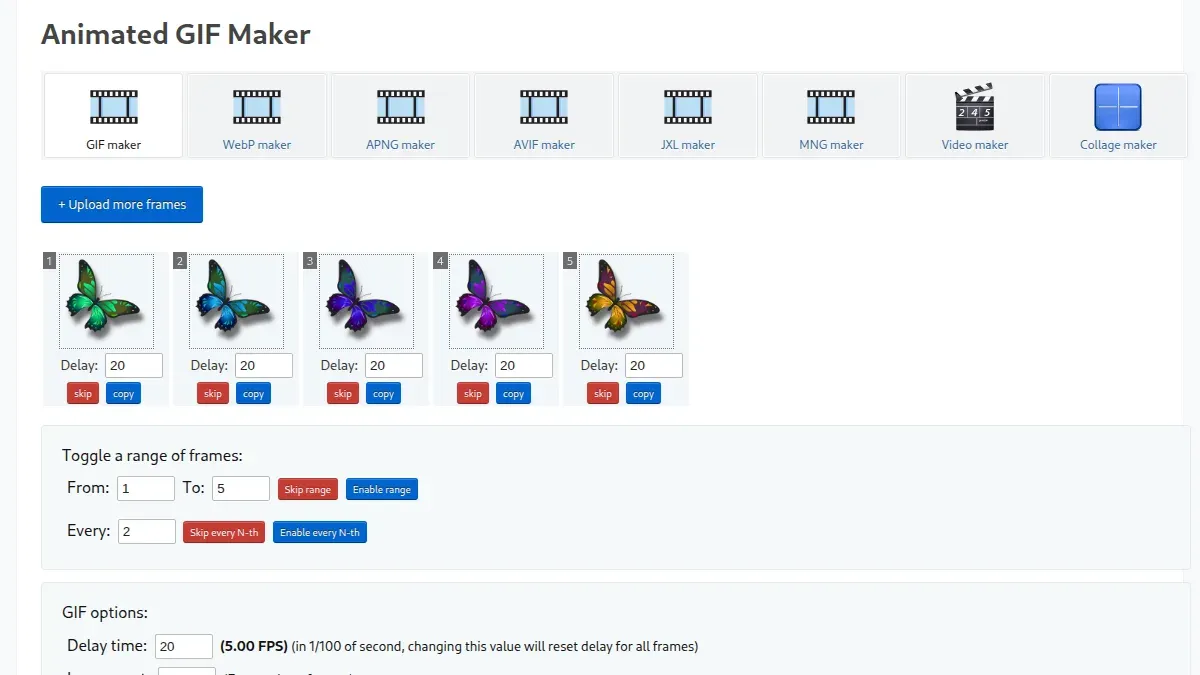
To enhance or tweak the animation after export, you can use GIF editors such as Photoshop, EZGIF, or Giphy’s online editor. These tools allow you to adjust frame timing, add effects like color filters or text overlays, and optimize file size. For example, if a fade effect in Keynote appears choppy in the GIF, slowing frame delay or adding extra transitional frames in the GIF editor can improve smoothness.
Deciding whether to return to Keynote or edit the GIF depends on the needed changes. If you want to alter the animation sequence, object motion, or timing fundamentally, revising the Keynote file is best because it provides more granular control. For minor timing tweaks or visual effects after export, editing the GIF directly is more efficient.
When creating text animations in Keynote that will convert well to GIF, use simple fades, slides, or scale effects with consistent speeds. Avoid complex easing or highly detailed transitions that may not translate smoothly. Comparing side-by-side, the Keynote preview shows fluid, interactive animation, while the exported GIF displays a frame-by-frame approximation that may lose subtle nuances but retains overall motion.
Troubleshooting common issues when making animated GIFs from Keynote
Creating animated GIFs from Keynote presentations can sometimes lead to common problems like playback issues, color loss, or export errors. Understanding how to address these will save you time and frustration.
Fixing GIF playback and looping problems
If your GIF doesn’t loop correctly or appears choppy, check the frame rate settings during video export. Export your animation at 30 fps for smoother motion. Also, some GIF viewers or platforms do not support loop settings embedded in the GIF file. Use a GIF editor to confirm the loop option is set to "Forever." If the GIF still stutters, reduce complex animations or shorten duration to optimize playback.
Dealing with color loss and pixelation
GIFs use a limited 256-color palette, which can cause colors to appear dull or pixelated. To minimize this, export your video at the highest resolution possible before conversion. When using GIF converters, select options to optimize color dithering and avoid aggressive compression. Tools like Photoshop or EZGIF offer fine control for balancing quality and file size.
Resolving export and conversion errors
Errors during video export or converting to GIF often stem from corrupted files or unsupported codecs. Confirm your Keynote export uses the H.264 codec and an.mp4 or.mov container. If conversion software fails, try alternative apps such as GIF Brewery or online converters. Restarting Keynote and your Mac can also clear temporary glitches.
Workarounds for Keynote’s animation export limitations
Keynote animations are exported as video frames, so some dynamic effects may not translate perfectly to GIF format. For complex animations, consider breaking your presentation into smaller clips and export them separately. Post-export, use dedicated GIF editors to enhance or tweak animations frame-by-frame. Returning to Keynote for animation adjustments before export is often necessary for best results.
- Export your Keynote presentation as a video at 30 fps and high resolution.
Expected result: A smooth, high-quality video file ready for conversion. - Use a GIF converter that supports loop settings; set the loop to "Forever."
Expected result: The GIF loops continuously without stopping. - Check color settings in the GIF converter to enable dithering and reduce compression.
Expected result: Richer colors and less pixelation in the final GIF. - If conversion fails, try a different app or online tool supporting H.264 videos.
Expected result: Successful GIF creation without errors. - For complex animations, export segments separately and refine in a GIF editor.
Expected result: Optimized animation with better control over frames.
Frequently asked questions
How to add gif to onenote?
To add a GIF to OneNote, simply drag and drop the GIF file into your desired page or use the Insert tab and select "Picture" to locate and add the GIF. OneNote supports animated GIFs, so your GIF should play automatically once inserted. Make sure the GIF file is saved locally or accessible from your device.
How to create an animated gif?
Create an animated GIF by first designing your animation frames or video, then exporting it as a video file from Keynote or another app. Use a GIF converter tool or software like Adobe Photoshop, Giphy, or online converters to transform your video into a GIF. Adjust frame rate and dimensions to balance smoothness and file size.
How to make gif animation?
Make a GIF animation by compiling sequential images or video frames that show progressive motion. In Keynote, animate elements on slides sequentially, export your presentation as a video, then convert that video to a GIF using a converter. Check the playback to ensure the animation flows smoothly before finalizing.
How to insert gif into onenote?
Insert a GIF into OneNote by clicking the Insert tab, then choosing "Pictures" and selecting your GIF file from your device. Alternatively, drag the GIF directly onto the OneNote page. The GIF will display and animate automatically, enhancing your notes with motion.
How to make gif for keyboard?
To make a GIF for keyboard use, create a small, looped animation with clear visuals and a limited color palette to ensure fast loading. After exporting your animation as a GIF, upload it to your keyboard app's GIF library or use it through supported messaging apps. Keep the file size small for quick sharing and smooth performance.
What This Guide Does Not Cover
This guide does not cover creating GIFs entirely outside of Keynote, such as those made purely in dedicated GIF software like Photoshop or online GIF makers, nor does it address coding-based animation creation. It assumes you are working within a macOS environment with Keynote installed and focuses on using Keynote's animation and export features combined with third-party tools to convert videos to GIFs. If you need advanced frame-by-frame GIF editing or want to create GIFs on Windows or mobile devices without Keynote, this guide may not fully meet your needs.
The single most useful next step is to experiment with exporting short animations from Keynote as videos using the "Export To > Movie" option, paying close attention to the frame rate and resolution settings. This ensures your final GIF will be smooth and clear when you convert it with your chosen GIF converter. Mastering this export process is key to producing high-quality animated GIFs that work well across platforms like OneNote or custom keyboards.



