How to Name Faces in People Album in Photos App: Step-by-Step Guide
This guide shows you how to name faces in the People album in Photos app for better photo organization and quick access.
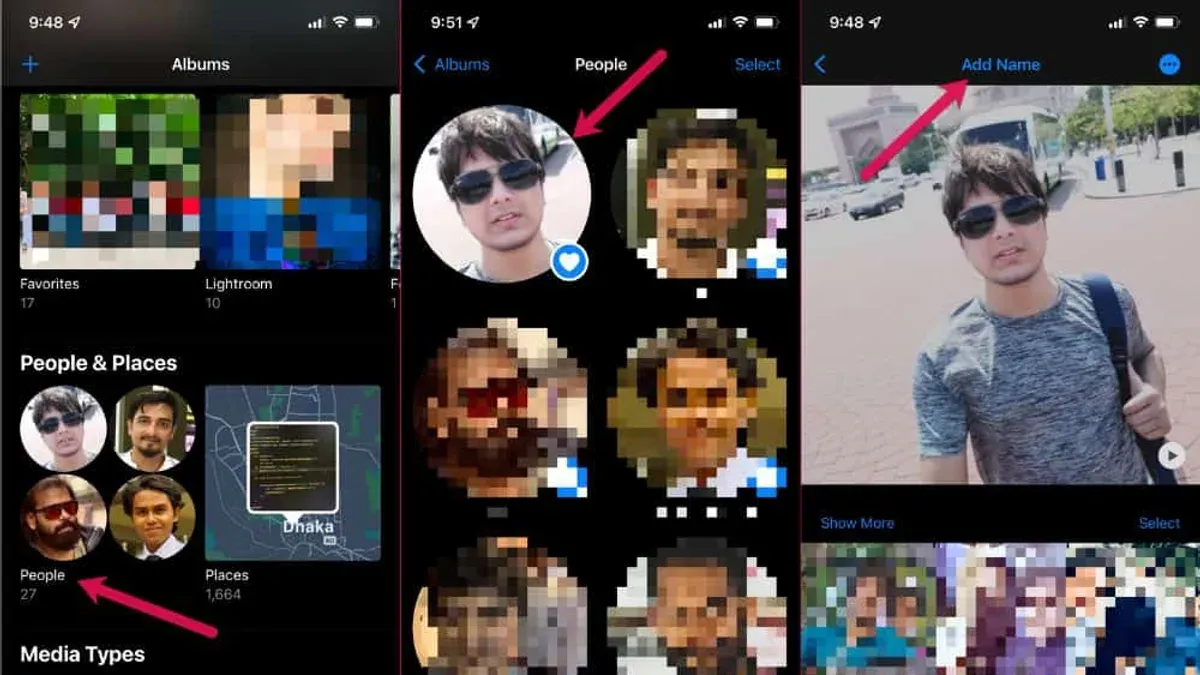
You have a growing People album in the Photos app, but many faces remain unnamed or incorrectly grouped. This makes it hard to find photos of specific people quickly or create personalized memories.
This guide explains how to name faces in People album in Photos app with a clear, step-by-step approach. You will learn to use the app’s automatic face grouping effectively while knowing its limitations and how to manually name and manage face groups for better accuracy.
Key takeaways
- Access the People album from the Photos tab to see automatically grouped faces.
- Name faces by selecting a group and tapping “Add Name” to improve organization.
- Merge or separate face groups to fix recognition errors and avoid duplicates.
- Sync face names across your devices using iCloud Photos for consistency.
- Troubleshoot common issues like missing faces by updating the app or re-indexing the library.
Before You Start: What You Need for Naming Faces
To ensure smooth face naming in the Photos app, start by confirming your device runs the latest operating system version that supports enhanced face recognition. Typically, this means iOS 14 or later, or macOS Big Sur and newer, depending on your device. Also, check that your Photos app is updated to the current release, as updates often improve face detection accuracy and People album management.
Next, verify that the People album appears in your Photos app library. This album is automatically created once the app detects faces, and you can find it under the Albums tab. If it is missing, face recognition may not be enabled or your app might need an update.
Face recognition works best with clear, frontal photos of faces. Blurry, profile, or obscured images could reduce accuracy. The Photos app processes face grouping on your device, so it requires permission to access your photos. Ensure you have granted this permission in your device’s privacy settings.
- Open your device’s Settings app, navigate to General > Software Update, and install any available updates. After updating, open the Photos app and confirm it shows the latest version by checking App Store updates.
- Launch the Photos app and tap the Albums tab. Scroll to find the People album under the My Albums section. You should see face thumbnails grouped here, indicating face recognition is active.
- Go to Settings > Privacy > Photos, select the Photos app, and ensure it has permission to access your photos. This allows the app to analyze your library for faces.
View and Identify Faces Automatically Grouped by the Photos App
- Open the Photos app on your device. You should see the main photo library interface.
- Tap the Albums tab at the bottom, then scroll to find and select the People album. This album contains groups of faces detected by the app.
- Inside the People album, observe how your photos are clustered into different face groups. Each group represents one person, identified by the app’s facial recognition technology.
- Notice that some face groups may be unnamed and simply show a generic silhouette or “Add Name” prompt. These are faces the app recognizes as distinct but has not yet been labeled by you.
- Understand that the Photos app uses on-device machine learning to analyze facial features and group photos accordingly. While this process is generally accurate, it may occasionally group different people together or split photos of the same person into multiple groups.
- Review a sample face group by tapping on it. You will see all photos the app associates with that face, which can help you confirm or correct the grouping before naming.
Name Faces in the People Album Step by Step

- Open the People album and tap on the face group you want to name. You will see a collection of photos where that face appears, but the group will initially be unnamed, labeled as "Add Name" or with a blank name field.
- Tap on "Add Name" or directly on the name field at the top of the screen. A keyboard will appear, allowing you to type the person's name.
- Enter the full name or preferred label for that person, then tap "Next" or "Done" on the keyboard. The name now appears above the face group, replacing the generic label.
- To add photos that were not automatically included, scroll down within the face group to find photos marked as "Confirm Additional Photos" or similar. Tap on the faces in these photos that belong to the named person, then tap "Confirm" to add them to the face group.
- After naming, return to the People album. The face group will now display the assigned name under the group’s main photo, making it easier to identify individuals at a glance compared to unnamed groups.
Correct Mistakes: Merge or Separate Face Groups
Sometimes, the Photos app may split one person into multiple face groups or combine different people into a single group. You can fix these errors by merging face groups for the same person or separating incorrectly grouped photos. Regularly reviewing your People album helps maintain accuracy and keeps your collection organized.
Merge Face Groups
- Open the People album and tap Select in the top-right corner.
- Choose the face groups that belong to the same person by tapping on them.
- Tap Merge at the bottom of the screen. You should see a confirmation dialog.
- Confirm the merge. The selected face groups combine into one, showing all photos together under a single name.
For example, if you see two groups labeled “Anna” with overlapping photos, merging them ensures all pictures appear under one Anna.
Separate Photos from a Face Group
- Open the face group containing incorrect photos.
- Tap Select and pick the photos that do not belong to this person.
- Tap the Share icon, then choose Not This Person.
- The selected photos are removed from the current group and the app will attempt to regroup or leave them unnamed.
For example, if John’s group mistakenly includes photos of his friend Mark, separating those photos maintains clear identification.
Best practice is to periodically scan your People album for such errors, especially after syncing new photos. This keeps names accurate and helps the app learn your preferences better over time.
Manage Face Naming Across Devices and iCloud Photos
When you use iCloud Photos, the names you assign to faces in the People album sync automatically across all your Apple devices signed in with the same Apple ID. This means if you name a face on your iPhone, that name appears on your iPad and Mac without extra effort, keeping your People album consistent everywhere.
If iCloud Photos is not enabled, face names stay local to the device where you named them. For example, naming a face on your iPhone won’t transfer that name to your Mac, so you’ll need to manually name faces on each device.
Regarding privacy, Photos performs face recognition entirely on your device. No facial data or images used for grouping and naming faces are uploaded to Apple’s servers. This on-device processing helps protect your personal information while still allowing seamless syncing of face names through iCloud Photos.
- Make sure iCloud Photos is enabled on each device by going to Settings > [your name] > iCloud > Photos and toggling on iCloud Photos. You should see your photo library syncing across devices.
- Name faces in the People album on one device. Once done, open the Photos app on another device signed in to the same Apple ID and connected to the internet. The named faces should appear there after a short sync delay.
- If you don’t see updated face names on another device, check that iCloud Photos is enabled and that the device is online. Face names won’t sync without these conditions.
Troubleshoot Common Issues When Naming Faces
If you find the People album missing or empty, first check that iCloud Photos is enabled and fully synced by going to Settings > [your name] > iCloud > Photos and ensuring iCloud Photos is on. Also, make sure the Photos app has permission to access your photos in Settings > Privacy > Photos. If faces are not detected or grouped correctly, the app might be struggling with low-quality images or unusual angles. Manually add missing photos to face groups or separate incorrectly grouped ones as needed.
If the Photos app behaves unexpectedly—such as failing to recognize faces or showing outdated groupings—you can reset the face recognition data by following these steps:
- Open the Settings app and go to Photos.
- Scroll down and tap Reset Suggested Memories & People.
- Confirm by tapping Reset. This clears the current face recognition data and forces the app to reanalyze your photos.
- Open the Photos app and allow some time for it to rebuild the People album. You should start seeing updated face groups appear.
Common error messages include “No Faces Detected,” which often means the image quality is too low or faces are obscured. Another symptom is “Face Group Not Available,” typically resolved by a device restart or ensuring your Photos app is updated. If syncing issues occur, verify your internet connection and that iCloud Photos storage isn’t full.
Frequently asked questions
Can I name faces for pets or objects in the People album?
The People album is designed specifically for recognizing human faces, so pets and objects will not be grouped or named here. For organizing photos of pets or objects, you can use the Albums feature to create custom collections manually. The app does not support automatic face recognition for animals or inanimate items within the People album.
Why do some faces appear multiple times with different groups?
This happens when the Photos app detects the same person under varying conditions like different angles, lighting, or ages, leading to multiple face groups. You can merge these groups manually by selecting the duplicates and confirming they belong to the same person. This step improves organization and helps the app learn better for future automatic grouping.
How does Photos app handle face recognition privacy?
Face recognition and naming data are processed locally on your device to protect your privacy. The app does not upload your facial data to iCloud unless you use iCloud Photos, where the data remains encrypted. You control the People album and can delete named faces at any time, ensuring control over your personal information.
Will naming faces improve automatic photo organization elsewhere in the app?
Yes, naming faces helps the Photos app refine its search and organization features, making it easier to find photos of that person across your library. It enhances Memories, Albums, and search results based on named individuals. However, automatic recognition still depends on factors like image quality and lighting, so manual naming remains important for accuracy.
What This Guide Does Not Cover
This guide focuses exclusively on face naming within the native Photos app. It does not cover third-party photo management applications or manual metadata editing outside of Photos. Additionally, the automatic face recognition feature depends heavily on the quality and variety of your photos, so it may not perfectly identify or group every face, especially if images are blurry, low resolution, or contain unusual angles and lighting.
If you require more advanced face recognition, extensive metadata customization, or cross-platform face tagging beyond what Photos provides, exploring specialized software or professional photo management tools might be more effective.
Next Step to Take
To get the most out of your People album, start by reviewing the automatically generated face groups and naming those you recognize. This initial manual input helps the Photos app improve its suggestions over time. Don’t skip the step of merging duplicate face groups or separating incorrectly grouped faces, as this fine-tuning directly enhances future automatic tagging accuracy. Regularly syncing your devices with iCloud Photos ensures your face naming stays consistent across all your Apple devices.
See also: How to Move Your Photos Library to an External Drive in Photos App · How to Create a Shared Album in Photos App: Step-by-Step Guide · How to Remove Duplicate Photos in Photos App: Step-by-Step Guide · How to Hide Photos in the Photos App: A Step-by-Step Guide