
How to Export for YouTube in iMovie: A Clear Step-by-Step Guide
Discover the best way to export your iMovie project for YouTube with clear steps to maintain video quality and compatibility across devices.

You’ve just finished editing your video in iMovie, and now it’s time to share it on YouTube. But before uploading, you want to make sure your export settings are correct to avoid quality loss or upload issues. This article covers how to export for YouTube in iMovie, guiding you through the best export options on Mac, iPhone, and iPad.
You’ll learn practical steps to get the right video format and resolution, how to export directly to YouTube, and how to avoid common mistakes that can affect your video’s appearance or compatibility. Whether you’re exporting to MP4 or handling device-specific nuances, this guide will help you confidently prepare your project for YouTube.
Key takeaways
- Choose 1080p or 4K resolution for optimal YouTube quality.
- Export using the "File > Share > File" path on Mac for custom settings.
- On iPhone/iPad, use the "Share" button and select "Save Video" for MP4 export.
- Direct YouTube sharing requires a stable internet connection and correct login.
- Check your video’s frame rate matches the original to avoid playback issues.
Before you start: What you need to export your video from iMovie to YouTube
Before exporting your video from iMovie to YouTube, ensure your project is fully edited and saved. This means reviewing your timeline for any final adjustments and using the File > Save Project option to avoid losing changes. The device you use—Mac, iPhone, or iPad—affects available export options and steps, so confirm your device to prepare accordingly. If you plan to upload your video directly from iMovie, a stable internet connection is essential to avoid interruptions.
YouTube supports several video formats such as MP4, MOV, AVI, and WMV; however, MP4 with H.264 codec is the most compatible and recommended for upload. iMovie exports MP4 and MOV by default, which means your exported file will align well with YouTube’s accepted formats. Understanding this helps you avoid format conversion after export.
Optionally, log in to your YouTube account on your device before exporting if you want to take advantage of iMovie’s direct sharing feature. This saves time by bypassing manual upload steps later. Having your YouTube credentials ready also prevents delays caused by authentication prompts during export.
- Check your iMovie project is complete and saved. You should see no unsaved changes indicated by the app.
- Confirm your device type (Mac, iPhone, or iPad). This dictates the export interface you will encounter.
- Ensure your internet connection is stable if uploading directly from iMovie. Test by loading a webpage quickly.
- Review YouTube’s preferred formats: MP4 (H.264) is best, which iMovie exports by default.
- Log in to your YouTube account on your device if you want to upload directly. Your account details should be accessible within iMovie’s sharing options.
How to export video from iMovie on Mac
Once your project is complete in iMovie on your Mac, exporting it correctly is crucial to ensure the best quality for YouTube. Start by opening your finished project in iMovie. Locate and click the Share button in the upper-right corner of the window. This button looks like a box with an arrow pointing upward.
- Click the Share button. You will see several options; choose File if you want to export the project as a video file saved on your Mac, or select YouTube & Facebook if you prefer to upload directly from iMovie.
- If you select File, a settings window appears. Here, set the Resolution to 1080p for a high-definition video or 720p if you want a smaller file size with decent quality. You can also choose 4K if your project was edited in this resolution and your device supports it.
- Adjust the Quality setting: High gives better video detail but results in a larger file size. Medium balances quality and size, while Low creates a smaller file but reduces clarity.
- Choose the Compression option. Better Quality compresses slower but keeps more detail, leading to larger files. Faster compression speeds up export time but produces smaller files with some quality loss. For YouTube, Better Quality is generally recommended unless you need a quick export.
- After setting your preferences, click Next. You will be prompted to select a location to save the exported video file. Choose a folder you can easily find later, such as the Desktop or Movies folder, and click Save.
For example, exporting a 1080p video at High quality with Better Quality compression may create a file around 500MB for a 5-minute clip. Using Faster compression could reduce this by up to half but with noticeable quality difference. Adjust these settings based on your priorities for upload speed versus video clarity.
Following these steps ensures your iMovie video is exported in a YouTube-friendly format with control over resolution, quality, and file size.
How to export a project in iMovie on iPhone and iPad
When you're ready to export your edited video from iMovie on your iPhone or iPad, the process is straightforward but slightly different from the Mac experience. First, open the project you want to export and look for the Share button, which appears as a square with an arrow pointing upward. This button opens your export options.
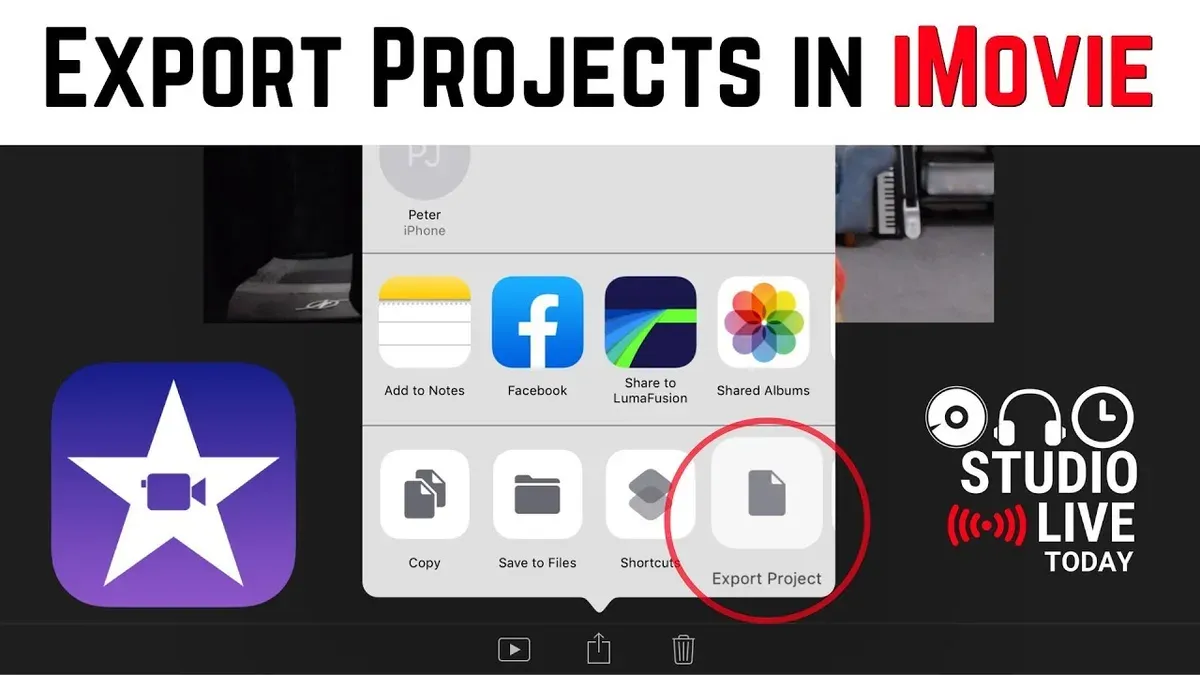
- Tap the Share button. You should see a menu with several options including 'Save Video' and various sharing destinations.
- Select 'Save Video' if you want to export the video to your Photos app. After tapping this, you will be prompted to choose an export resolution such as 720p, 1080p, or 4K if your device supports it.
- Pick your desired resolution. Higher resolutions like 1080p or 4K result in better quality but larger file sizes, so consider your device’s available storage before proceeding.
- Wait for iMovie to process and save the video. Once completed, you can find the video in your Photos app under Recents or Videos.
- If you want to upload directly to YouTube, tap the 'YouTube' option from the Share menu. You will then be asked to sign in if you haven’t already. Choose your resolution here as well and follow the prompts to add video details before uploading.
The export options on iOS devices are more streamlined than on Mac, focusing mainly on saving to Photos or sharing directly to platforms like YouTube. Unlike the Mac, there is no option to export as a file to a specific folder directly within the interface; everything routes through Photos or the sharing panel.
Before exporting, check your device’s free storage. Large videos, especially in 4K, can take up significant space. Clearing unnecessary files or transferring existing media to cloud storage can prevent export failures caused by insufficient space.
Remember, the export menu on iPhone and iPad is visually simple: after tapping Share, the resolution choices are typically listed under “Save Video” or within the chosen sharing service. This clarity helps avoid confusion about file quality and size.
How to export iMovie to MP4 on iPhone
When you export a video from iMovie on your iPhone, the app typically saves the file in the.mov format. Despite this, the.mov files produced by iMovie are fully compatible with YouTube and most popular video platforms, so you usually don’t need to convert them to MP4. If you want to check the file format after export, you can find the video in the Photos app, tap the info icon, and see the file extension or use a file manager app to confirm.
Using the “Save Video” option in iMovie exports a high-quality video that YouTube accepts without any additional conversion. This method balances quality and convenience, letting you upload directly from your device or share the video easily.
However, there are cases when you might specifically need an MP4 file—for example, if a particular editing tool or platform requires MP4 or if you want a smaller file size with similar quality. In such cases, you can convert the.mov file to MP4 using a dedicated video converter app available on the App Store. These apps let you choose export settings like resolution and bitrate to optimize your video for your needs.
- Open your iMovie project on your iPhone and tap the Share button (a square with an arrow pointing up). You should see sharing options including Save Video.
- Select Save Video. The video exports and saves directly to your Photos app as a.mov file. When this completes, you’ll see a confirmation message or the video appear in your Photos.
- To verify the file format, open the Photos app, locate the exported video, tap the info (i) icon, or use a file manager app to check the file extension. It will typically be.mov, compatible with YouTube.
- If you require an MP4 file, download a reliable video converter app from the App Store. Open the app and import your saved.mov video from Photos.
- In the converter app, choose MP4 as the output format and select desired resolution and quality settings, then start the conversion. After the process finishes, the MP4 video will be saved to your device, ready for upload or sharing.
How to export and share iMovie projects directly to YouTube
iMovie allows you to upload your finished project directly to YouTube without manually saving a video file first. This feature is available on both Mac and iOS devices, streamlining the sharing process. Before starting, ensure you are connected to the internet and have your YouTube login credentials ready.
- Open your completed iMovie project and click the Share button (a square with an arrow pointing upward).
- Select YouTube & Facebook from the share options. On iOS, this might appear as Share Project and then YouTube.
- Log into your YouTube account within the iMovie interface when prompted. A login window will appear; enter your credentials to allow iMovie to access your account.
- Fill in your video's Title, Description, and Tags. These fields help organize and optimize your video on YouTube. You can also choose the video category here.
- Choose your video's Privacy Setting: Public, Unlisted, or Private. This controls who can see your video once uploaded.
- Set the Resolution for the export. Selecting 1080p is common for high-quality uploads, but you may choose a lower setting to save upload time.
- Click Next (or Upload) to begin uploading. A progress bar will appear, showing the upload status. Once complete, you will see a confirmation message indicating your video is live on YouTube.
Direct upload is convenient but has limitations. Large files may fail due to network interruptions or iMovie timeout errors. If you encounter errors, exporting the video file to your device first and uploading via the YouTube website or app is often more reliable. Also, direct upload does not give you advanced compression or metadata options available in dedicated uploading tools.
For example, a successful direct upload on Mac shows the progress bar moving steadily and ends with "Upload Complete". You can then click a link to view your video on YouTube immediately. On iOS, you’ll see a similar progress indicator and a message confirming the upload.
How to import a YouTube video into iMovie
iMovie does not support importing videos directly from YouTube. To work with a YouTube video in iMovie, you first need to download the video using legal and ethical methods. Always ensure you have permission to download and use the content, respecting copyright laws and fair use policies to avoid infringement issues.
Once you have downloaded the video, you may need to convert it to a format compatible with iMovie. iMovie supports formats such as.mov,.mp4, and.m4v. Many downloaded videos come in.mp4 format, which typically works without conversion, but if your file is in a different format, a video converter app can help you change it to a compatible one.
- Download the YouTube video legally using a trusted service or software that complies with copyright rules. After this step, you should have the video file saved on your device.
- Check the video format and convert it if necessary using a video converter app. Select an output format supported by iMovie, such as.mp4 or.mov. You will see the converted file saved and ready for import.
- Open iMovie and create or select a project where you want to add the video.
- Click the Import Media button and navigate to the location of your downloaded video file. Select the file and click Import Selected. The video will appear in your iMovie media library for editing.
Following these steps ensures the YouTube video is ready to edit in iMovie while respecting copyright restrictions and file compatibility requirements.
Troubleshooting common issues exporting iMovie to YouTube
Export failures or upload problems often stem from file size limits or unstable internet connections. If your export stops unexpectedly or the video won’t upload, first check that your file size is not excessively large—YouTube recommends keeping uploads under 128 GB. Ensure your internet connection is stable; switching to a wired connection or a reliable Wi-Fi network can help.
Low video quality usually results from export settings that compress the video too much. Use the "High" quality option and select at least 1080p resolution in the export dialog. Avoid the "Faster" compression setting if you want better quality, as it reduces file size at the cost of clarity.
Audio issues like out-of-sync sound or missing audio track can occur if the export process was interrupted or if incompatible audio formats are used. Re-export with the default audio settings and test playback before uploading to catch these problems early.
YouTube upload errors such as "Upload failed" or "Video processing stuck" may require clearing your browser cache or trying a different browser. Logging out and back into your YouTube account can also resolve authorization errors.
On iOS devices, if you get storage warnings during export, free up space by deleting unused apps or media. iMovie requires sufficient free storage to create temporary export files; aim to have at least double the video file size available.
- Check your exported file size by selecting the video file and viewing its information. It should be within YouTube’s recommended limits. If too large, reduce resolution or quality settings and re-export. Successful step: file size is manageable for upload.
- Verify your internet connection stability—run a speed test or try a different network. A stable connection typically shows upload speeds above 5 Mbps. Successful step: consistent internet connectivity.
- Play the exported video locally to ensure video and audio sync properly. If audio is missing or out of sync, re-export using default audio settings in iMovie. Successful step: smooth local playback with synchronized audio.
- Clear your browser cache and cookies, then attempt to upload again. If using the YouTube app, log out and log back in. Successful step: upload initiates without errors.
- If exporting on iPhone or iPad, check storage space in Settings > General > iPhone Storage. Delete unnecessary files if free space is low, then re-export. Successful step: export completes without storage warnings.
Frequently asked questions
How to export a movie in imovie?
To export a movie in iMovie, first make sure your project is complete. On Mac, click the share button (a square with an arrow) in the upper-right corner, then select "File". Choose your desired resolution, quality, and compression settings before clicking "Next" to save the file. On iPhone or iPad, tap the share icon, then "Save Video" and pick the resolution.
How to export an imovie file?
Exporting an iMovie file typically means saving your project as a video file. On Mac, use the "File" > "Share" > "File" option to export to a standard video format like MP4. On iOS devices, use the share button and select "Save Video" to export to the Photos app, which creates an MP4 file by default.
How to import youtube video into imovie?
You cannot import YouTube videos directly into iMovie. Instead, download the YouTube video using a trusted third-party downloader, save it as an MP4 file, and then import that file into iMovie using the "Import Media" option. Always ensure you have permission to use the video content.
How to get imovie to youtube?
You can upload your iMovie project directly to YouTube by using the share feature. On Mac, click the share button, select "YouTube & Facebook", sign in to your account, and enter your video details before uploading. On iPhone/iPad, tap the share icon, choose "YouTube", and follow prompts to publish.
How to export imovie to youtube?
To export iMovie videos for YouTube, export your project using the "YouTube & Facebook" share option on Mac or the YouTube share option on iOS. This method automatically applies the recommended 1080p resolution and H.264 compression for best quality and compatibility with YouTube. Alternatively, export as a high-quality MP4 file and upload manually through YouTube's website or app.
What This Guide Does Not Cover
This guide focuses on using iMovie’s built-in export options suitable for most YouTube uploads. It does not cover advanced video encoding settings such as custom codecs, bitrate manipulation, or professional-level color grading and compression. If you require precise control over video parameters, multi-track audio mixing, or need to work with formats outside iMovie’s scope, dedicated video editing software like Final Cut Pro or Adobe Premiere Pro will better serve your needs.
For those encountering file size issues or needing specific format compatibility beyond MP4 and MOV, consider specialized encoding tools such as HandBrake after exporting your project.
Your Next Step: Verify Export Settings Before Uploading
Before uploading your exported video to YouTube, always double-check your file’s resolution, frame rate, and format by reviewing the video info in Finder (Mac) or the Files app (iPhone/iPad). Ensure your export matches YouTube’s recommended settings—typically 1920x1080 resolution, H.264 codec, and AAC audio at 48 kHz. This simple verification helps avoid unnecessary re-exports and upload errors, saving you time and preserving your video quality.
See also: How to Export Your iMovie Project in 4K: A Step-by-Step Guide · How to Remove Background Noise in iMovie: A Step-by-Step Guide · How to Add Subtitles in iMovie: A Complete Step-by-Step Guide · How to Add Background Music in iMovie: A Step-by-Step Guide



