
How to Remove Background Noise in iMovie: A Step-by-Step Guide
Discover easy steps to remove background noise in iMovie and improve your video's audio quality using built-in features and free AI tools.
You're reviewing your latest iMovie project and notice distracting background noise that takes away from the clarity of your audio. Whether it's faint humming, outdoor sounds, or unwanted chatter, cleaning up this noise can significantly improve your video's quality.
This guide explains how to remove background noise in iMovie across Mac, iPhone, and iPad. You'll learn the exact steps to reduce noise using iMovie's built-in features, understand their limits, and discover practical solutions with free AI tools when native options aren’t enough.
By following this step-by-step approach, you can enhance your audio clarity and make your videos sound more professional without needing advanced software.
Key takeaways
- Use iMovie’s “Reduce background noise” checkbox under the audio adjustments on Mac for quick noise suppression.
- On iPhone and iPad, enable the “Noise Reduction and Equalizer” option under audio settings to clean up sound.
- When iMovie’s tools fall short, export audio and use free AI noise removal apps for better results.
- Add background music or ambient sound within iMovie to mask any remaining noise without overpowering dialogue.
- Record audio in quiet environments and close to the microphone to minimize background noise before editing.
Before you start: What you need to remove background noise in iMovie
To effectively reduce background noise in iMovie, you need the right setup and understanding of the tools available. iMovie supports noise reduction on iPhone, iPad, and Mac, but the audio capabilities differ slightly across these platforms. The Mac version provides more detailed noise control options compared to the mobile apps, which offer simpler adjustments.
Start with a clean original audio source whenever possible. Recording in a quiet environment minimizes unwanted noise, making post-editing easier. Typical background noises that iMovie can handle include low hums, static, and faint ambient sounds, but it struggles with more complex noises like overlapping voices or sudden loud interruptions.
Keep in mind that iMovie’s built-in noise reduction is basic and may not fully eliminate all background noise. For this reason, backing up your project before making audio edits is essential to prevent accidental loss of your original work.
Follow these steps to prepare your project before applying noise reduction:
- Open your iMovie project on your device. You should see your video timeline displayed clearly.
- Ensure the audio clip you want to edit is selected in the timeline; it will be highlighted or bordered.
- Save a duplicate of your project or export a backup copy. This lets you revert if needed without losing progress.
- Check your environment and source audio quality; if possible, re-record in a quieter setting or improve microphone placement before editing.
- Familiarize yourself with the noise reduction controls available on your device’s iMovie version to set realistic expectations.
How to reduce background noise in iMovie on Mac
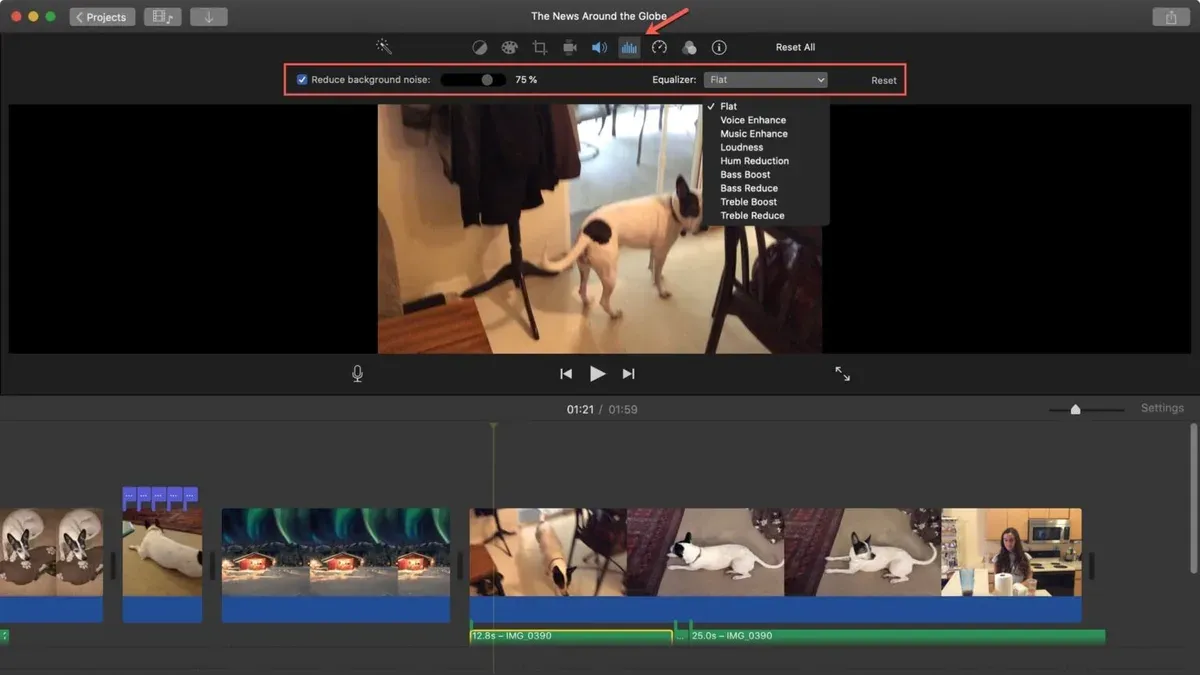
To start reducing background noise in iMovie on your Mac, open your project and select the clip containing the audio you want to improve. You will see the selected clip highlighted in the timeline. Next, click the Audio button above the viewer to open the audio adjustment panel. This panel provides controls for volume, noise reduction, and equalization.
- With your clip selected, locate the Noise Reduction and Equalizer section in the audio panel.
- Check the box labeled Reduce background noise to enable this feature. You will see a slider appear beneath it.
- Move the slider slowly from 0% upward while playing back the clip to preview changes in real time. Stop increasing the slider when the background noise is sufficiently lowered but the voice remains clear and natural.
- Optionally, enable the Equalizer dropdown and select presets like Voice Enhance to further improve clarity.
- Listen carefully for any distortion or muffling as you adjust the settings. If the voice starts to degrade, reduce the noise reduction slider slightly to restore quality.
Before and after applying noise reduction, you can observe the audio waveforms in the timeline. The waveform generally appears smoother and less erratic after noise reduction, reflecting cleaner audio. This visual confirmation helps ensure you are effectively reducing noise without sacrificing the important sounds.
How to remove background noise in iMovie on iPhone and iPad
Removing background noise in iMovie on iPhone and iPad involves a slightly different process than on Mac due to the app’s streamlined interface. The iOS and iPadOS versions provide basic noise reduction and equalizer options, but these are more limited in range and control compared to the desktop version. To start, you need to open your project and select the clip with the audio you want to improve.
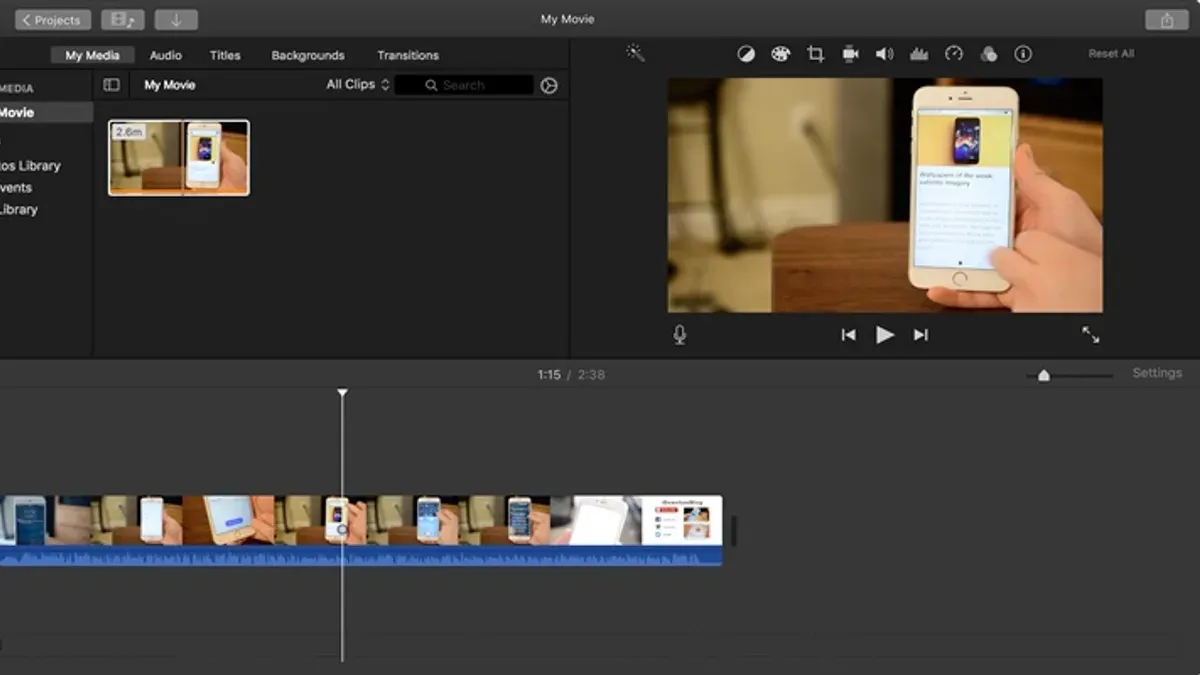
- Open your iMovie project and tap the video clip in the timeline. This action reveals the audio controls below the preview area.
- Tap the Volume button, which looks like a speaker icon. This opens volume adjustment settings.
- Look for the Noise Reduction and Equalizer toggle and switch it on. When enabled, iMovie applies a preset filter aimed at reducing background noise.
- Play back the clip to check the effect. You should notice some reduction in consistent background sounds, though the voice clarity may still be less refined than on Mac.
The noise reduction on iPhone and iPad is effective for mild background noise but can struggle with complex or loud interference. If the built-in tool isn’t enough, consider detaching the audio by tapping the clip and selecting Detach Audio. This separates the sound so you can delete or mute the noisy part and replace it with a clean voiceover or background sound track.
Compared to Mac’s noise reduction slider and equalizer, the iOS/iPadOS version offers less precise adjustments, which means the audio clarity improvements are more subtle. For best results, use iMovie’s mobile noise reduction for quick fixes and combine it with external apps or voiceovers when thorough audio cleanup is necessary.
How to remove background noise in iMovie on iPad and iPhone when native tools aren’t enough
If iMovie’s built-in noise reduction on your iPad or iPhone doesn’t fully clean up your audio, you can use free AI-powered noise removal tools outside of iMovie. This approach involves exporting your video or audio, running it through an external noise remover, and then bringing the improved audio back into iMovie for final editing.
Several free online AI noise removal tools are effective and safe to use, such as Audio Denoise by 123Apps or Krisp.ai’s free web version. These tools analyze your audio, distinguish background noise from speech, and reduce unwanted sounds without manual equalizer adjustments.
- Export your video from iMovie by tapping the Share button and selecting Save Video. You should see your video saved to the Photos app.
- Open the exported video in a noise removal app or upload the audio track extracted from the video to an AI noise removal website. For example, use 123Apps’ Audio Denoise tool by uploading your file and starting the noise removal process. When done, you will see a downloadable cleaned audio file.
- Return to iMovie and create a new project or open your existing one. Import the cleaned audio file by tapping the + icon, then Audio, and selecting Files or Browse to find your cleaned track. Drag this audio onto your timeline.
- Mute or detach the original noisy audio track in iMovie to prevent overlap. Play the timeline to check that the background noise is reduced and the voice remains clear.
- Adjust audio volume levels as needed, then export your project with the improved sound.
This workflow typically takes a few minutes longer but can significantly improve audio clarity when iMovie’s native tools fall short. Comparing before and after audio clips reveals a marked reduction in hiss, hum, or ambient noise, making your video sound more professional.
How to add background sound on iMovie to mask remaining noise
Adding background music or ambient sounds in iMovie can effectively mask any residual background noise that remains after noise reduction. This creates a more pleasant listening experience by diverting attention from unwanted noise while enhancing the mood of your video. You can import audio files such as soft music tracks, nature sounds, or subtle soundscapes directly into your project on Mac, iPhone, or iPad.
- Open your iMovie project and tap or click the Audio tab to browse your sound library or import custom audio files. You should see the selected audio appear in your timeline below your video clips.
- Drag the background audio clip to align with your video segment where noise masking is needed. The clip will be visually represented as a colored bar beneath your video track.
- Adjust the background sound volume by selecting the audio clip and using the volume slider. Setting the volume around 15-25% usually balances masking noise without overpowering dialogue. You should hear the background audio softly playing alongside your voice track.
- To maintain dialogue clarity, lower the background sound volume if speech becomes difficult to understand. The goal is subtle support, not distraction.
- Apply fade-in and fade-out effects by dragging the fade handles at the start and end of the background audio clip. This smooths transitions so the sound does not start or stop abruptly. You will see the audio waveform gradually rise or fall visually.
For example, a gentle rain sound at 20% volume can mask low-level hums without covering speech, while a soft instrumental track timed with the video mood enhances engagement and reduces perceived noise. Experiment with background sound types and volume levels to find the best blend for your project.
How to delete or mute background noise in video using iMovie features
When noise reduction tools don't fully remove distracting background noise, you can delete or mute the audio track from your video clip entirely. This lets you start fresh by adding new sound or voiceover without interference.
- Detach the audio from your video clip. Select the clip in the timeline, then go to the Modify menu and choose Detach Audio. You will see the audio appear as a separate green track below the video clip.
- Mute or delete the original audio track. Click the detached audio track and press the Delete key to remove it, or select the clip and drag the volume slider to zero in the audio inspector. The timeline should now show the video clip without its original sound.
- Add replacement audio or voiceover. To add a voiceover, click the microphone icon above the timeline and record directly, or import a clean audio file by dragging it into the timeline. Position it to sync with the video.
- Adjust the new audio’s volume and fade. Use the audio controls to balance volume and apply fades so the replacement sound fits naturally with the video visuals.
Muting or deleting the audio track is preferable when background noise is too loud or complex for noise reduction sliders to handle. This method gives you full control over the sound but requires adding alternative audio to maintain engagement.
Troubleshooting common problems when removing background noise in iMovie
Sometimes noise reduction can make your audio sound muffled or robotic. This usually happens when the noise reduction slider is set too high. To fix this, lower the noise reduction level gradually until the voice sounds natural again while background noise is still reduced. Balancing this slider carefully is key to maintaining clarity.
If you do not see the noise reduction option, first check your iMovie version and device compatibility. Noise reduction features are available on recent versions of iMovie and supported devices only. Updating iMovie or using a compatible device should resolve this issue.
If your audio remains noisy after using iMovie’s noise reduction, consider using external AI noise removal tools or re-recording the audio in a quieter environment. These options often provide cleaner results when iMovie’s native tools are insufficient.
Sync issues may arise after replacing audio tracks, causing dialogue to appear out of time with the video. To fix this, zoom in on the timeline and manually align the audio waveform with the video action. Playing back frequently during adjustment helps confirm proper synchronization.
- Adjust noise reduction slider slightly lower if audio sounds muffled; you should hear clearer voice without robotic tone.
- Check iMovie version by tapping Settings > About or on Mac use the App Store > Updates; update if option is missing.
- If noise remains after reduction, export audio and process with a free AI noise remover, then re-import cleaned audio.
- Detach audio track, zoom timeline, drag audio to align with video lip movements; playback confirms sync is restored.
These steps address common difficulties and help you achieve cleaner, natural-sounding audio in iMovie.
Tips for recording audio to minimize background noise for iMovie projects
Recording clean audio from the start greatly reduces the need for heavy noise removal later. Choose quiet locations and times with minimal ambient noise, such as early mornings or late evenings, to capture clearer sound. Avoid rooms with echo or hard surfaces that can cause unwanted reverberation, opting instead for spaces with soft furnishings that absorb sound.
Using external microphones compatible with your device—whether iPhone, iPad, or Mac—can significantly improve audio quality. Lavalier or shotgun microphones that connect via Lightning or USB-C ports provide better directional audio capture and reduce background noise compared to built-in microphones.
Set appropriate input levels by checking your device’s audio meter before recording. Aim for levels that avoid clipping (red indicators) and low-level hiss, typically keeping peaks around -12 to -6 dB. This balance prevents distortion and ensures a clean signal for editing.
Wear headphones during recording to monitor audio in real-time. This helps you catch and address unwanted noises immediately, such as rustling, distant traffic, or microphone handling sounds, improving your final audio track quality.
Overall, high-quality source audio improves noise reduction success rates by preserving voice clarity and reducing artifacts from aggressive filtering. Following these tips makes your iMovie editing more effective and your videos sound more professional.
Frequently asked questions
Can imovie remove background noise?
Yes, iMovie includes a built-in feature that allows you to reduce background noise in your video clips. On Mac, you can access this by selecting your clip, clicking the noise reduction and equalizer button, and adjusting the "Reduce background noise" slider. On iPhone and iPad, you can enable the "Reduce Background Noise" option in the audio settings for a clip. However, iMovie’s noise removal works best with moderate background noise and may not fully eliminate loud or complex noise.
How to delete background noise in video?
In iMovie, you can't completely delete background noise, but you can reduce it significantly. Select the clip, open the audio adjustments, and use the "Reduce background noise" slider to lower it. For more stubborn noise, you might consider muting the audio track or replacing it with background music or voiceover. If iMovie’s tools aren't enough, exporting the audio for external editing is a practical option.
Can iMovie remove background noise completely?
iMovie cannot completely remove all background noise, especially if it's loud or overlaps with important audio. Its noise reduction is designed to minimize noise, but some residual sounds may remain. For more precise noise removal, using external audio editing tools with advanced noise reduction capabilities alongside iMovie is recommended.
How to remove background noise in iMovie on iPhone?
Open your project in iMovie on your iPhone, tap the clip with background noise, then tap the sound icon at the bottom. Enable the "Reduce Background Noise" toggle to apply noise reduction. You can also adjust the volume to balance the audio, but iMovie on iPhone has limited controls compared to the Mac version.
Is there a free way to remove background noise from video online?
Yes, several free online tools offer background noise removal from video or audio files. After exporting your audio or video from iMovie, you can upload it to websites like Kapwing, VEED.io, or Auphonic, which provide basic noise reduction features without cost. Keep in mind that free versions may have file size limits or watermarking, so check their terms before use.
Understanding iMovie’s Limitations and When to Seek Other Tools
iMovie’s built-in noise reduction features provide a helpful starting point but are limited in their ability to fully eliminate severe or complex background noise. If your audio requires professional-level clarity, consider using dedicated audio editing software like Audacity, Adobe Audition, or Logic Pro, which offer more advanced noise reduction controls and finer adjustments. Additionally, free online AI noise removal tools can enhance your audio beyond iMovie’s capabilities, but be mindful of file size limits and privacy policies before uploading sensitive content. Always review terms of service to ensure your data remains secure.
The single most useful next step is to experiment with iMovie’s background noise reduction slider alongside adding subtle background sounds to mask residual noise. This combined approach often yields the best balance between clarity and natural audio quality without needing external software. Try adjusting these settings while previewing your clip carefully to find the optimal sound that suits your project.
See also: How to Record a Voiceover in iMovie: Step-by-Step Guide



