Can Mac Use NTFS? Clear Answers and Practical Solutions
Discover how to read and write NTFS drives on your Mac with native options and reliable third-party solutions for full access.
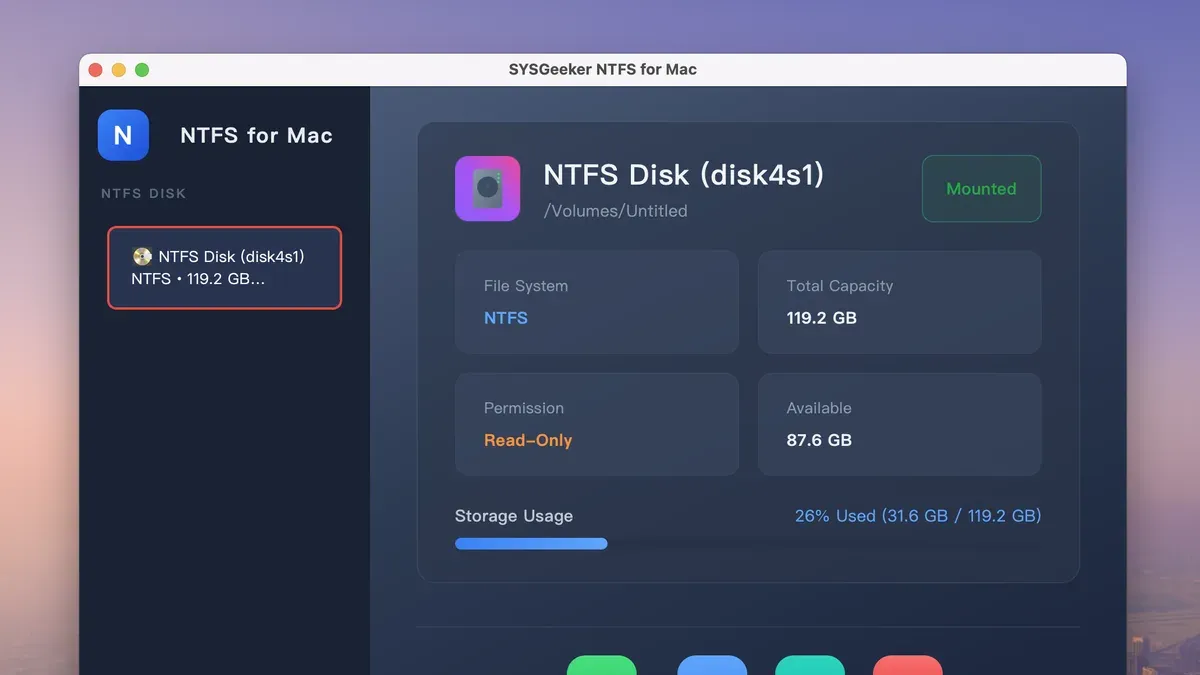
You connect an external hard drive to your Mac, only to find you can read files but not save or edit them. If you’ve ever wondered, "can mac use ntfs" drives fully, you’re not alone. Mac computers can read NTFS-formatted drives out of the box, but writing to them is a different story.
This article will walk you through how NTFS works on macOS, the practical ways to enable full read-write access, and the pros and cons of native versus third-party solutions. By understanding these options, you’ll be able to choose the best approach for your needs and technical comfort level.
Key takeaways
- macOS can read NTFS drives natively but restricts writing by default.
- Enabling NTFS write access requires third-party software or careful command-line tweaks.
- Third-party NTFS tools offer more reliable and user-friendly write support.
- Formatting drives as exFAT or FAT32 ensures seamless read-write compatibility between Mac and Windows.
- Choosing the right method depends on your usage frequency and data safety priorities.
Can Mac read and write to NTFS drives?
By default, macOS can read NTFS-formatted drives but cannot write to them. This means you can open, copy, or move files from an NTFS drive to your Mac without issue, but you cannot save new files, delete, or modify existing ones directly on the NTFS volume. Writing includes any action that changes the contents of the drive, such as editing documents or adding new data.
Apple’s official documentation confirms that macOS provides read-only support for NTFS natively. The write capability is deliberately disabled because Apple's implementation is incomplete and may cause data corruption or instability if enabled. This cautious approach protects your files and system integrity.
Comparing macOS and Windows, Windows has full native read/write NTFS support, making it seamless for NTFS drives. macOS’s read-only limitation requires users to consider additional solutions if they need to write to NTFS drives regularly. Understanding this distinction helps you decide how to handle NTFS drives on your Mac based on your needs.
How to use NTFS on Mac for writing and full access
You can enable write access to NTFS drives on your Mac either by using macOS’s experimental native support or by installing third-party NTFS drivers. The native method involves Terminal commands but is not officially supported by Apple and may cause data loss or drive corruption. To try it, identify your NTFS drive with diskutil list, then create a mount point and use sudo mount -t ntfs -o rw,nobrowse /dev/diskXsY /Volumes/NTFS replacing diskXsY with your drive identifier. Remember to eject safely with diskutil unmount /Volumes/NTFS. This method suits tech-savvy users aware of the risks.
More reliable and user-friendly are third-party NTFS drivers. Popular paid options include Paragon NTFS for Mac and Tuxera NTFS for Mac, both offering seamless read/write access, high performance, and easy installation, usually priced around $20-$50 with trial versions available. Free options like Mounty and the open-source NTFS-3G exist but often require additional tools like FUSE for macOS and involve more complex setup, making them better suited for advanced users. These tools also handle safe mounting and unmounting through their interfaces, reducing the risk of data corruption.
When using any NTFS driver, always eject drives properly through Finder’s eject button or by right-clicking the drive icon and selecting “Eject” to prevent data loss. Choosing between native support and third-party drivers depends on your technical comfort, need for stability, and budget.
Why does macOS limit NTFS write support?
macOS limits NTFS write support primarily because NTFS is a proprietary file system owned by Microsoft, which introduces licensing restrictions and technical complexities. Apple must respect these licensing terms, making full native write implementation challenging. Additionally, Apple prioritizes its native file systems, APFS and HFS+, to ensure the best compatibility, performance, and integration within macOS.
From a technical standpoint, writing to NTFS safely requires handling complex metadata and journaling features that Apple has not fully reverse-engineered or licensed. This creates risks of data corruption or loss if the implementation is incomplete or unstable. Apple’s cautious approach reflects a focus on maintaining system stability, data integrity, and a consistent user experience rather than offering partial or risky NTFS write support.
For cross-platform compatibility, macOS supports FAT32 and exFAT with full read and write capabilities. These file systems are openly licensed and simpler, providing reliable options for sharing drives between Mac and Windows without the challenges NTFS presents.
Can Mac use NTFS external drives seamlessly?
By default, when you connect an NTFS external drive to your Mac, it mounts as read-only, so you can open and copy files but cannot modify or add new ones. This behavior ensures system stability but can disrupt workflows if you frequently need to write to these drives. If your use case involves occasional read access, this default setting is usually fine and requires no extra steps.
For regular writing and full access, third-party NTFS drivers offer a smoother experience. Tools like Paragon NTFS for Mac or Tuxera NTFS enable seamless read/write operations, often integrating into Finder for quick file management. However, these come with trade-offs: some may slightly affect drive performance, and there’s always a small risk of data corruption if the software isn’t perfectly stable or if the drive is ejected improperly.
If performance and safety are paramount, and you control the drive’s formatting, consider reformatting the drive to exFAT or APFS, which macOS supports natively with full read/write. This avoids third-party dependencies but requires wiping the drive, so backing up your data first is essential. Regardless of method, always maintain regular backups—whether to cloud storage or another drive—especially before making changes to NTFS drives on Mac. Backup best practices help prevent data loss from unexpected software issues or drive errors.
For example, a graphic designer who frequently transfers large files between Mac and Windows might choose a third-party driver for convenience, accepting minor performance impact. Conversely, a casual user who only reads files might stick with the native read-only mode and avoid extra software altogether.
What is the best NTFS software for Mac?
The best NTFS software for Mac depends on your priorities like ease of use, speed, and budget. Commercial options such as Paragon NTFS for Mac and Tuxera NTFS offer polished interfaces, fast transfer speeds, and broad macOS compatibility. Paragon typically costs around $20-$30 with a trial, known for seamless integration and prompt updates. Tuxera, slightly more expensive, emphasizes reliability and includes features like caching for speed optimization.
Free alternatives like NTFS-3G provide basic full NTFS support but require manual installation via Terminal and additional tools like FUSE, which can be challenging for less technical users and may impact speed. NTFS-3G is suitable if you prefer open-source solutions and can tolerate more setup complexity.
When choosing software, consider macOS version compatibility, customer support availability, and whether a trial version lets you assess performance and stability firsthand. Testing before purchase helps ensure the software meets your workflow needs without surprises.
| Software | Price | Ease of Use | Speed | macOS Compatibility | Support |
|---|---|---|---|---|---|
| Paragon NTFS for Mac | Paid (~$20-$30) | Very user-friendly | High | Latest versions supported | Active customer support |
| Tuxera NTFS | Paid (higher than Paragon) | User-friendly with advanced features | High with caching | Latest versions supported | Good customer support |
| NTFS-3G | Free | Complex installation | Moderate | Varies, may need updates | Community support |
How to safely format drives for Mac and Windows compatibility
The safest way to ensure smooth use of external drives between Mac and Windows is to format them as exFAT. This file system supports large files and works natively on both operating systems without the write limitations of NTFS on Mac or the 4GB file size limit of FAT32.
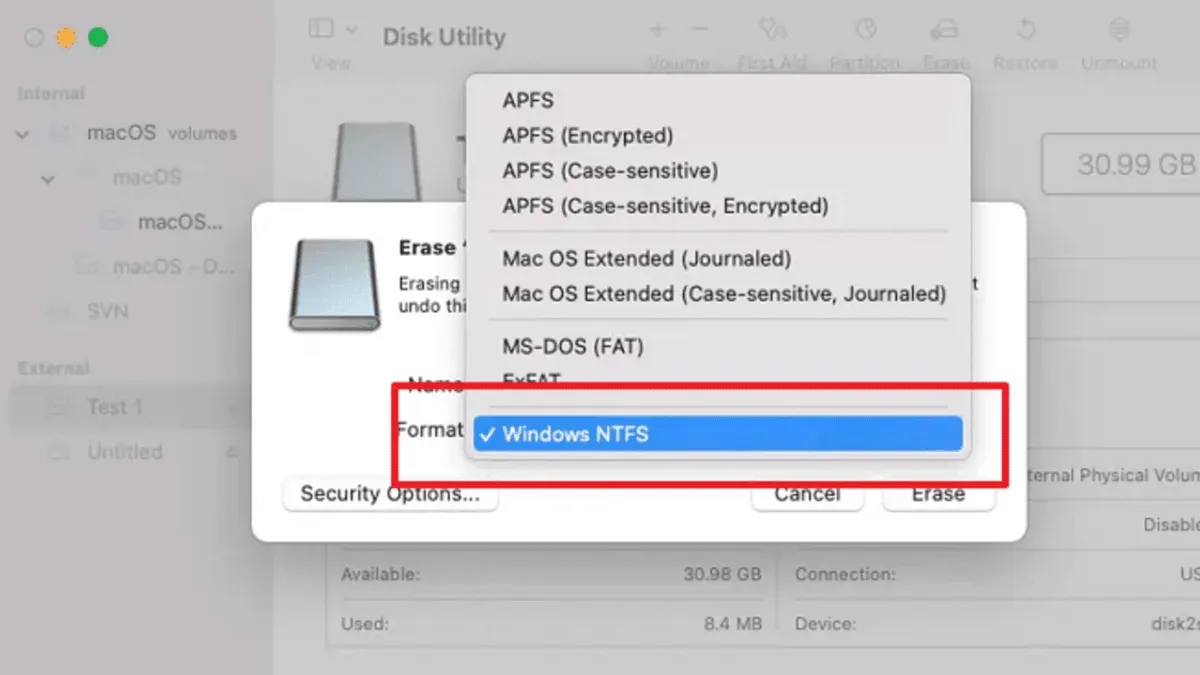
To format a drive as exFAT on Mac, open Disk Utility, select the drive, click Erase, choose exFAT under Format, and confirm. On Windows, open File Explorer, right-click the drive, select Format, choose exFAT from the File System dropdown, and start the process. For FAT32, the steps are similar but FAT32 should only be used if you need compatibility with very old devices, keeping in mind its 4GB maximum file size limit.
Reformatting is often better than relying on NTFS write software because it avoids third-party driver issues and provides native read/write access on both platforms. However, remember that formatting erases all data on the drive, so back up your files before proceeding.
Frequently asked questions
Can mac write to ntfs?
By default, macOS can read NTFS drives but does not fully support writing to them. There is a hidden, experimental NTFS write feature that you can enable via Terminal commands, but it is unreliable and not recommended for important data. To write safely to NTFS drives, you will need third-party software designed specifically for NTFS write support on Mac.
Is ntfs compatible with mac?
macOS can read NTFS-formatted drives natively, so compatibility for reading files is built-in and seamless. However, write compatibility is limited without additional software, meaning you cannot reliably save or modify files on NTFS drives without third-party tools. For full read-write compatibility, consider using dedicated NTFS drivers or reformatting the drive to a Mac-compatible file system.
Can you use ntfs on mac?
You can use NTFS drives on a Mac primarily for reading files without extra software. If you need to write or modify files, you will either have to enable an unreliable native workaround or install third-party NTFS driver software. Your choice depends on how often you need write access and how comfortable you are installing system-level utilities.
Can mac read ntfs?
Yes, macOS has built-in support to read NTFS drives out of the box. When you plug in an NTFS-formatted external drive, your Mac will recognize it and allow you to open, copy, and view files without issue. This read-only access is stable and reliable for everyday use.
Can mac os write to ntfs?
macOS does not officially support writing to NTFS drives. Although a hidden write feature exists, it is not enabled by default and can cause data corruption. For reliable write access, using third-party NTFS drivers or formatting your drive to a macOS-friendly file system like exFAT is the safer option.
Limits of This Advice
This advice does not cover data recovery from corrupted NTFS drives or advanced enterprise-level NTFS use cases. If you are dealing with important data loss or complex networked NTFS storage in a corporate environment, it's best to consult specialized professionals or IT support. Also, this guide assumes you have basic familiarity with macOS settings and external drive management. For deep technical troubleshooting or custom NTFS driver development, alternative resources and expert help will be necessary.
The single most useful next step is to evaluate your typical workflow with NTFS drives. If you frequently need to write to NTFS volumes, consider installing a reputable third-party NTFS driver like Paragon NTFS for Mac or Tuxera NTFS to avoid manual workarounds and ensure smooth read-write access. On the other hand, if your NTFS drives are mostly read-only on Mac, relying on native macOS support combined with occasional reformatting to exFAT for cross-platform writing might be enough. This approach balances convenience, cost, and data safety based on your comfort level and usage patterns.
See also: How to Fix ‘The Disk You Inserted Was Not Readable on Mac’ Step-by-Step · How to Manage and Free Up MacBook Pro M1 Pro Storage Effectively · Fix iCloud Drive Stuck on Uploading on Mac: Step-by-Step Guide