How to Resize a Partition Using Disk Utility: Step-by-Step Guide
This guide shows you how to resize a partition in Disk Utility safely, including tips for Boot Camp and Linux partitions on your Mac.
You need more space on your Mac's drive, or perhaps you want to adjust the size of a Boot Camp Windows partition without losing data. Maybe you're working with Linux partitions as part of a dual-boot setup and wonder how to manage those safely from macOS. Understanding how to resize a partition in Disk Utility is essential for these tasks.
This guide walks you through resizing partitions using macOS Disk Utility, including specific steps for Windows and Linux partitions on your Mac. You'll learn practical tips for avoiding common pitfalls, managing Boot Camp partitions, and knowing when Disk Utility's limitations require additional tools. Step by step, you'll gain confidence handling partition adjustments while keeping your data secure.
Key takeaways
- Always back up your data before resizing partitions to prevent data loss.
- Use Disk Utility's "Partition" tab to resize macOS partitions safely.
- Boot Camp partitions require special care; resizing from macOS can be limited.
- Linux partitions often need third-party tools or operations from their native OS.
- Disk Utility has limits; consider specialized software for complex partition tasks.
Prepare your Mac and drive before resizing a partition
Before you start resizing a partition using Disk Utility, it’s essential to prepare your Mac and the drive carefully to avoid potential data loss or system issues. The first step is to back up all important data using Time Machine or another reliable backup method. Data loss risks increase significantly if the resizing process encounters errors, so having a recent backup ensures you can restore your files if needed.
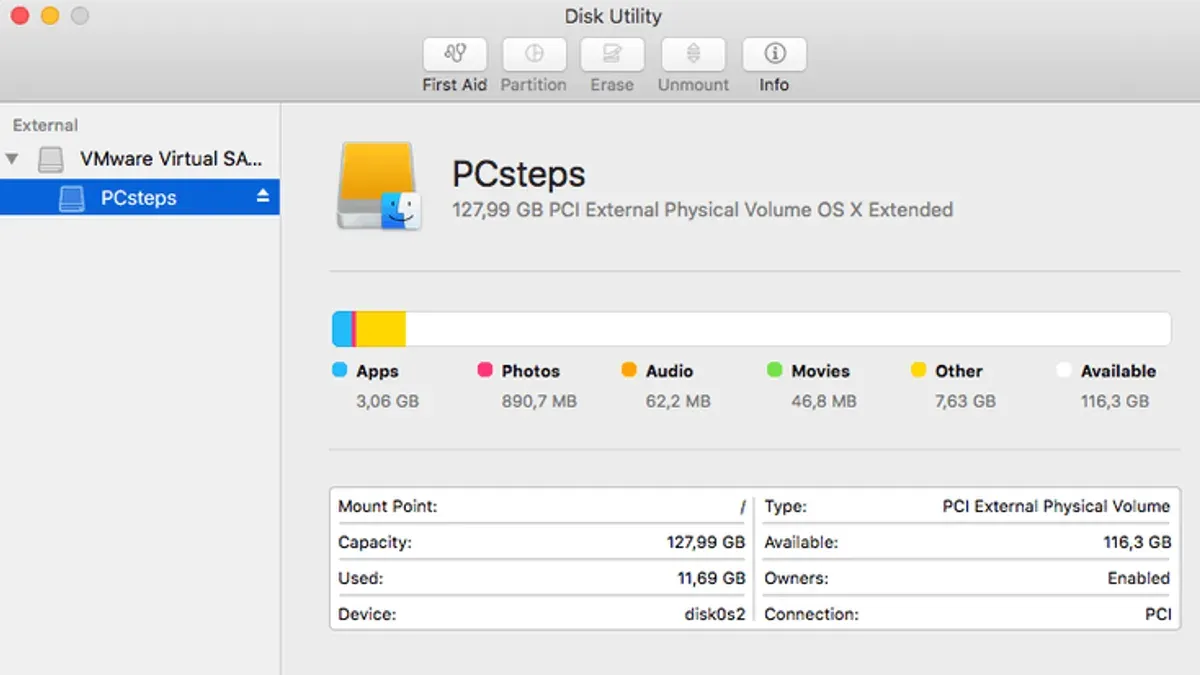
Next, close all running applications to prevent conflicts and unmount any external drives that aren’t involved in the resizing. This reduces the chance of interference during the operation. Open Disk Utility and run the First Aid tool on the target disk by selecting the disk in the sidebar and clicking "First Aid." If Disk Utility reports no errors, you can proceed; however, if errors are found, repair them before resizing. For example, a successful First Aid run shows a green checkmark with the message "The volume appears to be OK." This step helps confirm the disk's health and prevents resizing on a corrupted partition.
Check that there is enough free space on the disk to accommodate the resizing you plan. Disk Utility requires contiguous free space to expand or shrink partitions reliably. Finally, understand the difference between resizing APFS volumes inside containers versus traditional partitions. APFS volumes share space dynamically within containers, so resizing a volume may not require changing the container size, unlike older partition schemes where each partition has a fixed size.
- Back up your important data using Time Machine or a trusted backup tool. After backing up, verify you can access your backup files.
- Close all open applications and unmount any external drives not involved in the resizing. Confirm that only the target disk is mounted.
- Open Disk Utility, select the disk, and click "First Aid." Wait for the process to complete and check that you see a confirmation that the disk is healthy.
- Check available free space on the disk. You should see enough free space to perform the resize without errors.
- Review whether the partitions are APFS volumes or traditional partitions to understand the resizing behavior you should expect.
Resize a partition in Disk Utility on macOS
To resize a partition on your Mac, start by opening Disk Utility. You can find it by searching in Spotlight or navigating to Applications > Utilities > Disk Utility. Once open, locate the disk that contains the partition you want to resize in the sidebar. Make sure to select the physical disk, not just a volume within it.
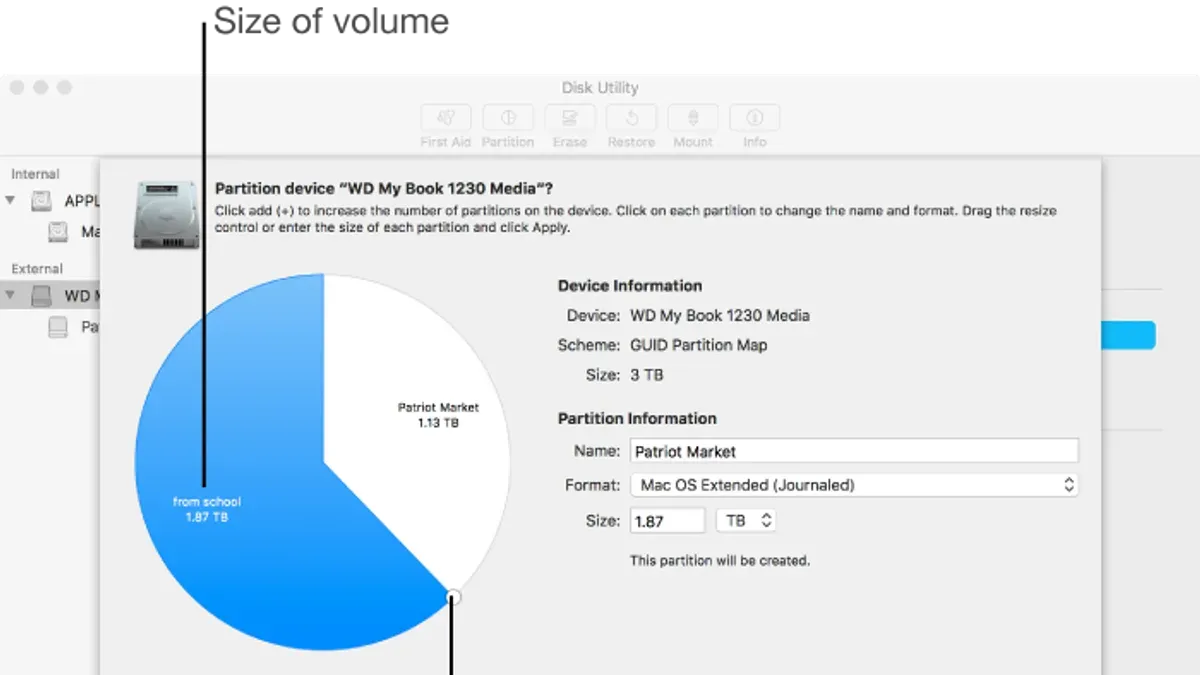
Next, click the Partition button in the toolbar. This action displays a visual layout of your disk’s partitions, showing their sizes and arrangement. Each partition appears as a segment in a pie chart or a rectangular bar, depending on your macOS version.
To resize a partition, select it in the layout. You will see a resize handle—usually a small circle or dot at the edge of the partition’s segment. Click and drag this handle to increase or decrease the partition’s size. Alternatively, you can enter an exact size in the size field below the layout for more precision. After adjusting, the free space will be reflected in the display around the partitions.
When you are satisfied with your changes, click Apply. Disk Utility will confirm the resizing operation before proceeding. Wait patiently as Disk Utility processes the changes; this may take several minutes depending on disk size and data. Do not interrupt the process to avoid data corruption.
Note that resizing APFS volumes differs slightly from traditional partitions. APFS uses a container that can dynamically allocate space among its volumes, so resizing an APFS volume often only involves changing a quota rather than moving partition boundaries. For example, you can select an APFS volume and adjust its size limit, which modifies the available space without repartitioning the disk.
By following these steps, you can safely resize partitions on your Mac using Disk Utility’s native tools, whether you are handling traditional partitions or APFS volumes.
Resize Windows partitions on Mac using Disk Utility and Boot Camp
Windows partitions created by Boot Camp are formatted with the NTFS file system, which Disk Utility on macOS does not natively support for resizing. Attempting to resize these partitions directly in Disk Utility can lead to data corruption or loss of the Windows bootability. This is because Disk Utility is designed primarily for Apple file systems like APFS and HFS+, and it cannot safely modify NTFS partitions that Boot Camp manages.
To safely resize a Boot Camp Windows partition, you should use Boot Camp Assistant or trusted third-party tools specifically designed for managing NTFS partitions. Boot Camp Assistant allows you to remove and reinstall Windows with a different partition size, but it does not offer a direct resize feature. Therefore, the recommended approach often involves backing up your Windows data, removing the Boot Camp partition via Boot Camp Assistant, and then creating a new partition with the desired size before reinstalling Windows.
Some third-party tools, such as Paragon Hard Disk Manager or specialized NTFS partition managers, can resize Boot Camp partitions without deleting them, preserving the Windows environment. However, these tools require careful use and a full backup beforehand, as improper resizing can make the Windows partition unbootable.
- Back up all important data from your Windows partition using Windows Backup or a disk imaging tool. After successful backup, open Boot Camp Assistant from the Utilities folder in Applications. You should see the current Boot Camp partition listed.
- Choose “Remove Windows 10 or later version” to delete the existing Windows partition safely. Once the partition is removed, your disk space will revert to a single macOS partition.
- Use Boot Camp Assistant to create a new Windows partition by dragging the partition size slider to your desired size. Proceed to install Windows as usual. After installation, verify that Windows boots correctly.
Attempting to use Disk Utility to modify the Boot Camp partition without following these steps can cause partition corruption, leading to Windows boot failures. Always ensure you have a reliable backup and consider third-party NTFS partition tools only after understanding the risks and confirming compatibility.
Resize Linux partitions from macOS and Windows environments
Linux partitions typically use filesystems like ext4, which are not supported by Disk Utility on macOS. This means you cannot resize Linux partitions directly using Disk Utility without risking data corruption. Similarly, Windows built-in tools such as Disk Management and DiskPart do not natively support resizing ext4 or other Linux filesystems, so relying on them can lead to errors or data loss.
To safely resize Linux partitions, the recommended approach is to use a Linux live USB with tools like GParted. GParted provides full compatibility with ext4 and many other Linux filesystems, allowing you to adjust partition sizes without compromising data integrity. When booted into a live Linux environment, you can resize your Linux partitions independently of macOS or Windows, which avoids filesystem conflicts.
Here is a step-by-step example of resizing a Linux ext4 partition using GParted:
- Create a bootable Linux live USB using an application like balenaEtcher or Rufus. When done correctly, you should be able to boot your Mac or PC from this USB.
- Restart your computer and boot from the live USB. You should see the Linux desktop environment load without affecting your existing OS installations.
- Open GParted from the applications menu. It will scan all connected drives and display partitions visually.
- Locate your Linux ext4 partition in the list. Select it, then choose the resize/move option. Adjust the partition size by entering new values or dragging the slider. Confirm the changes.
- Apply the pending operations and wait until GParted finishes resizing. You will see a progress bar and a success message when complete.
- Shut down the live environment and remove the USB. Boot back into macOS or Windows as usual.
When managing dual-boot setups, always back up data before resizing partitions. Avoid using Windows DiskPart on Linux partitions since it lacks ext4 support and can corrupt data. Cross-platform tools like GParted are the safest choice to maintain compatibility and stability across systems.
Use DiskPart to resize partitions on Windows
DiskPart is a built-in Windows command-line tool useful for managing disks, partitions, and volumes. It is appropriate to use DiskPart when you need to extend or shrink partitions on drives formatted with NTFS or FAT32, especially when the graphical Disk Management tool lacks the needed flexibility. However, DiskPart has limitations, particularly when shrinking system partitions due to immovable files like the page file or shadow copies.
Follow these steps to resize partitions with DiskPart:
- Open Command Prompt as an administrator. You should see a window titled "Administrator: Command Prompt."
- Type diskpart and press Enter. The prompt changes to DISKPART>, indicating the tool is active.
- List all volumes by typing list volume. This displays volume numbers, drive letters, labels, file system types, and sizes.
- Select the volume you want to resize by typing select volume X, replacing X with the volume number. The prompt will confirm with "Volume X is the selected volume."
- To shrink a partition, type shrink desired=YYYY where YYYY is the amount in megabytes you want to reduce. For example, "shrink desired=10240" shrinks by 10 GB. If successful, DiskPart reports the amount shrunk.
- To extend a partition, type extend size=YYYY if you want to specify the amount, or simply extend to use all adjacent free space. DiskPart confirms the extension with a success message.
DiskPart cannot shrink partitions if immovable files block the space, often resulting in the error "Virtual Disk Service error: The volume cannot be shrunk because the file system structures are located on the part of the volume that is to be shrunk." In such cases, defragmenting the volume or disabling system files may help, but sometimes resizing is impossible without third-party tools.
DiskPart also cannot extend a partition unless there is contiguous unallocated space immediately following the volume. If this condition is not met, consider using third-party partition managers that can move partitions or resize non-contiguous spaces.
Always back up your data before using DiskPart. Incorrect commands or interruptions can cause data loss. DiskPart’s success rate is generally high for simple operations but decreases with complex partitions or system volumes, so proceed cautiously.
Troubleshoot common issues when resizing partitions
If Disk Utility refuses to resize a partition, it often signals underlying problems such as disk corruption, locked volumes, or fragmentation. Common error messages like "The operation couldn’t be completed" or "Disk is locked" indicate these issues, requiring targeted fixes before proceeding. Understanding your partition layout can help identify conflicts, for example, when a recovery partition sits immediately after the one you want to resize, preventing shrinking or expanding.
When you face errors related to disk corruption, run First Aid on the affected volume. If First Aid reports unfixable errors, consider restoring from a backup or using specialized disk repair tools. Locked volumes may result from active system processes; rebooting into macOS Recovery and trying Disk Utility there can release these locks.
Insufficient space errors often stem from fragmentation or immovable files at the partition’s boundary. Defragmentation tools are limited on macOS, so freeing up contiguous free space by deleting large files or moving data elsewhere can help. If resizing a Boot Camp partition fails, it typically requires removing and recreating the partition using Boot Camp Assistant. To restore Windows bootloader problems after resizing, use a Windows recovery USB to run boot repair commands.
Step-by-step to resolve resizing conflicts:
- Identify error message in Disk Utility and note affected partition.
Successful step: Error message is clear and matched to a known issue. - Run First Aid on the partition and parent disk.
Successful step: First Aid completes without errors or repairs reported. - If volume is locked, restart Mac in Recovery Mode (hold Command+R during boot) and attempt resizing again.
Successful step: Disk Utility allows resizing without lock errors. - Free up contiguous disk space by moving or deleting large files on the partition.
Successful step: More free space is available and Disk Utility permits resizing. - For Boot Camp issues, back up Windows data, remove the partition, then recreate it via Boot Camp Assistant.
Successful step: Boot Camp partition is resized safely. - If Windows bootloader is broken, boot from Windows recovery media and run boot repair commands (bootrec /fixmbr and bootrec /fixboot).
Successful step: Windows boots normally after repair. - If problems persist or data is critical, consult professional data recovery services or use specialized partition software like Paragon Hard Disk Manager.
Successful step: Data integrity maintained and partition resized successfully.
Recognizing the specific cause of resizing errors and following these corrective steps helps you safely manage partitions without risking data loss or system instability.
Understand the limits of Disk Utility and when to use third-party tools
Disk Utility is a powerful tool integrated into macOS for managing partitions, but it has distinct limitations you should recognize. It cannot resize encrypted partitions, Windows NTFS volumes, or Linux ext4 filesystems. Attempting to modify these partition types without suitable tools risks data corruption or complete loss. Additionally, resizing system or utility partitions—such as the macOS Recovery partition or Boot Camp partitions—requires specialized handling beyond Disk Utility’s capabilities.
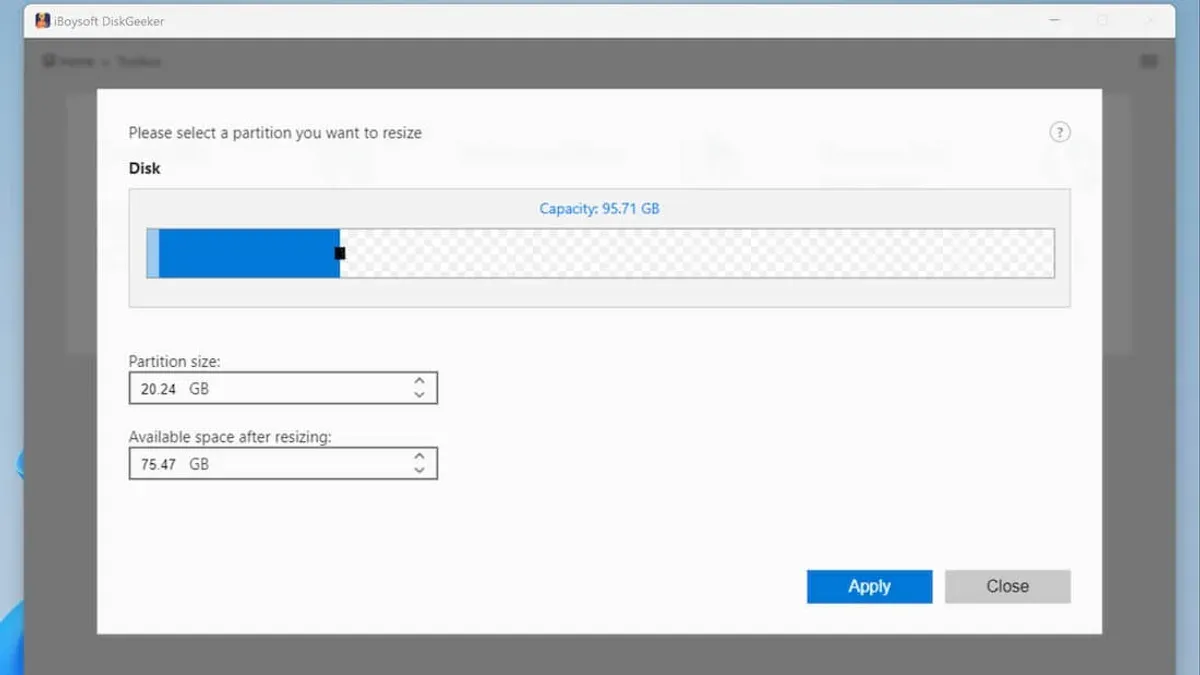
When you need advanced resizing features, several third-party tools offer more flexibility. Free options like GParted (via a Linux live USB) support Linux filesystems and complex partition layouts. Paid applications, such as Paragon Hard Disk Manager or Stellar Partition Manager, provide user-friendly interfaces for safely resizing NTFS and other partitions on Mac.
Sometimes resizing is not advisable, especially if the disk shows signs of failure or if critical system partitions are involved. In those cases, replacing the disk or restoring from a complete backup is a safer approach than forcing a resize. Always keep current backups before attempting any partition modification, regardless of the tool used, as this protects against unexpected data loss.
| Feature | Disk Utility | GParted | Paragon Hard Disk Manager |
|---|---|---|---|
| Resize macOS APFS | Yes | Limited support | Yes |
| Resize macOS HFS+ | Yes | Yes | Yes |
| Resize Windows NTFS | No | Yes | Yes |
| Resize Linux ext4 | No | Yes | Partial |
| Encrypted partitions | No | No | Varies |
Real user experiences often highlight that Disk Utility can fail silently when resizing unsupported partitions, leading to system boot issues or data inaccessibility. Using dedicated tools designed for specific filesystems reduces these risks and provides clearer feedback during operations.
Frequently asked questions
How to resize a partition?
To resize a partition, you typically open the disk management tool on your operating system—Disk Utility on macOS or Disk Management/ DiskPart on Windows. Select the partition you want to resize, then choose to either shrink or expand it by specifying the new size. Always back up your data before resizing to prevent loss, and ensure the partition is not in use or locked by the system during the operation.
How to resize a hard drive partition?
Resizing a hard drive partition involves adjusting its allocated space using system tools like Disk Utility on Mac or Disk Management on Windows. You can shrink an existing partition to free up space or expand it if adjacent free space is available. It’s crucial to verify that the partition is formatted in a compatible file system and to have a current backup before proceeding.
How to resize windows partition?
On a Mac, resizing a Windows partition created by Boot Camp is done through Boot Camp Assistant or Disk Utility, but Boot Camp Assistant limits expansion. For more flexibility, you may need third-party tools or resize from within Windows using Disk Management. Always shut down Windows properly before resizing and back up important data to avoid corruption.
How to resize windows partitions in linux?
In Linux, you can resize Windows partitions using tools like GParted, which supports NTFS partitions. First, unmount the partition to avoid conflicts, then resize by dragging or specifying sizes. Since resizing can risk data loss, ensure Windows was properly shut down (not hibernated) and backup your files before starting.
How to resize utility partition?
Utility partitions, such as recovery or EFI partitions, are typically small and system-managed, so resizing them is not recommended unless necessary. Disk Utility may show these partitions but often restricts resizing to prevent system issues. If resizing is essential, use advanced partition tools and proceed cautiously with backups, as improper changes can affect system boot or recovery functions.
Understand the Limits of Disk Utility and When to Use Third-Party Tools
This guide does not cover resizing encrypted partitions or those managed by specialized software like FileVault or third-party encryption tools, as these require different precautions and tools. Additionally, Disk Utility has limitations when handling non-Apple file systems, such as certain Linux partitions or complex Boot Camp configurations that involve multiple partitions or encrypted volumes. If you encounter errors, or need to resize partitions beyond basic macOS and Boot Camp setups, consider using dedicated partition management software designed for those environments. Always back up your data before proceeding with any partition changes to avoid data loss.
To move forward confidently, the single most useful next step is to create a complete backup of your drive using Time Machine or another reliable backup method. This step ensures your data remains safe while you make changes. Once backed up, follow the step-by-step instructions here carefully, and verify each change before applying it. Taking these precautions helps you resize partitions smoothly and protects your system from unexpected issues.
See also: How to Erase a Drive in Disk Utility: A Clear Step-by-Step Guide · How to Fix External Drive Not Mounting in Disk Utility · How to Check SSD Health Using Disk Utility: Step-by-Step Guide