How to Schedule Do Not Disturb on Mac: A Complete 2026 Guide
This guide shows you how to schedule Do Not Disturb on Mac and manage settings to stay focused and reduce distractions in 2026.
You’re preparing for a focused work session on your MacBook, but notifications keep breaking your flow. You want to block distractions without missing critical alerts on your other Apple devices.
This guide explains how to schedule Do Not Disturb on Mac and manage its settings effectively in 2026. It covers step-by-step setup on your MacBook and Mac, adjusting preferences, turning Do Not Disturb on and off, and how this feature syncs across your Apple ecosystem. You’ll also find solutions to common issues and learn how to disable Do Not Disturb without impacting other Focus modes.
Key takeaways
- Set Do Not Disturb from System Settings > Focus > Do Not Disturb to schedule times or activate based on location or app use.
- Use Control Center to quickly toggle Do Not Disturb on or off on your Mac and sync settings with iPhone and iPad.
- Customize notification exceptions and allow calls from specific contacts to stay reachable during Do Not Disturb periods.
- Check Focus status syncing in System Settings to ensure consistent behavior across all Apple devices.
- If Do Not Disturb won’t disable, reset Focus modes or restart your Mac to resolve syncing glitches.
Before you start: what you need to schedule Do Not Disturb on Mac
To schedule Do Not Disturb on your Mac in 2026, ensure your device runs macOS Ventura (version 13) or later, as Focus modes with scheduling were introduced starting with this macOS release. Older Macs that cannot upgrade to Ventura or later will not support these features.
You should have a basic understanding of the System Settings app, where Focus and Do Not Disturb options are located. Familiarity with navigating System Settings > Focus will help you configure and manage your preferences effectively.
Do Not Disturb is one of several Focus modes Apple introduced in macOS Ventura. It temporarily silences notifications based on your schedule or manual activation, fitting into the broader Focus framework that allows customized modes for different activities.
If you own other Apple devices signed in with the same Apple ID, such as an iPhone, iPad, or Apple Watch, enabling Focus sync across devices can unify your Do Not Disturb schedule for seamless notification management throughout your ecosystem. This step is optional but recommended for a consistent experience.
- Open the Apple menu () and select About This Mac. Confirm your macOS version is Ventura (13) or later. If not, consider updating your system via System Settings > General > Software Update.
- Launch System Settings and locate the Focus section. You should see Do Not Disturb listed among the available Focus modes.
- Check if your Mac model supports macOS Ventura or later by verifying on Apple's official support page. Devices older than mid-2017 MacBook Pro or 2015 MacBook Air may lack compatibility.
- Optionally, verify that your other Apple devices are signed into the same Apple ID under System Settings > Apple ID to enable Focus syncing across devices.
How to set up Do Not Disturb on MacBook step-by-step
- Open System Settings from the Apple menu or Dock. You should see a sidebar with various categories.
- Select Focus in the sidebar. The main pane displays existing Focus modes including Do Not Disturb.
- Click on Do Not Disturb to view and edit its settings. This opens the scheduling and customization interface.
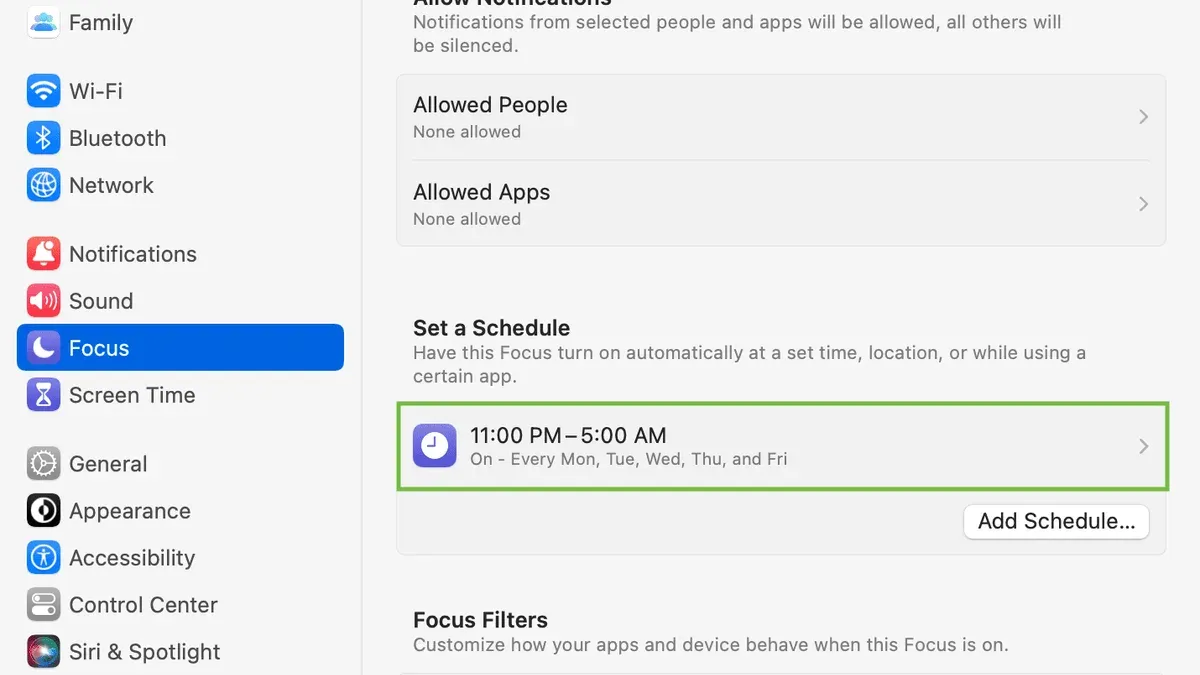
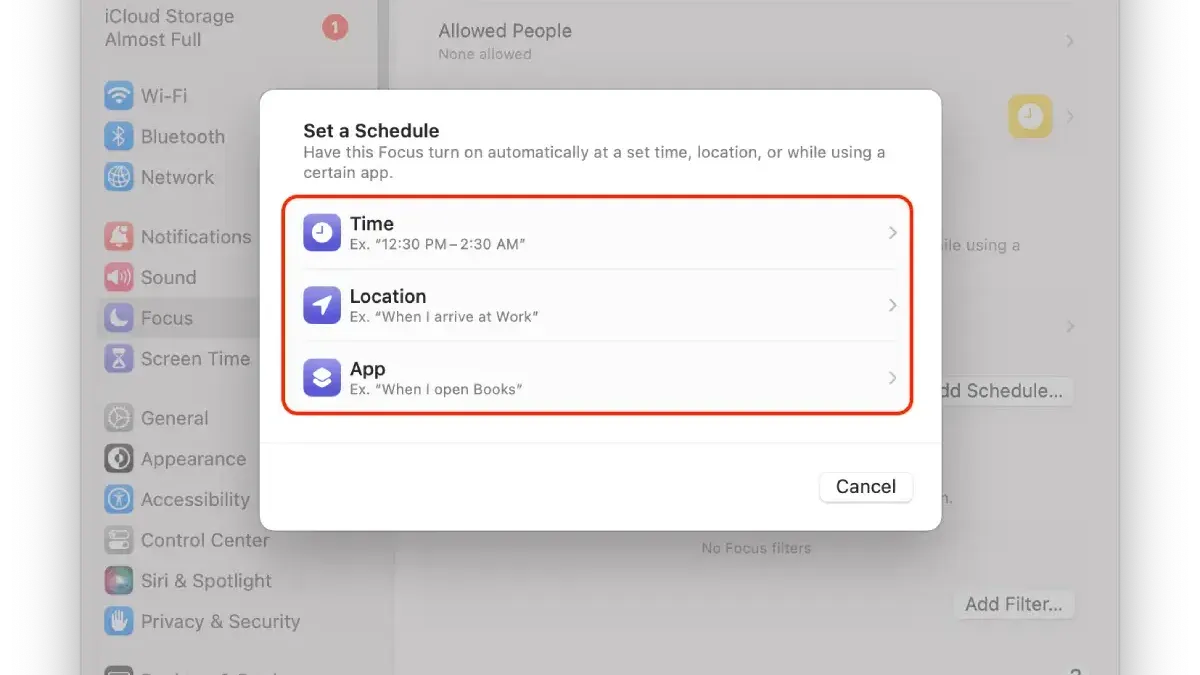
- To create a schedule, click Add Schedule or Edit next to existing schedules. You can choose triggers like Time, Location, or App Usage.
- For example, select Time and set a schedule from 9:00 AM to 5:00 PM on weekdays. Confirm by clicking Done. The schedule will now activate Do Not Disturb automatically during these hours.
- Scroll down to Allowed Notifications. Click on People to add contacts who can notify you even during Do Not Disturb. This is useful for urgent calls or messages.
- Similarly, click on Apps to allow notifications from specific applications, such as calendar alerts or security software.
- To activate Do Not Disturb manually, open Control Center from the menu bar, then click the Focus button and select Do Not Disturb. You can choose to turn it on for a set duration or until turned off.
- Confirm your schedule by checking the Focus section in System Settings. The active schedule and allowed notifications should be visible and editable.
Example: Scheduling Do Not Disturb from 9 AM to 5 PM Monday through Friday with exceptions for calls from family and calendar alerts is a common setup that balances focus with availability.
How to change Do Not Disturb settings on MacBook and Mac
Modifying your Do Not Disturb schedule and preferences is straightforward via System Settings, allowing you to tailor interruptions precisely. You can edit or delete scheduled times, adjust notification exceptions, switch Focus modes, and manage quick toggles for instant control.
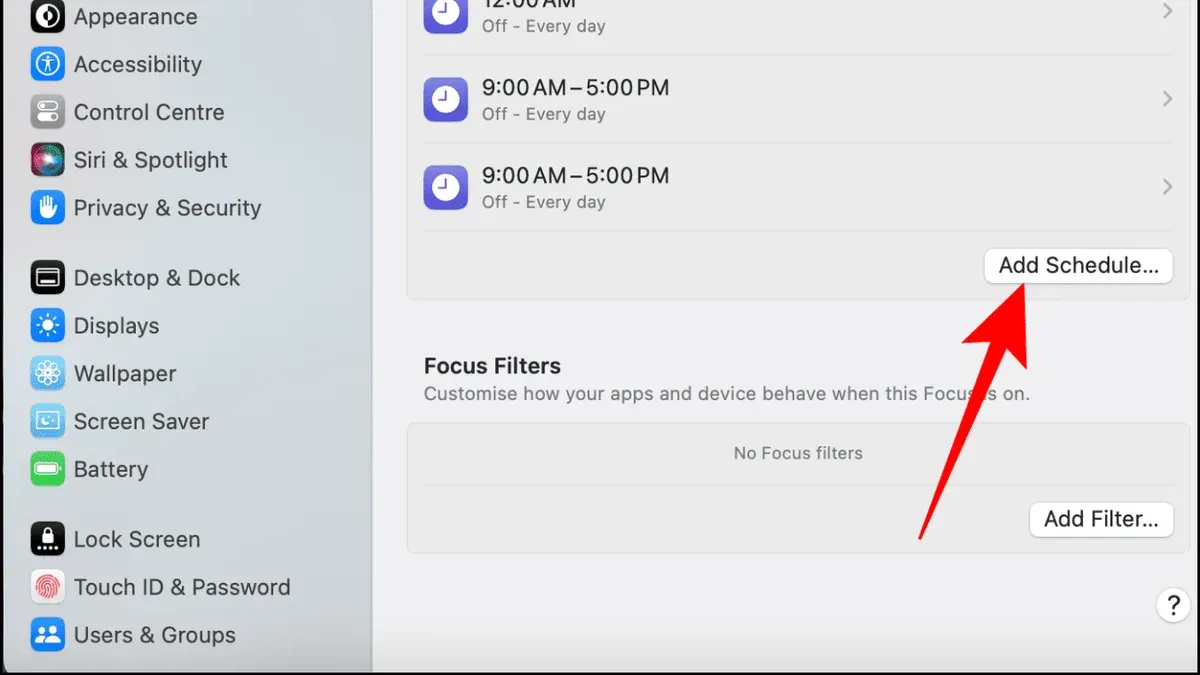
- Open System Settings from the Apple menu and select Focus. You will see a list of your Focus modes including Do Not Disturb.
- Click Do Not Disturb to view current schedules. To edit a scheduled time, select the specific schedule entry and adjust the start and end times or days. When changes are saved, the schedule updates immediately.
- To delete a schedule, select it and click the – button. This removes the schedule and disables automatic activation during those times.
- Scroll to Allowed Notifications to adjust exceptions. For example, you can allow calls from Favorites or permit urgent calls by enabling Emergency Bypass. Changes here refine which alerts bypass Do Not Disturb.
- Under Focus Status, toggle whether apps can share your Do Not Disturb status with contacts. This setting helps others know when you prefer not to be disturbed.
- To switch between Do Not Disturb and other Focus modes, use the sidebar within System Settings or the Control Center. Selecting a different Focus activates it immediately, overriding Do Not Disturb.
- For quick manual toggling, open the Control Center from the menu bar, click Focus, and choose Do Not Disturb or another mode. This shortcut is ideal for temporary changes without adjusting schedules.
Default Do Not Disturb settings typically silence all notifications, but customizing exceptions and schedules makes it practical for varied daily needs. For instance, allowing urgent calls while silencing others balances focus with accessibility.
How to turn on and turn off Do Not Disturb on Mac and MacBook
You can quickly toggle Do Not Disturb (DND) manually on your Mac or MacBook using the Control Center or keyboard shortcuts, independent of your scheduled settings. Manual activation temporarily silences notifications until you turn it off, while scheduled activation follows the set times.
- Click the Control Center icon in the menu bar (it looks like two stacked switches). You will see the Focus section including Do Not Disturb.
- Click Do Not Disturb to toggle it on. When active, the icon highlights and notifications are immediately silenced. You will see a crescent moon icon in the menu bar indicating DND is on.
- To turn off Do Not Disturb, click the Control Center icon again and click Do Not Disturb to toggle it off. Notifications resume promptly, and the crescent moon icon disappears.
- You can also use a keyboard shortcut: press Option (⌥) + Click on the date and time in the menu bar to toggle Do Not Disturb on or off. This provides a quick alternative if you prefer the keyboard.
- If you have set a DND schedule, manual toggling overrides it temporarily. Once manual Do Not Disturb is turned off, the system resumes the scheduled behavior.
- Turning off Do Not Disturb immediately allows incoming notifications to appear as usual. There is no delay, ensuring you do not miss important alerts.
How Do Not Disturb on Mac interacts with Apple ecosystem devices
In 2026, Do Not Disturb (DND) on Mac syncs with other Apple devices like iPhone and Apple Watch through Focus mode using your Apple ID. When Focus syncing is enabled, activating DND on one device automatically activates it on all others signed in with the same Apple ID. This seamless syncing helps maintain uninterrupted focus across your Apple ecosystem.
For example, if you schedule Do Not Disturb on your iPhone from 10 PM to 7 AM, your Mac will also enter DND mode during these hours, provided Focus syncing is active. You will see the crescent moon icon in your Mac’s menu bar, indicating DND is on. This syncing extends to Apple Watch as well, silencing notifications across devices simultaneously.
You can set up independent DND schedules on each device if you prefer. On your Mac, go to System Settings > Focus > Do Not Disturb and customize the schedule. On iPhone, access Settings > Focus > Do Not Disturb to set separate times. Apple Watch settings follow iPhone schedules by default but can be customized in the Watch app. When independent schedules are active, DND will only sync during overlapping active periods, otherwise devices manage notifications separately.
Limitations exist in cross-device syncing. For instance, manual DND activation on one device immediately syncs across devices, but scheduled DND may not always align perfectly if schedules differ. Additionally, some third-party apps may not fully respect Focus syncing settings, occasionally causing inconsistent notification behavior.
- Ensure Focus syncing is enabled: On Mac, open System Settings > Focus > and toggle on "Share Across Devices". On iPhone and Apple Watch, verify the same setting in Focus options. You should see a confirmation that your Focus status is shared.
- Set a DND schedule on iPhone: Go to Settings > Focus > Do Not Disturb > Add Schedule or Automation. For example, set DND from 10 PM to 7 AM. When the schedule activates, check your Mac’s menu bar for the DND crescent moon icon indicating synced activation.
- Customize a separate schedule on Mac: Open System Settings > Focus > Do Not Disturb and set a different active time, such as 9 PM to 6 AM. During times when both schedules overlap, DND will be active on both. Outside overlapping times, each device manages DND independently.
- Test manual activation: Turn on DND manually on your Apple Watch via Control Center. You should see DND activate immediately on Mac and iPhone, regardless of schedule. This confirms real-time syncing is functional.
Troubleshooting common Do Not Disturb issues on Mac in 2026
If Do Not Disturb (DND) on your Mac isn’t activating as scheduled, or notifications still come through during DND, several common causes exist. One frequent error message is “Focus mode couldn’t activate,” often linked to conflicting schedules or corrupted settings.
To resolve Do Not Disturb not activating as scheduled:
- Open System Settings and navigate to Focus > Do Not Disturb.
- Verify your schedule is enabled and the time intervals are correct; incorrect AM/PM settings are a common mistake.
- Check for overlapping Focus modes that might override DND schedules.
- If it still fails, toggle the schedule off and on to refresh settings.
If notifications arrive despite DND being active, check apps allowed to send notifications:
- In System Settings, go to Notifications > Allowed Apps During Focus.
- Remove apps that should not bypass Do Not Disturb.
- Test by activating DND manually and observing notification behavior.
Focus syncing issues across devices occur when Apple ID or iCloud settings are inconsistent. To fix:
- Confirm you’re signed in with the same Apple ID on all devices.
- Ensure iCloud Drive and Focus syncing are enabled under Apple ID > iCloud settings.
- Force quit System Settings and restart your Mac to refresh syncing.
To reset Focus settings safely and resolve persistent issues without losing data:
- Open System Settings > Focus.
- Select Do Not Disturb and click “Delete Focus” at the bottom.
- Recreate Do Not Disturb with fresh settings.
- You should see an empty Do Not Disturb schedule, resetting notification allowances.
These steps address the most reported Do Not Disturb problems on Mac in 2026, helping you regain control over your notification management.
How to disable Do Not Disturb on Mac without affecting other Focus modes
Disabling Do Not Disturb (DND) on your Mac specifically stops this mode without impacting other Focus modes you have set up, such as Work or Sleep. This differs from turning off all Focus modes, which suspends every configured Focus and can lead to a flood of notifications you might not want.
| Action | Effect on Do Not Disturb | Effect on Other Focus Modes |
|---|---|---|
| Disable Do Not Disturb only | Stops DND notifications suppression immediately | Other Focus modes remain active and unaffected |
| Disable all Focus modes | Stops DND and all other Focus modes | All notifications resume; no Focus filtering applies |
To disable Do Not Disturb without touching other Focus modes, follow these steps:
- Open System Settings on your Mac.
- Click Focus in the sidebar.
- Select Do Not Disturb from the list of Focus modes.
- Toggle off the switch labeled Turn On Automatically if it is enabled; this stops scheduled activation.
- Manually toggle off the switch at the top to disable Do Not Disturb immediately.
- Confirm that other Focus modes remain enabled by checking their individual toggles are still on.
Consider disabling DND directly when you want notifications to resume only from this mode without interrupting other Focus modes. Editing schedules is preferable if you want to adjust when DND activates rather than turning it off fully. Disabling DND entirely can increase notification flow and potentially disrupt your workflow if other Focus modes are not active to filter interruptions.
For example, if you use a Work Focus for meetings and a Sleep Focus at night, disabling only Do Not Disturb allows you to receive notifications outside those specific modes without losing their benefits.
Frequently asked questions
How to schedule do not disturb?
To schedule Do Not Disturb on your Mac, open System Settings, then go to Focus > Do Not Disturb. From there, enable the Schedule toggle and set the start and end times that suit your routine. This automatic scheduling helps you avoid manual activation and ensures notifications silence during your set hours.
Do not disturb macbook?
Do Not Disturb on MacBook is a Focus mode that silences calls, alerts, and notifications. You can quickly turn it on via the Control Center by clicking the Focus button and selecting Do Not Disturb or configure it with specific times and allowed notifications in System Settings under Focus.
Do not disturb mode on apple phone?
On an Apple phone, Do Not Disturb is accessed through Settings > Focus > Do Not Disturb. You can schedule it, customize who can contact you, and enable it manually. It also syncs across devices if you use the same Apple ID and have Focus Sharing enabled.
Do not disturb apple?
Do Not Disturb is part of Apple’s Focus feature available on Macs, iPhones, and iPads. It lets you silence notifications to maintain concentration. Settings can be adjusted per device or synced across your Apple ecosystem to provide a consistent experience.
How to change do not disturb on macbook?
To change Do Not Disturb settings on your MacBook, open System Settings and navigate to Focus > Do Not Disturb. Here you can adjust schedule times, allowed notifications, and enable or disable the mode. Changes take effect immediately and can also be synced across devices if you have Focus Sharing enabled in 2026.
Limits of this guide and who should look elsewhere
This guide focuses exclusively on scheduling and managing Do Not Disturb on Mac and within the Apple ecosystem as of 2026. It does not cover Do Not Disturb settings on non-Apple platforms such as Android or Windows, where notification management differs significantly. Users who rely heavily on third-party notification or focus management apps may encounter behavior that varies from the built-in macOS features described here. For complex workflows involving multiple operating systems or specialized notification tools, consulting platform-specific resources or vendor support is recommended.
To move forward effectively, the single most useful next step is to open System Settings on your Mac, navigate to Focus & Notifications, and create a custom Do Not Disturb schedule tailored to your daily routine. This direct hands-on setup will help you experience the benefits of seamless notification management integrated across all your Apple devices.