How to Set Up Python in VS Code on Mac: A 2026 Step-by-Step Guide
Follow this step-by-step guide to set up Python in VS Code on Mac and start coding smoothly with the latest 2026 tools and macOS features.
You’ve just installed macOS Ventura or later, and you want to start coding in Python using Visual Studio Code. Setting up Python in VS Code on a Mac can feel tricky due to Apple’s evolving system architecture and security policies.
This guide explains how to set up Python in VS Code on Mac in 2026, focusing on the latest versions of both tools and Mac-specific considerations. You’ll learn the step-by-step process from installing VS Code and Python to configuring the environment and running your first script smoothly.
Key takeaways
- Download VS Code directly from code.visualstudio.com to get the latest Mac-specific build for 2026.
- Install Python 3.11 or later from python.org or via Homebrew, ensuring compatibility with macOS Ventura and newer.
- Configure the Python extension in VS Code and select the correct interpreter from the Command Palette (⇧⌘P) under "Python: Select Interpreter."
- Grant Terminal and VS Code Full Disk Access in System Preferences > Security & Privacy to avoid permission issues.
- Use the built-in VS Code debugger and integrated terminal for an efficient development workflow on Mac.
Before you start: What you need to set up Python in VS Code on Mac
To ensure a smooth installation and configuration of Python in VS Code on your Mac, start by verifying your system meets the necessary requirements. VS Code in 2026 supports macOS versions 12.0 (Monterey) and later, so confirm your Mac runs macOS Monterey or newer. Python 3.11 or higher is recommended because it offers improved performance and new features essential for modern development.
Make sure you have a stable internet connection to download VS Code, Python installers, and any required extensions without interruption. Basic familiarity with Mac terminal commands will help you navigate installations and configurations efficiently, such as using brew or running Python scripts.
While not mandatory, browsing the VS Code Extensions Marketplace beforehand can familiarize you with useful tools like the official Python extension by Microsoft, which enhances coding and debugging.
- Check your macOS version by clicking the Apple menu > About This Mac; you should see macOS Monterey (12.0) or later.
- Verify your internet connection by opening a browser and loading a webpage quickly without issues.
- Open Terminal (found in Applications > Utilities) and run python3 --version to check if Python is already installed; if it shows version 3.11 or higher, you have the recommended version.
- Install Homebrew if you haven’t already, by running the official install command (https://brew.sh) to simplify managing Python and VS Code installations.
- Visit the VS Code Extensions Marketplace (https://marketplace.visualstudio.com/vscode) to preview popular Python-related extensions you might want later.
Completing these steps will prepare your Mac environment for the latest Python and VS Code setup, minimizing compatibility issues and ensuring a streamlined workflow.
How to install VS Code on Mac
To install Visual Studio Code (VS Code) on your Mac, start by visiting the official VS Code website at https://code.visualstudio.com/. On the homepage, you will see a download button tailored to Mac users.
VS Code offers two Mac builds: one for Intel-based Macs and another for Apple Silicon (M1 and later). Selecting the correct version ensures optimal performance. To check your Mac's processor type, click the Apple menu > About This Mac and look for the chip information.
- On the VS Code download page, click the dropdown next to the download button and select either "macOS Universal" (recommended for Apple Silicon and Intel) or the specific architecture build if preferred. You will download a .zip file.
- Once downloaded, open the .zip file to extract the Visual Studio Code application.
- Drag the Visual Studio Code app icon into your Applications folder. This step installs VS Code system-wide.
- Open the Applications folder and double-click Visual Studio Code. macOS may display a security prompt since the app is downloaded from the internet; click "Open" to proceed.
- Upon first launch, you may be asked to allow VS Code to access files or grant permissions—allow these as needed for full functionality.
- To verify the installation, open Terminal and type code --version. If VS Code is properly installed and the command line tool is set up, the terminal will output the current VS Code version number.
- If the
codecommand is not recognized, open VS Code, press Cmd + Shift + P, type "Shell Command: Install 'code' command in PATH," and press Enter. Then retry the terminal verification.
How to install Python on Mac for VS Code
macOS includes a system Python version mainly for internal use, usually outdated and not recommended for development. Installing Python 3.11 or higher separately ensures compatibility with VS Code and access to the latest features.
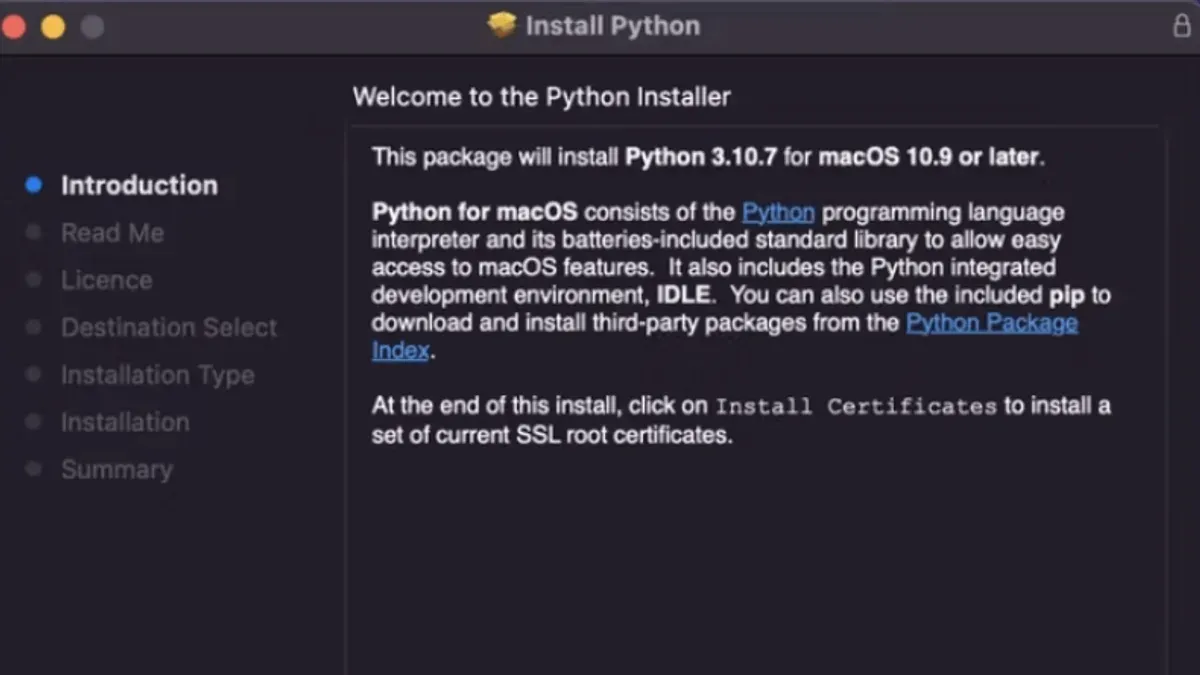
- Choose your installation method: official installer from python.org or Homebrew. The official installer provides a straightforward GUI setup, while Homebrew offers command-line control and easier upgrades.
- To install via the official installer, visit python.org/downloads/mac-osx/, download the macOS 64-bit universal2 installer for Python 3.11 or later, then open the .pkg file and follow the prompts. Successful installation adds Python binaries to
/usr/local/bin. - For Homebrew, open Terminal and run
brew install [email protected]. Homebrew installs Python in its Cellar directory and symlinks the executables to/opt/homebrew/bin(Apple Silicon) or/usr/local/bin(Intel Macs). - Set your PATH environment variable if needed. On macOS 13 or later, edit your shell profile (e.g.,
~/.zshrc) to include the Python binary directory, for example:export PATH="/opt/homebrew/bin:$PATH"
Then runsource ~/.zshrcto apply changes. - Verify the Python installation by running
python3 --versionin Terminal. You should see something likePython 3.11.5, confirming the correct version is active.
Choosing the official installer is simpler for users unfamiliar with command-line tools, while Homebrew suits those who prefer managing packages via Terminal and want easier updates. Both methods work well with VS Code once Python 3.11+ is correctly installed and on your PATH.
How to set up Python in VS Code on Mac
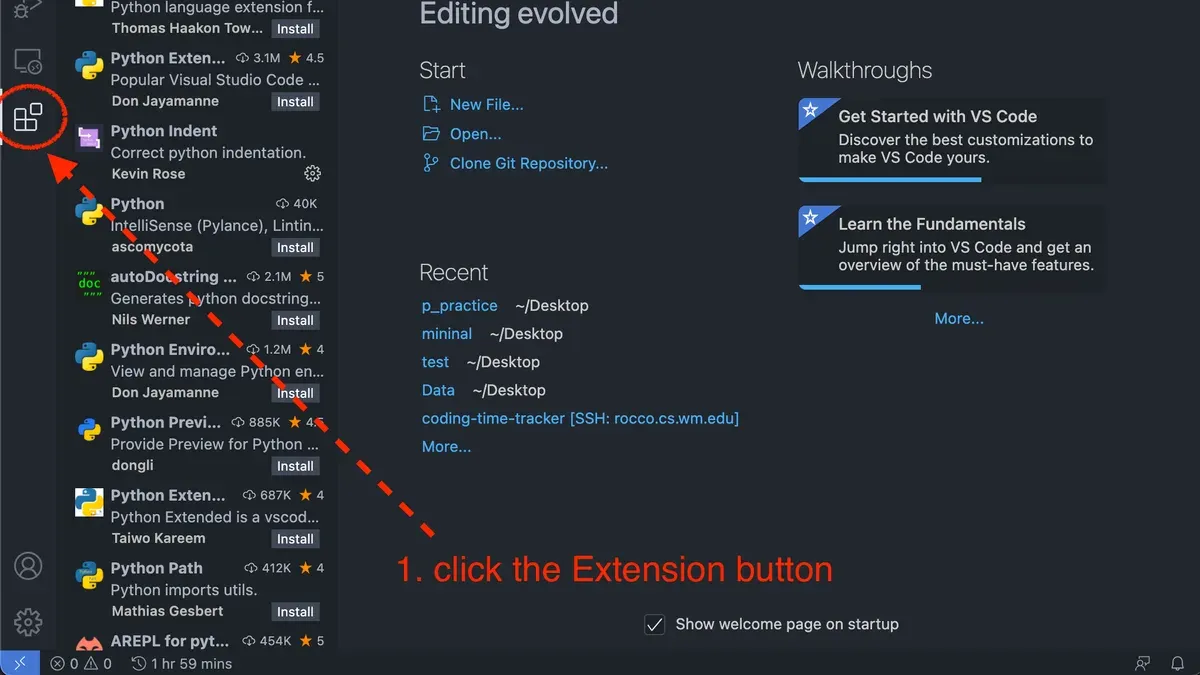
- Open VS Code and navigate to the Extensions view by clicking the square icon on the sidebar or pressing Shift + Command + X. In the search bar, type Python and install the extension published by Microsoft. When installed, you should see a green checkmark indicating it is active.
- Create or open a folder for your Python project by selecting File > Open Folder... and choosing your workspace. Once opened, VS Code will treat this as your project root, making Python environment settings folder-specific.
- Select the Python interpreter you installed earlier by opening the Command Palette (Command + Shift + P) and typing Python: Select Interpreter. Choose the version matching your Python 3.11+ installation; this ensures VS Code runs your code with the correct interpreter. A dropdown will confirm the selected path.
- Configure workspace settings to enhance coding. Open the Command Palette and select Preferences: Open Workspace Settings (JSON). Add or verify these settings:Save the file; VS Code applies these settings to your project.
"python.linting.enabled": true— turns on linting."python.linting.pylintEnabled": true— enables Pylint for code analysis."python.formatting.provider": "black"— sets Black as the code formatter."editor.formatOnSave": true— formats code automatically on save."python.languageServer": "Pylance"— activates Pylance for IntelliSense and type checking.
- Test IntelliSense by creating a new Python file (e.g.,
test.py) and start typing a standard library import such asimport os. VS Code should suggest completions and show documentation on hover, confirming IntelliSense is active.
Following these steps sets up VS Code to work efficiently with Python on your Mac, tailored to the latest environment and your project needs.
How to run Python code on Mac using VS Code
Running Python scripts inside VS Code on your Mac can be done easily through several methods that fit different development workflows. You can execute scripts directly in the built-in terminal or use the Run button for quick launches.
- Open your Python script in VS Code. Click the green Run button in the top right corner. You should see the script output in the integrated Terminal panel below. For example, running print('Hello, Mac 2026') will display Hello, Mac 2026 in the terminal.
- Alternatively, open the Terminal inside VS Code via View > Terminal and run your script manually with
python3 your_script.py. The terminal output verifies the script ran successfully. - To debug, set breakpoints by clicking the gutter next to the line numbers in your script. Then press Run > Start Debugging or hit F5. The debugger pauses at breakpoints, letting you inspect variables and step through code.
- Open the Debug pane to add watch expressions for variables you want to monitor during debugging. This helps track state changes in real time.
- To run code interactively, use the Python REPL by typing
python3in the terminal or utilize the Python Interactive window in VS Code, which supports Jupyter notebooks. This allows executing cells and visualizing output inline, beneficial for exploratory coding.
For custom run or debug configurations, create or edit the launch.json file in the .vscode folder. A typical Python debug config includes setting "program" to your script path and "console" to "integratedTerminal". Example:
| Key | Value |
|---|---|
| name | Python: Current File |
| type | python |
| request | launch |
| program | ${file} |
| console | integratedTerminal |
Following these steps, you can efficiently run and debug Python scripts tailored to your Mac environment, leveraging VS Code's integrated tools to streamline your coding process.
How to configure Python in VS Code for Mac-specific workflows
macOS imposes specific permissions that can affect how VS Code interacts with the terminal and file system. To grant VS Code full terminal and file access, open System Settings > Privacy & Security > Full Disk Access, then add VS Code to the allowed apps. This ensures smooth operation when running or debugging Python scripts that access protected folders.
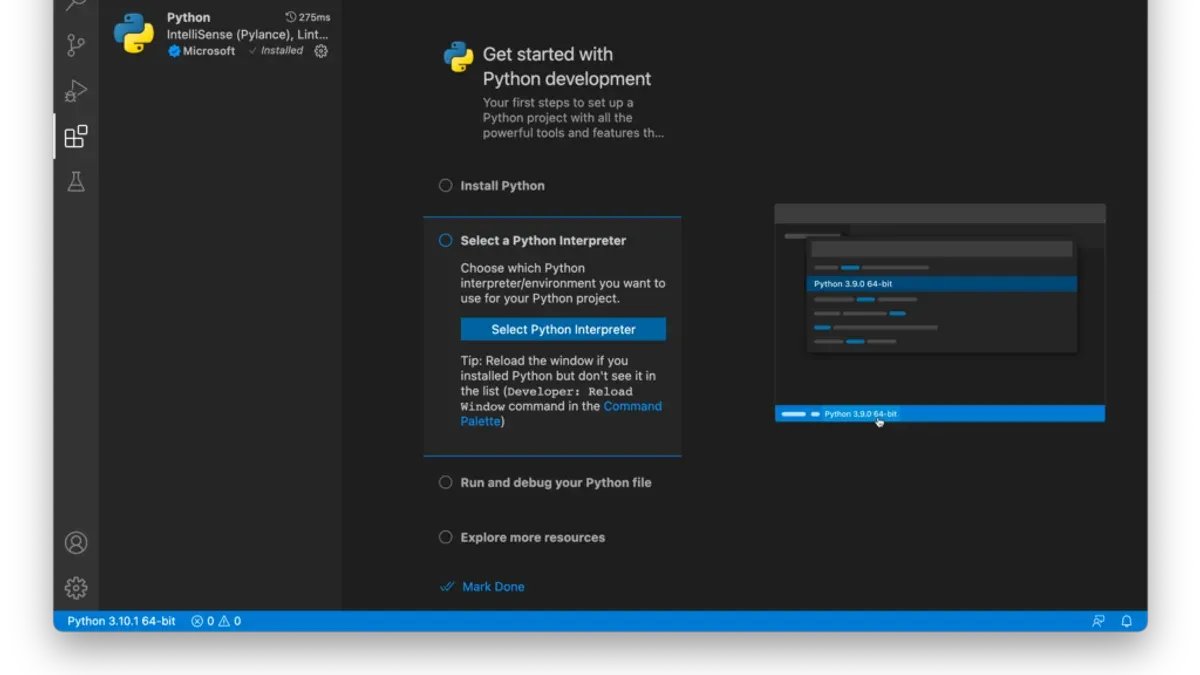
Setting up virtual environments is essential for managing dependencies on Mac. In the integrated terminal, navigate to your project folder and run python3 -m venv env to create a virtual environment named env. Activate it with source env/bin/activate. When activated, VS Code should detect and use this environment automatically; confirm by checking the interpreter path in the status bar.
Mac users often choose between the zsh shell, default since macOS Catalina, and bash. VS Code defaults to the user shell, but you can specify a shell by going to Settings > Terminal > Integrated > Shell: macOS and setting the path (e.g., /bin/zsh or /bin/bash). Zsh offers powerful scripting and completion features, but some legacy scripts might need bash.
Integrating Homebrew simplifies managing Python versions and packages outside virtual environments. You can install or switch Python versions with commands like brew install [email protected] and update PATH accordingly. VS Code picks the version set in your shell environment, so confirm with python3 --version inside the terminal.
Performance-wise, using virtual environments reduces package conflicts and load times. Avoid installing packages globally unless necessary. If you experience slow IntelliSense or linting, disable unused extensions and check that the Python extension uses the correct interpreter. Also, keep VS Code and Python updated to the latest 2026 releases to benefit from optimizations and bug fixes.
Troubleshooting common issues when setting up Python in VS Code on Mac
Setting up Python in VS Code on Mac can encounter several typical problems in 2026. This guide helps you resolve frequent errors related to interpreter detection, PATH variables, extension installation, permissions, and version conflicts.
Fixing "Python interpreter not found" errors
- Open VS Code, go to the Command Palette (⇧⌘P), and choose "Python: Select Interpreter."
Success: Your installed Python 3.11+ interpreter appears in the list and is selectable. - If no interpreter shows, verify Python is in your PATH by running
python3 --versionin Terminal.
Success: The terminal outputs the installed Python version, e.g., "Python 3.11.2". - If Terminal does not find Python, add it to PATH by editing your shell profile (
.zshrcor.bash_profile) to include the Python install directory.
Success: Runningpython3 --versionnow outputs the correct version.
Resolving PATH and environment variable issues
- Check environment variables in VS Code by opening the integrated terminal and running
echo $PATH.
Success: The output includes the Python and Homebrew directories. - If PATH is incorrect, configure the VS Code settings to inherit your shell environment by setting
"terminal.integrated.inheritEnv": trueinsettings.json.
Success: The integrated terminal recognizes Python commands without errors.
Dealing with VS Code extension installation failures
- Verify network connectivity and try reinstalling the Python extension via Extensions view. If it fails, check for permission issues with
/Applications/Visual Studio Code.app.
Success: The extension installs without errors, visible in the Extensions pane. - Restart VS Code after installation to ensure proper loading.
Success: Python features like IntelliSense activate without error messages.
Handling permission errors on macOS when running Python scripts
- When you see errors like "Permission denied" running scripts, check file permissions with
ls -l script.py.
Success: The script has executable permissions (e.g.,-rwxr-xr-x). - Add execute permissions if missing:
chmod +x script.py.
Success: Running./script.pyno longer shows permission errors. - If macOS prompts for permissions when accessing files, grant access via System Preferences → Security & Privacy → Privacy tab.
Success: Scripts run without repeated permission prompts.
Addressing Python version mismatches and pip installation problems
- Confirm the Python version in VS Code matches your installed Python 3.11+ by checking the selected interpreter.
Success: VS Code's Python interpreter matches the output ofpython3 --version. - If pip is missing or outdated, upgrade it by running
python3 -m ensurepip --upgradeorpython3 -m pip install --upgrade pip.
Success: Runningpip --versionshows the latest pip compatible with Python 3.11+.
Following these steps should resolve the most common setup issues on Mac in 2026, ensuring a stable Python development environment in VS Code.
Frequently asked questions
How to setup python in vs code?
To set up Python in VS Code on your Mac, first install Python from the official python.org website or use Homebrew. Then, install VS Code from the Microsoft website. Open VS Code, go to the Extensions view by clicking the square icon or pressing Shift+Command+X, and install the "Python" extension by Microsoft. Finally, select the Python interpreter via Command Palette (Shift+Command+P) and typing "Python: Select Interpreter" to choose the installed Python version.
How to set python in vs code?
Setting Python in VS Code involves selecting the correct Python interpreter. Use Shift+Command+P to open the Command Palette, type "Python: Select Interpreter," and pick the Python version installed on your Mac. This ensures VS Code uses the right environment for running and debugging your Python scripts.
How to install vs code in mac?
Download the latest VS Code installer for Mac from the official Visual Studio Code website. Open the downloaded .zip file and drag the Visual Studio Code app into your Applications folder. Launch VS Code from Applications, and optionally install the "code" command-line tool via the Command Palette with "Shell Command: Install 'code' command in PATH" for terminal access.
How to setup python on mac?
Install Python on your Mac by downloading the latest installer from python.org or using Homebrew with the command brew install python. Verify the installation by running python3 --version in Terminal. Make sure Python is added to your PATH to enable smooth execution and access in VS Code.
Can you code python on mac?
Yes, you can code Python on a Mac using various editors, including VS Code. Macs come with Python 2.x preinstalled, but for development, installing Python 3 is recommended. With VS Code and the Python extension, you get syntax highlighting, debugging, and IntelliSense tailored for Python development on Mac.
What this guide does not cover and who should look elsewhere
This guide does not cover advanced Python environment management tools like Conda or Docker, which may be preferred in some professional workflows requiring complex dependencies or containerization.
It assumes a basic comfort level with terminal commands and macOS system settings; absolute beginners may require supplementary learning resources to build foundational skills.
The instructions focus on Python 3.11+ and the latest VS Code version as of 2026; earlier versions might have different installation steps or feature availability.
For the next step, ensure you have installed the Python extension from the VS Code Marketplace and configure the Python interpreter path under View > Command Palette > Python: Select Interpreter. This setup is essential for enabling IntelliSense, debugging, and linting tailored specifically to your Mac environment.