How to Set Up Universal Control on Mac: A Complete Step-by-Step Guide
Discover how to set up Universal Control on Mac to use one mouse and keyboard across multiple Apple devices with ease.
You’re working across your Mac and iPad, moving the cursor between devices and wondering if there’s a smoother way to control them all with a single mouse and keyboard. Universal Control offers a seamless way to do this, but setting it up correctly can be confusing without clear guidance.
This article explains how to set up Universal Control on Mac, clarifying what it does and doesn’t do compared to other control options. You’ll get a practical, step-by-step walkthrough to get your devices working together smoothly and tips to avoid common setup pitfalls.
Key takeaways
- Universal Control lets you use one mouse and keyboard across multiple Apple devices without manual switching.
- Ensure all devices are signed in with the same Apple ID and have Bluetooth, Wi-Fi, and Handoff enabled for setup.
- Set up involves enabling Universal Control in System Settings under Displays and configuring device arrangement.
- Common issues include devices not appearing due to network settings or firewall restrictions.
- Universal Control differs from Screen Sharing or Sidecar by enabling seamless cursor movement rather than full screen mirroring or remote control.
Before you start: what you need for Universal Control
Universal Control lets you control multiple Apple devices seamlessly, but it requires specific hardware, software, and network conditions to function correctly.
Compatible devices
Universal Control supports a range of Mac models including MacBook Pro 2016 or later, MacBook Air 2018 or later, iMac 2017 or later, iMac (Retina 5K, 27-inch, Late 2015), Mac mini 2018 or later, Mac Studio, and Mac Pro 2019 or later. For iPads, models must support iPadOS 15.4 or later, such as iPad Pro (all models), iPad Air 3rd generation or later, iPad 6th generation or later, and iPad mini 5th generation or later.
Software requirements
Your Mac must be running macOS Monterey 12.3 or later, and your iPad must have iPadOS 15.4 or later installed. Older operating systems do not support Universal Control.
Network and account prerequisites
Both devices need to have Wi-Fi and Bluetooth turned on and be within 10 meters (about 30 feet) of each other. Handoff must be enabled, which you can find under System Settings > General > AirPlay & Handoff on Mac, and Settings > General > AirPlay & Handoff on iPad. Additionally, both devices must be signed in with the same Apple ID using two-factor authentication and have iCloud enabled.
Limitations with non-Apple devices
Universal Control does not support Windows or other non-Apple devices natively. It relies on Apple-specific protocols for seamless input sharing, making third-party alternatives necessary for cross-platform control.
Example pairing
For example, a MacBook Pro (2021) running macOS Ventura and an iPad Air (4th generation) running iPadOS 16 can be paired to use Universal Control once all the above requirements are met.
What is Universal Control and how it differs from other Mac control options
Universal Control is a feature that allows you to use a single keyboard and mouse or trackpad to control multiple Apple devices, such as Macs and iPads, seamlessly and simultaneously. Unlike remote desktop or screen sharing, it does not mirror or stream the screen of one device to another. Instead, it extends your cursor and keyboard input across devices while each device continues to run its own operating system locally.
Universal Control is often confused with universal remote controls, which typically refer to devices that control TVs and other consumer electronics via infrared or Bluetooth. Universal Control does not operate as a remote control in this sense; it requires compatible Apple hardware and software and focuses on input device sharing rather than device management.
Compared to remote desktop solutions like Apple’s Screen Sharing or third-party apps such as TeamViewer, Universal Control does not provide full control over another device's screen or applications. It cannot be used to control Windows or non-Apple systems and does not support remote access over the internet. Its strength lies in providing a fluid multi-device workflow within the Apple ecosystem.
| Feature | Universal Control | Remote Desktop | Universal Remote Control |
|---|---|---|---|
| Devices controlled | Multiple Apple devices (Mac, iPad) | Single device screen remotely | Consumer electronics (TV, audio) |
| Control type | Keyboard and mouse sharing | Screen and input sharing | Infrared/Bluetooth commands |
| Internet required | No, local network only | Yes, often internet or LAN | No |
| Cross-platform | No, Apple devices only | Yes, varies by app | No |
| Use case | Seamless multi-device workflow | Remote support or access | Control media devices |
How to set up Universal Control on Mac step by step
- Update your Mac and iPad to the latest supported macOS and iPadOS versions. Open System Settings > General > Software Update on Mac and Settings > General > Software Update on iPad. You should see an option to download and install if updates are available.
- Ensure Bluetooth, Wi-Fi, and Handoff are enabled on all devices. On Mac, go to System Settings > Bluetooth and toggle it on, then System Settings > General > AirDrop & Handoff to enable Handoff. On iPad, open Settings > Bluetooth, Settings > Wi-Fi, and Settings > General > AirPlay & Handoff to enable these features. When enabled correctly, icons should appear active and status indicators show connected.
- Sign in to the same Apple ID on all devices. Check on Mac under System Settings > Apple ID and on iPad under Settings > Apple ID. The Apple ID email should match exactly to enable device communication.
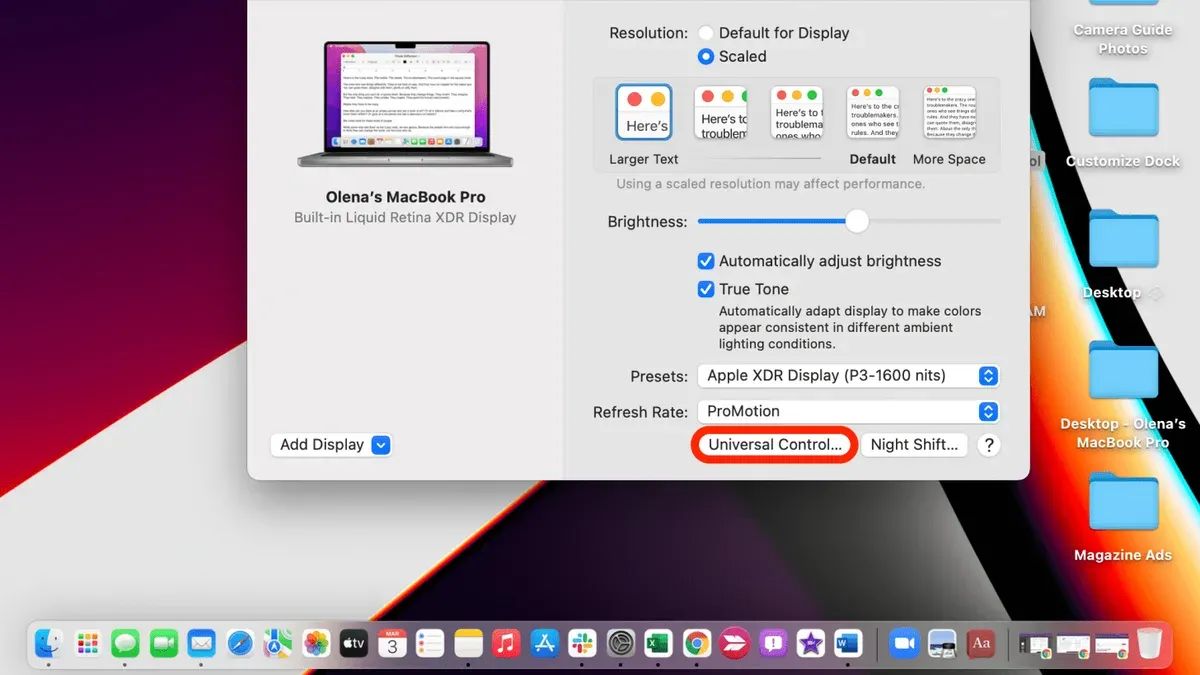
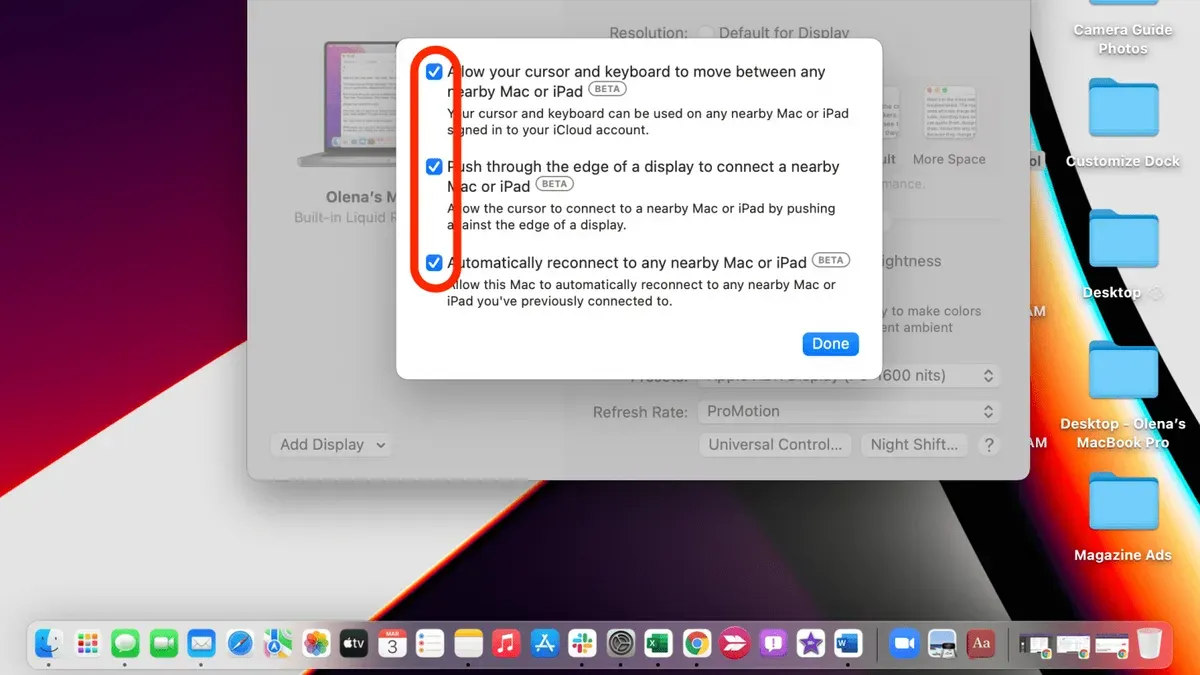
- On your Mac, open System Settings > Displays. Scroll down to find and enable all Universal Control options: "Allow your pointer and keyboard to move between any nearby Mac or iPad," "Push through the edge of a display to connect a nearby Mac or iPad," and "Automatically reconnect to any nearby Mac or iPad." A blue toggle indicates the feature is active.
- Physically arrange your devices side by side on your desk. In System Settings > Displays on Mac, drag the display icons to match the physical layout. This arrangement ensures the cursor moves naturally between device screens in the correct direction.
- Test the setup by moving your Mac’s cursor toward the edge of the screen adjacent to your iPad or second Mac. If set up properly, the cursor will appear on the other device’s screen seamlessly. Try typing on your keyboard to confirm input is received on the new device. This confirms Universal Control is connected and working.
How to troubleshoot Universal Control not working
If Universal Control isn’t functioning as expected, start by confirming all your devices meet compatibility and software requirements. Ensure each Mac and iPad runs the necessary OS versions and supports Universal Control features.
Verify that Bluetooth, Wi-Fi, and Handoff are enabled and active on all devices. Open System Settings > General > AirDrop & Handoff to confirm Handoff is on. Check Bluetooth and Wi-Fi from the menu bar or System Settings.
Make sure all devices are signed in with the same Apple ID and that two-factor authentication is enabled for the account, as this is required for Universal Control.
- Restart all devices involved. A fresh start often resolves connection glitches. After reboot, check if Universal Control connects automatically.
- Toggle Universal Control settings off and on again via System Settings > Displays > Advanced. If the option is grayed out, revisit compatibility and Apple ID checks.
- Use Wireless Diagnostics on your Mac (hold Option and click the Wi-Fi icon, then choose "Open Wireless Diagnostics") to scan for network issues or interference that could disrupt device communication.
- If problems persist, reset the Bluetooth module. Hold Shift + Option while clicking the Bluetooth icon in the menu bar, then select "Reset the Bluetooth module." Re-pair your devices afterward.
For example, when a user experienced consistent disconnection, the Wireless Diagnostics reported excessive Wi-Fi interference from a nearby device operating on the same 2.4 GHz band. Switching the router to 5 GHz and resetting Bluetooth cleared the issue, restoring Universal Control functionality.
How to control Mac from Windows alternatives
Universal Control does not support Windows devices, so controlling a Mac from a Windows PC requires third-party remote desktop software. Popular options include VNC clients like RealVNC, and commercial apps such as TeamViewer or AnyDesk. These tools offer remote access by streaming your Mac’s screen to the Windows machine, enabling keyboard and mouse interaction.
Compared to Universal Control, remote desktop apps provide full control over the Mac but typically introduce latency and rely on a network connection, which can affect responsiveness. Universal Control’s strength lies in seamless, low-latency input sharing across Apple devices on the same local network without screen sharing.
Security is a key consideration. Remote desktop apps require enabling remote login or screen sharing on your Mac and often depend on passwords or access codes, so ensure strong credentials and use encrypted connections to protect your data.
| Feature | Universal Control | Remote Desktop (VNC, TeamViewer) |
|---|---|---|
| Cross-OS Support | Apple devices only | Windows, Mac, Linux |
| Control Type | Input sharing only | Full remote screen control |
| Latency | Low, local network | Higher, depends on Internet/network |
| Setup Complexity | Simple for Apple devices | Requires remote access configuration |
| Security | Apple ID-based, local network | Requires strong passwords, encryption |
To use remote desktop software, follow these steps:
- Enable Screen Sharing on your Mac: Go to System Settings > General > Sharing, then toggle on Screen Sharing. You should see a message with your Mac’s network address.
- Install a compatible remote desktop client on your Windows PC, such as RealVNC Viewer or TeamViewer.
- Open the client on Windows and enter the Mac’s network address or TeamViewer ID.
- Authenticate using the Mac’s user credentials or the remote app’s access code. Upon success, your Mac’s desktop should appear on the Windows screen.
- Use your Windows mouse and keyboard to control the Mac remotely, keeping in mind possible latency and reduced visual smoothness compared to native Apple solutions.
These remote desktop methods enable cross-platform productivity workflows, such as accessing Mac-only apps from Windows or managing files remotely, but they lack Universal Control’s fluid multi-device input sharing within the Apple ecosystem.
Understanding the control button on Mac and keyboard shortcuts
The Control key on a Mac keyboard is a modifier key used primarily for contextual menus and certain shortcuts, differing from the Command and Option keys in function and usage. The Command key (⌘) is the main modifier for most system-wide shortcuts like copy (Command+C) and paste (Command+V), while the Option key (⌥) often modifies actions or accesses alternate options.
Common shortcuts involving these keys include:
- Command+C: Copy selected item
- Command+V: Paste copied item (not Control+V, which is common on Windows)
- Command+X: Cut selected item
- Command+Tab: Switch between open apps
- Control+Click: Open contextual menu (right-click equivalent)
- Option+Click: Access alternate features in menus or apps
When using Universal Control across multiple Apple devices, keyboard shortcuts behave as if you are directly interacting with the active device, so Command and Option shortcuts work consistently across Macs and iPads. The Control key’s role remains primarily for contextual menus or specific app shortcuts, ensuring familiar interactions without confusion.
You can customize keyboard shortcuts by going to System Settings > Keyboard > Keyboard Shortcuts. Here you can add, remove, or modify shortcuts to suit your workflow across devices.
A common confusion arises with paste commands: unlike Windows where Control+V pastes, on Mac you must use Command+V. Universal Control respects this, so pressing Control+V on a Mac or iPad will not paste text as expected.
How to set parental controls on MacBook alongside Universal Control
Parental controls and Universal Control serve different purposes: parental controls help manage and monitor device usage and app access, while Universal Control enables seamless control across multiple Apple devices with one keyboard and mouse. Universal Control does not regulate user permissions or restrict app usage.
To enable parental controls, use the Screen Time feature on your MacBook, which offers detailed monitoring and restrictions suitable for families managing multiple devices.
- Open System Settings and select Screen Time. You should see an overview dashboard showing your usage and options for managing controls.
- Click Options in the lower-left corner and turn on Screen Time if it’s not already enabled. This activates monitoring and control features.
- Choose Content & Privacy to set restrictions. Enable Content & Privacy Restrictions, then configure limits on apps, web content, and purchases. You will see toggles and dropdowns for customizing allowed content.
- Go to Downtime to schedule device usage limits, useful for enforcing breaks or bedtime. Setting this will show a calendar and time picker to specify active periods.
- Use App Limits to restrict time spent on specific apps or categories, ideal for managing screen time across devices controlled via Universal Control.
When using Universal Control, remember that parental controls apply individually to each device. Managing multiple devices requires checking Screen Time settings on each one to ensure consistent restrictions. Universal Control facilitates workflow but does not override these user-level controls.
Popular parental control settings for families include limiting social media and gaming apps, blocking explicit content in Safari, and scheduling downtime during homework or sleep hours. These help maintain healthy device habits alongside the productivity benefits of Universal Control.
How to set up an Anki remote on Mac: a niche control use case
Anki is a popular flashcard app used for memorization and study efficiency. Some users want to remotely control Anki on their Mac, allowing them to advance cards or manage decks without switching devices physically. This setup supports study workflows, especially when paired with other control methods like Universal Control.
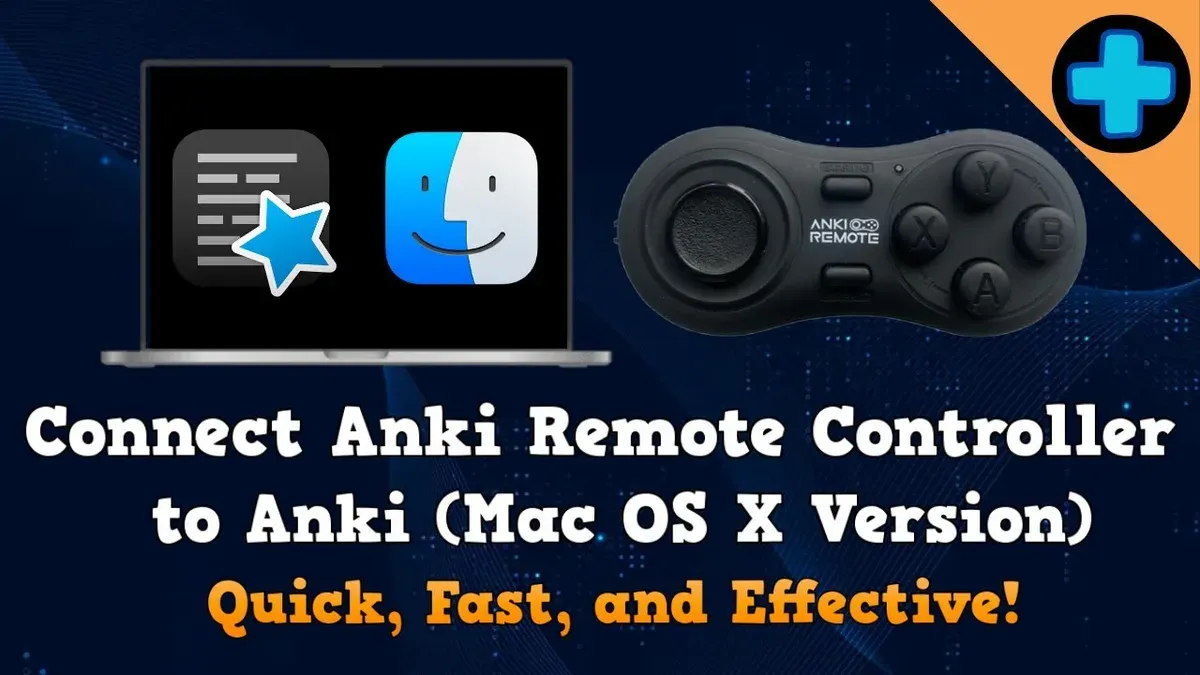
Several third-party apps and scripts enable remote control of Anki on Mac. One common approach uses AnkiConnect, a plugin that exposes Anki’s functions through a local API. Combined with a mobile or web client, you can send commands to your Mac remotely.
- Install the AnkiConnect add-on on your Mac’s Anki app by going to Tools > Add-ons > Get Add-ons and entering code 2055492159. Restart Anki and ensure the add-on is active.
- On your remote device (e.g., iPhone or iPad), install a compatible Anki remote app or use a script that sends JSON requests to the Mac’s AnkiConnect API endpoint (usually http://localhost:8765).
- Connect both devices to the same local network to enable communication. Configure the remote app to target your Mac’s IP address at port 8765.
- Test basic commands like advancing a card or syncing decks from the remote device. Successful commands will reflect immediately in the Mac’s Anki interface.
This remote control method is limited compared to Universal Control; it only manages Anki functions and does not allow full keyboard or mouse sharing. However, it complements Universal Control by enabling focused control of study material while using other devices seamlessly.
- How to Customize Control Center on Mac: A Complete Step-by-Step Guide
- How to Add Widgets to Your Mac Desktop: A Step-by-Step Guide
Frequently asked questions
How to download universal control?
Universal Control is built into macOS and iPadOS, so you don’t need to download it separately. To use it, ensure your Mac is running macOS Monterey or later and your devices are signed into the same Apple ID with two-factor authentication enabled. Keep your software up to date by checking System Preferences > Software Update.
What is control on a mac?
The Control key on a Mac keyboard is a modifier key used in combination with other keys to perform shortcuts, such as Control+C for copy in some contexts. It differs from the Command key, which handles most common shortcuts, but Control is often used in terminal commands or when right-clicking with the mouse.
How to setup a universal remote control?
Setting up a universal remote control typically involves syncing the remote with your devices by entering device codes or using automatic scanning. For Apple devices, Universal Control is not a remote but a feature to share keyboard and mouse across Macs and iPads. For other devices, follow the remote’s instructions to pair with TVs, sound systems, or other electronics.
What is universal control on mac?
Universal Control on Mac allows you to use a single mouse and keyboard seamlessly across multiple Macs and iPads. It enables cursor and keyboard sharing without manual pairing, working wirelessly when devices are nearby and signed into the same Apple ID. Unlike screen sharing, it doesn’t mirror screens but lets you move between devices naturally.
How to set up mac?
To set up a Mac, turn it on and follow the on-screen setup assistant to select your language, Wi-Fi network, and sign in with your Apple ID. You’ll configure settings like Siri, Touch ID, and privacy preferences. After setup, use System Preferences to customize your Mac further.
What Universal Control does not cover and when to consider alternatives
Universal Control only works between compatible Apple devices signed into the same Apple ID and cannot control non-Apple devices such as Windows PCs or Android devices. It also does not reliably transfer files or share clipboards in every situation, so users expecting full remote desktop features or seamless file sharing might find it limiting.
If you need to manage Windows or Linux machines, or require comprehensive remote access with file transfers and clipboard syncing, consider dedicated remote desktop apps like Microsoft Remote Desktop or third-party solutions such as TeamViewer or AnyDesk.
Next step: Enable Universal Control in System Settings and arrange your devices
The most practical next step is to open System Settings on your Mac, navigate to Displays, then click the "Universal Control" button to enable all available options. After that, position your devices physically close and arrange their relative positions within the Displays settings. This setup ensures your cursor and keyboard flow naturally between devices, giving you the smoothest cross-device experience.