How to Share Screen with Audio in Microsoft Teams on Mac: Step-by-Step
Discover how to share your screen with audio in Microsoft Teams on Mac by enabling permissions and adjusting settings for clear sound in meetings.
You're in a Microsoft Teams meeting on your Mac and want to share a video or presentation with sound. You start sharing your screen, but the audio isn't coming through, leaving participants confused.
This article walks you through how to share screen with audio in Microsoft Teams on Mac, focusing on the system settings and permissions that often block audio sharing. You will learn not only the steps within Teams but also how to correctly configure your Mac’s Screen Recording and Microphone permissions to make sure your audience hears everything clearly.
Key takeaways
- Enable Screen Recording and Microphone access for Microsoft Teams in your Mac’s System Preferences under Security & Privacy.
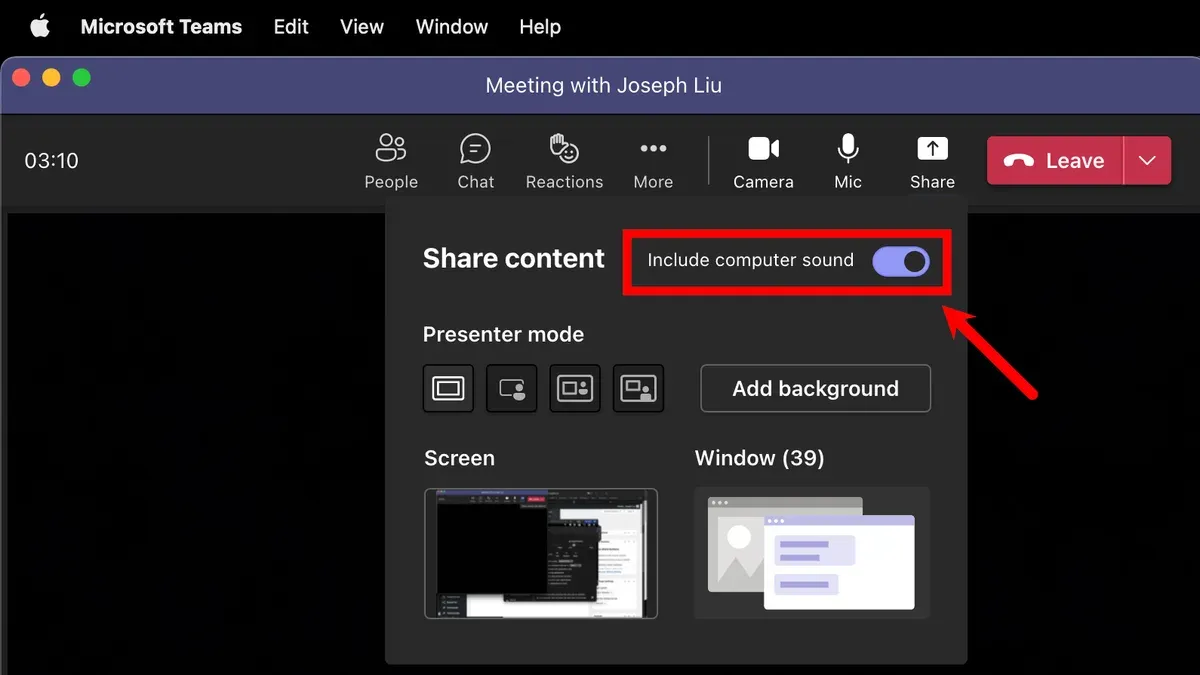
- Choose "Include computer sound" when you start sharing your screen in Teams to transmit audio.
- Adjust volume levels in Teams and on your Mac to avoid audio being too low or muted.
- If audio doesn't work, check permissions again and restart Teams to apply changes.
- Understand that some apps with DRM or protected content may not allow audio sharing even with correct settings.
Before You Start: What You Need to Share Screen with Audio
Before sharing your screen with audio in Microsoft Teams on your Mac, make sure your setup meets the necessary requirements. First, confirm that you have the latest version of the Microsoft Teams app installed. Teams updates frequently enhance features and fix bugs, so using the current version ensures smooth audio sharing.
Next, check your Mac’s operating system version. Screen sharing with audio requires macOS Mojave (10.14) or later. Older versions do not support capturing system audio within Teams. You can verify your macOS version by clicking the Apple menu and selecting "About This Mac." Ensure your system is up to date enough to support this functionality.
You will also need to have the proper permissions enabled in macOS. This includes allowing screen recording and microphone access specifically for Teams. Without these permissions, sharing your screen with audio will not work correctly. Later sections will guide you through granting these permissions if needed.
Finally, understand the difference between sharing a single window, an app, or your entire screen in Teams. Sharing your entire screen allows audio from any app to be captured, while sharing only a window or app may limit audio sharing to that context. This distinction helps you decide which sharing mode fits your needs.
- Open the Microsoft Teams app on your Mac. You should see the main Teams interface without errors.
- Click the Apple menu and select "About This Mac" to confirm your macOS version is Mojave (10.14) or later.
- Verify you have granted Teams permissions for Screen Recording and Microphone in System Preferences under Security & Privacy > Privacy.
- Familiarize yourself with the sharing options in Teams to choose between sharing a window, app, or full screen during a meeting.
Allow Screen Recording and Microphone Access on Your Mac
To share your screen with audio in Microsoft Teams on Mac, you must grant the app specific permissions in your macOS security settings. Without these permissions, Teams cannot capture your screen content or the system audio, which leads to issues like sharing a blank screen or missing sound.
- Open System Preferences by clicking the Apple menu in the top-left corner and selecting it from the dropdown. You should see a window with various system settings.
- Click on Security & Privacy. This section manages app permissions and privacy settings.
- Select the Privacy tab at the top of the window. On the left sidebar, scroll down and find Screen Recording.
- Click Screen Recording. On the right, you will see a list of apps requesting permission. Locate Microsoft Teams and check the box next to it to enable screen recording access. If it’s already checked, no action is needed here.
- Next, in the same sidebar, select Microphone. Again, find Microsoft Teams and ensure the box is checked to allow access.
- If you had to make any changes, you will need to quit and restart Microsoft Teams for the permissions to take effect. You can do this by right-clicking the Teams icon in the Dock and selecting Quit, then reopening the app.
These permissions are crucial because macOS isolates app access for privacy and security. Without enabling Screen Recording, Teams cannot capture your screen content, and without Microphone access, it cannot transmit audio from your device. Missing either permission often causes the audio to fail when sharing your screen, even if you think Teams is set correctly.
After following these steps, you should see Teams listed with checked boxes under both the Screen Recording and Microphone categories. This setup allows Teams to share your screen and audio simultaneously during meetings.
Share Your Screen with Audio in Microsoft Teams
- Join or start your Microsoft Teams meeting. When connected, look for the Share Content button, usually represented by an upward arrow inside a square at the top right of the meeting controls.
- Click Share Content. You will see options to share your entire screen, a specific window, or a PowerPoint.
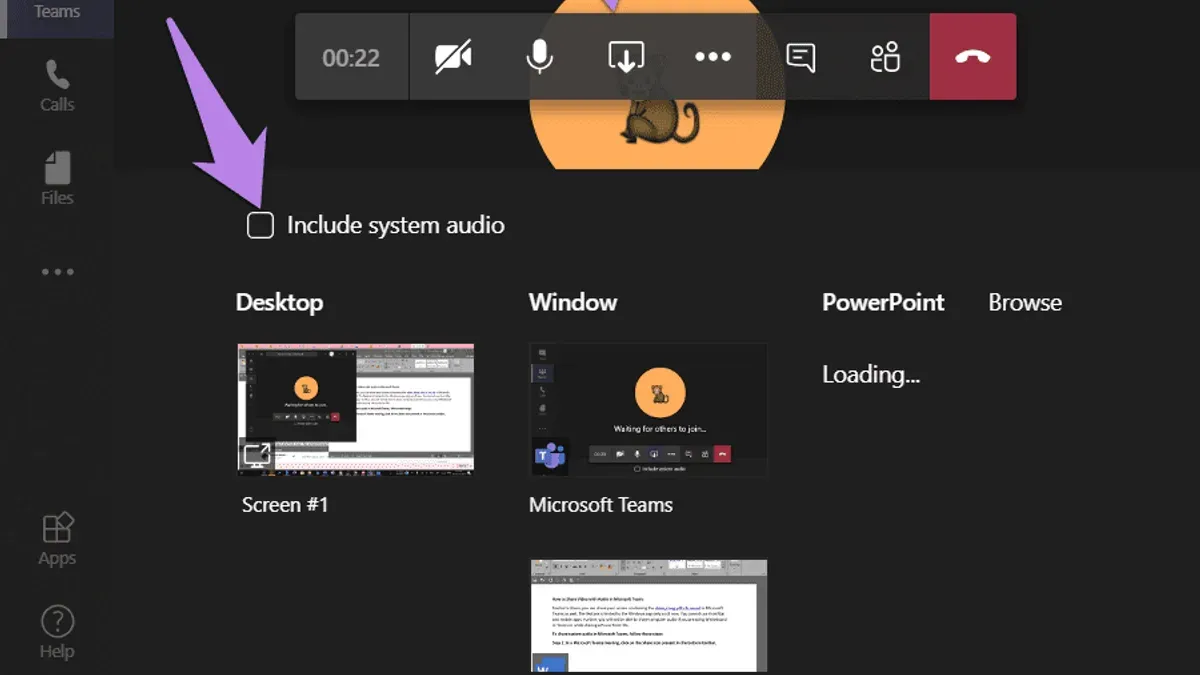
- Before selecting the screen or window to share, make sure to check the box labeled Include computer sound. This ensures that any audio from your Mac, like a video soundtrack, is broadcast to attendees.
- Select the screen or application window you want to share. Once chosen, your screen will be visible to others, and any sound from your Mac will be transmitted if you enabled the audio option.
- Confirm that audio is working by asking attendees if they can hear sound or by observing Teams’ audio indicators, such as the microphone icon or volume meters moving as audio plays.
For example, when sharing a video clip, if you forget to check Include computer sound, attendees will see the video but hear no audio. Checking this box transmits both picture and sound, creating a seamless experience.
Adjust Audio Settings in Microsoft Teams for Best Experience
To ensure clear sound when sharing your screen with audio, start by checking your audio devices in Teams. Open Teams, click your profile picture, then select Settings > Devices. Under Audio devices, confirm that the correct microphone and speaker are selected—your Mac’s built-in microphone and speakers or any connected headset.
Next, mute your microphone when sharing system audio to prevent echo or feedback. When your microphone picks up the sound coming from your speakers, it can cause an echo that distracts others. Muting your mic allows only the system audio to be transmitted clearly.
If you experience low volume or unclear sound, use Teams’ built-in Make a test call feature found in the same Devices settings page. This tool lets you check how your voice and system audio sound and gives suggestions if problems are detected.
Teams automatically mixes your microphone input with system sounds during screen sharing if the microphone is unmuted, but this can sometimes reduce clarity. For the best experience, mute your mic while sharing audio and unmute only when you need to speak.
- Open Microsoft Teams and click your profile icon, then go to Settings > Devices. You should see your audio devices listed correctly.
- Before sharing your screen, mute your microphone by clicking the microphone icon in the meeting controls; it should show a slash indicating it's muted.
- Use the Make a test call option to verify your audio setup. Listen carefully to the playback to ensure clarity and adjust volume if necessary.
- When speaking, unmute your microphone briefly, then mute again to keep audio clear during screen sharing.
Troubleshoot Common Issues When Sharing Screen with Audio on Mac
If the 'Include computer sound' option is greyed out or missing in Microsoft Teams, it often relates to permissions or app glitches. First, ensure that Microsoft Teams has Screen Recording and Microphone access enabled in System Preferences > Security & Privacy > Privacy. Sometimes, macOS may block these permissions after updates, requiring you to re-enable them.
When permissions are denied, you might see a prompt or an error message. To fix this, go to System Preferences, unlock the settings with your administrator password, and manually check the boxes next to Microsoft Teams under Screen Recording and Microphone. Restart Teams afterward to apply the changes.
Teams app glitches are another common cause. Restarting the Teams app often restores the 'Include computer sound' option. If restarting does not help, check for updates by clicking your profile picture in Teams, selecting 'Check for updates,' and installing any available updates. Updates frequently fix bugs affecting audio sharing.
On some Macs, audio driver conflicts or hardware issues can interfere with audio sharing. If you experience distorted sound or no audio, restart your Mac to refresh hardware connections. Also, disconnect and reconnect any external audio devices. If problems persist, testing with another Mac user account or reinstalling Teams can help isolate the issue.
- Open System Preferences > Security & Privacy > Privacy > Screen Recording and confirm Microsoft Teams is checked. You should see the option enabled after restarting Teams.
- Check Microphone permissions similarly and restart Teams to apply changes.
- Quit Microsoft Teams fully and reopen it. The 'Include computer sound' checkbox should now be accessible.
- Click your profile picture in Teams, select 'Check for updates,' and install any found updates. After updating, verify the audio sharing option is present.
- Restart your Mac and test audio sharing again. The issue should resolve if caused by hardware or driver conflicts.
Understand the Limits: What Screen Sharing with Audio Does Not Cover
When sharing your screen with audio in Microsoft Teams on Mac, it is important to understand that this feature supports audio transmission only when you share your entire screen or specific application windows. Certain content types, like some DRM-protected media, may block audio sharing due to copyright restrictions enforced by the software or content providers. For example, streaming services such as Netflix or Apple TV+ often prevent their audio from being captured during screen sharing.
Additionally, this guide does not cover sharing audio from external devices connected to your Mac or audio from applications outside of Microsoft Teams. If you are using older Mac hardware or operating system versions predating macOS Mojave, some audio sharing features may not be available or may work inconsistently. Microsoft’s official documentation notes these limitations to set realistic expectations about the functionality.
Understanding these constraints helps avoid confusion when audio does not transmit as expected and guides you toward alternative solutions if needed.
Frequently asked questions
Why can’t I hear audio when I share my screen in Teams on Mac?
This usually happens because the necessary permissions for screen recording or microphone access are not granted in your Mac’s System Preferences. Additionally, Microsoft Teams requires explicit permission to capture audio from your computer. Double-check that “Screen Recording” and “Microphone” are enabled for Teams under System Preferences > Security & Privacy > Privacy. Also, ensure that you select “Include computer sound” when you begin sharing your screen in Teams.
How do I enable computer sound sharing in Microsoft Teams on Mac?
When you start sharing your screen in Teams, a pop-up appears with sharing options. Make sure to check the box labeled “Include computer sound” before selecting the screen or window to share. This option ensures your meeting participants hear the audio playing on your Mac. If this checkbox is missing, it likely means your Mac system permissions for screen recording or audio capture are not set correctly.
What permissions does Microsoft Teams need on macOS to share audio?
Microsoft Teams needs at least two permissions to share audio: “Screen Recording” and “Microphone” access. You can find these under System Preferences > Security & Privacy > Privacy. Without Screen Recording permission, Teams cannot capture your screen content or system audio, while without Microphone permission, it cannot capture your voice or audio from apps.
Can I share audio from a specific app only in Teams on Mac?
Currently, Microsoft Teams on Mac does not support sharing audio from just one specific app; the “Include computer sound” option shares all system audio. If you want to share audio from a particular app, you’ll need to play only that app’s sound during screen sharing or mute other apps to avoid unwanted audio being transmitted.
Understand the Limits of Screen Sharing with Audio on Mac
This article focuses on using Microsoft Teams on a Mac to share your screen along with audio, emphasizing the necessary Mac system permissions and Teams settings. However, it does not cover Windows or mobile versions of Microsoft Teams, which have different procedures and audio sharing capabilities. If you primarily use Teams on an iPhone, iPad, or Windows PC, you should consult guides specific to those platforms for accurate instructions. Additionally, this advice assumes you have administrative access to adjust Mac system preferences; if you do not, you might need assistance from your IT department.
To make your next meeting run smoothly, the single most useful next step is to double-check that you have granted both Screen Recording and Microphone access to Microsoft Teams in your Mac's System Preferences under Security & Privacy. This step often gets overlooked but is crucial for sharing audio properly. Taking a moment to verify these permissions before your meeting can save you from last-minute troubleshooting and ensure your participants hear everything clearly.
See also: How to Fix Outlook Not Syncing on Mac: Step-by-Step Solutions · How to Set Out of Office in Outlook on Mac: Step-by-Step Guide · How to Use Dictation in Microsoft Word on Mac: A Step-by-Step Guide · Master Portrait Mode in FaceTime on Mac: A Step-by-Step Guide