
How to Add Transitions in iMovie: Step-by-Step Guide for iPhone, iPad, and Mac
This guide shows you how to add transitions in iMovie on iPhone, iPad, and Mac to make your videos flow smoothly and look polished.
You've just finished arranging your video clips in iMovie, but the transitions between scenes feel abrupt and distract from your story. Smoothly blending one clip into another can make your video look polished and professional without needing advanced editing skills.
This guide explains how to add transitions in iMovie across your iPhone, iPad, and Mac. You'll learn step-by-step methods to place and manage transitions, including how to apply them all at once and use keyboard shortcuts on Mac. Common misconceptions about iMovie's transition options are also clarified, helping you avoid frustration and create seamless videos with confidence.
Key takeaways
- You can add transitions by tapping the small icon between clips on iPhone or iPad, or by dragging transitions from the sidebar on Mac.
- Applying transitions to all clips at once is possible via the Edit menu on Mac, saving time on longer projects.
- Shortcuts like Command+T on Mac insert default transitions quickly without opening menus.
- Refining transition duration and style helps match your video’s pacing and tone.
- Free video clips and transition effects can enhance your project without extra cost.
Before you start: What you need to add transitions in iMovie
To add transitions in iMovie, you need to prepare your devices and projects properly. First, ensure you have the latest version of iMovie installed on your iPhone, iPad, or Mac. Transitions work smoothly on iOS 15 or later for iPhone and iPad, and macOS 12 Monterey or later for Mac. If your device runs an older version, updating the operating system and iMovie app will improve compatibility and access to the latest features.
Next, import your video clips into iMovie and arrange them in a timeline or project. Transitions only appear between two or more clips, so having at least two clips placed next to each other is necessary. Without this, you won’t see transition options because iMovie can’t create a transition without a cut point.
It also helps to familiarize yourself with the iMovie interface on your device. On iPhone and iPad, the timeline and clip browser look different from the Mac version, but the basic principles of selecting clips and adding transitions are similar. Be sure you understand how to navigate your project timeline before proceeding.
Lastly, remember that iMovie transitions are visual effects between video clips and are unrelated to HTML or web-based transitions you might have encountered elsewhere. This guide focuses solely on video transitions within the iMovie app environment.
- Open the App Store on your device, search for iMovie, and tap Update or Install. When done, launch iMovie and confirm the version in the About menu (Mac: iMovie > About iMovie; iPhone/iPad: Settings > iMovie).
- Create a new project and import at least two video clips. You should see the clips arranged side by side in the timeline or storyboard view.
- Familiarize yourself with your device's timeline interface: on Mac, the timeline is at the bottom with clips horizontally aligned; on iPhone/iPad, the timeline appears as a linear strip with clips you can tap.
After these steps, you will be ready to add, manage, and customize transitions effectively in your iMovie project.
How do you add transitions in iMovie on Mac
- Open your iMovie project and make sure you have at least two clips positioned next to each other on the timeline. When clips are adjacent, you can add transitions between them.
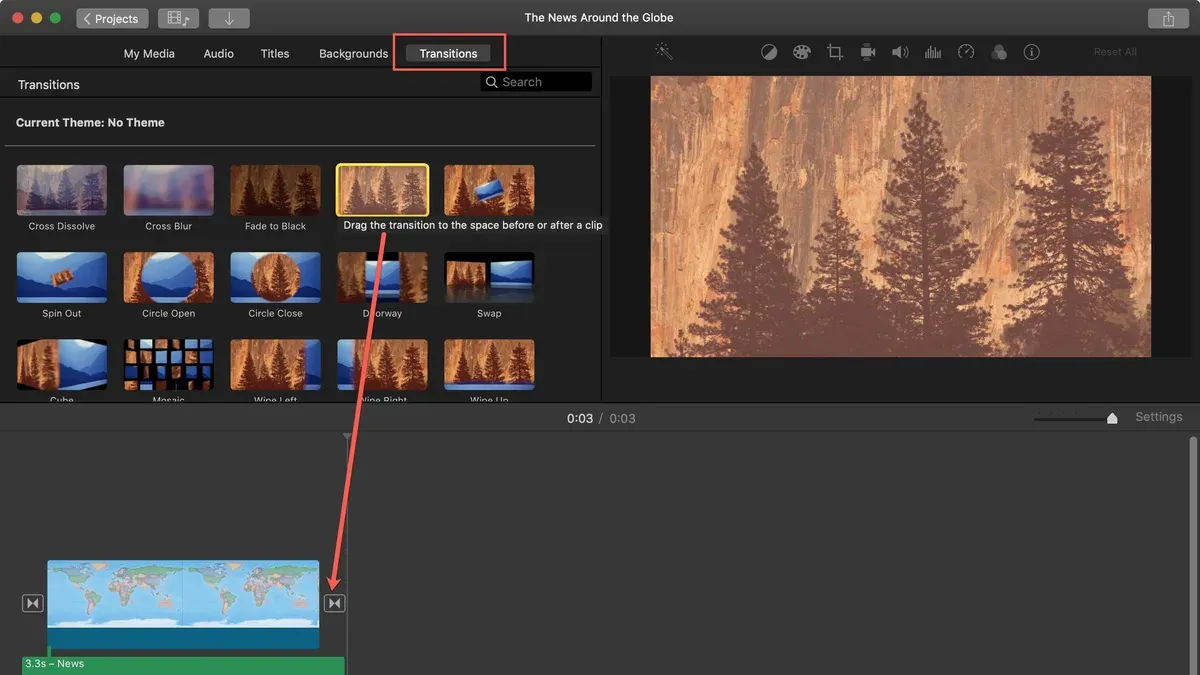
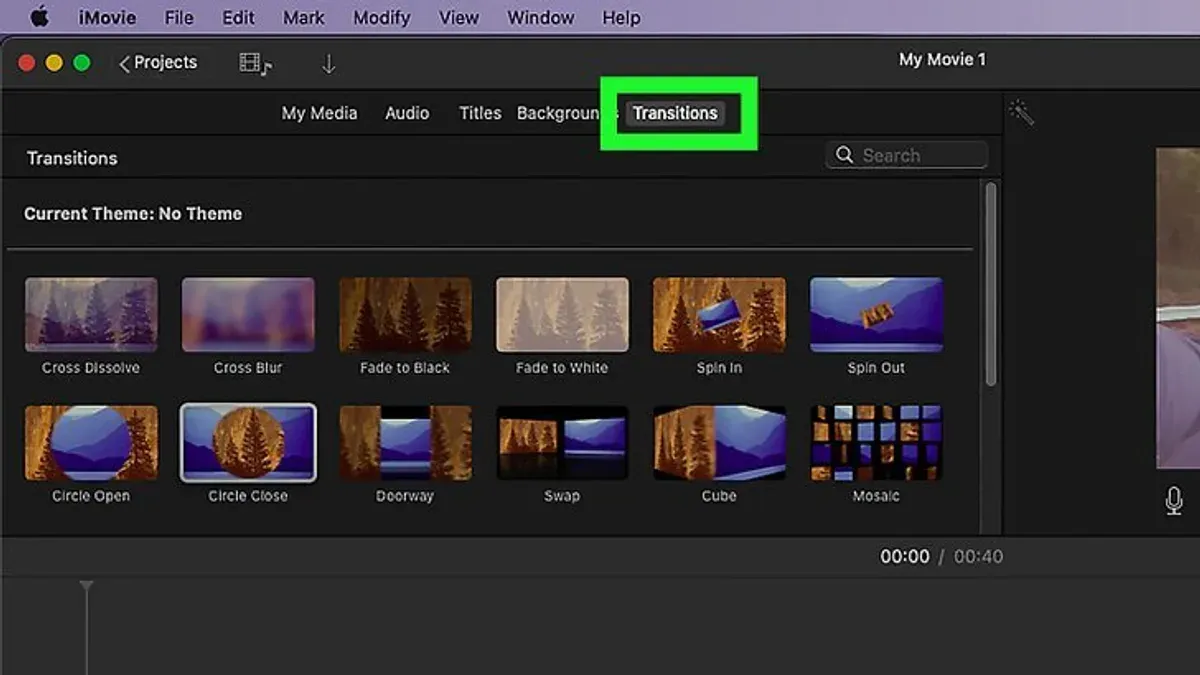
- Click the Transitions button located above the browser to open the Transitions browser. Here, you can preview different transition styles by hovering your pointer over each icon to see how they will look.
- Drag the desired transition from the Transitions browser and drop it between the two clips on the timeline. You will see the transition icon appear between the clips, indicating it has been added successfully.
- To adjust the duration of the transition, double-click the transition icon on the timeline. A small window will appear allowing you to enter the duration in seconds. For example, setting it to 1.5 seconds will make the transition last one and a half seconds.
- Use keyboard shortcuts for faster editing: press Command+T to add the default cross dissolve transition between selected clips.
- To delete a transition, select the transition icon on the timeline and press the Delete key. To replace a transition, drag a new transition directly onto the existing one; it will swap automatically.
Summary of Mac keyboard shortcuts for transitions:
| Action | Shortcut |
|---|---|
| Add default transition | Command + T |
| Select next transition | Right Arrow (in Transitions browser) |
| Select previous transition | Left Arrow (in Transitions browser) |
By following these steps, you can efficiently add, customize, and manage transitions on your Mac, creating smoother video edits without confusion.
How to add transitions in iMovie on iPhone and iPad
To add transitions between clips on your iPhone or iPad, start by opening your project and tapping the timeline to enter edit mode. You will notice small transition icons appear between each clip, represented by two overlapping squares. These icons indicate where you can insert a transition.
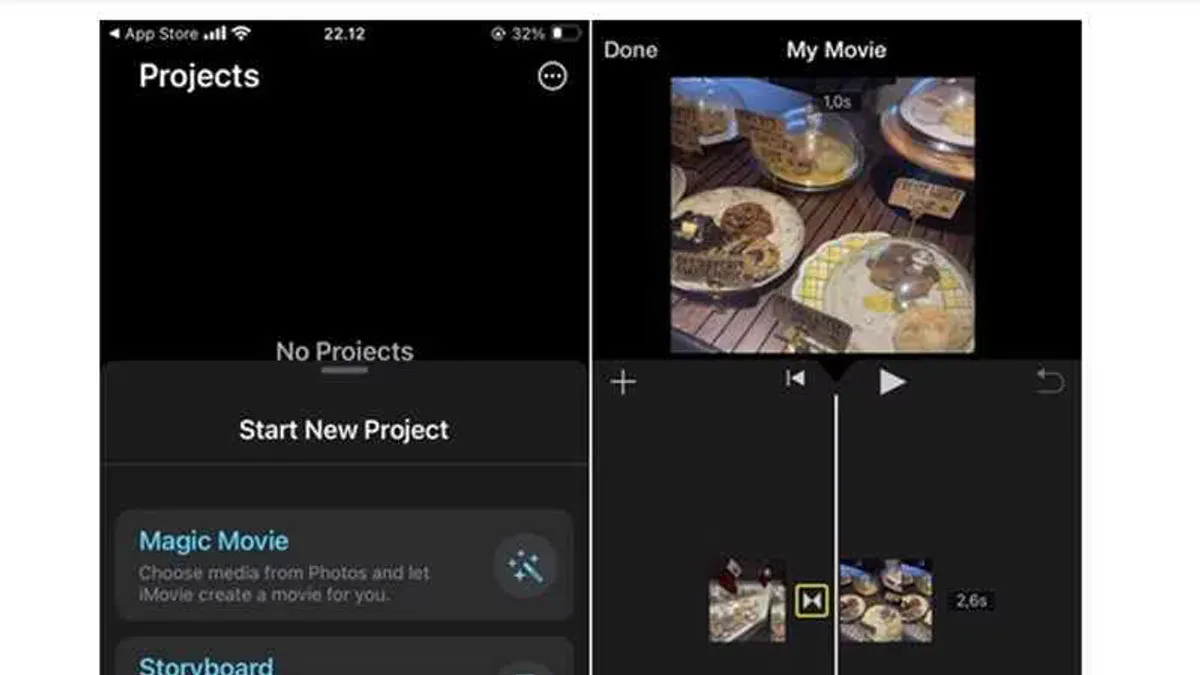
- Tap the small transition icon located between the clips where you want to add a transition. This opens the transition selection menu.
- Browse the available transition styles such as Cross Dissolve, Slide, or Wipe. Tap on the one you want to apply. When selected, the transition will preview automatically.
- If the option is available, adjust the transition duration by tapping the duration field and choosing a length, usually between 0.5 and 2 seconds. Longer transitions create smoother effects but can affect video pacing.
- Repeat this process for each cut where you want a transition. Currently, iMovie on iPhone and iPad does not support adding transitions to all cuts at once, so you need to add them one by one.
- For faster editing, consider using iMovie’s Magic Movie feature. Magic Movie automatically creates a project with clips and applies transitions and effects for you. You can then fine-tune transitions manually if needed.
Adding transitions manually on iOS devices requires a bit of patience but gives you control over each cut. Keep an eye on the transition icons in the timeline to confirm your changes. If you want to automate more, Magic Movie is a helpful starting point.
How to add transitions in iMovie all at once
iMovie does not include a built-in feature to add transitions to all clips in your project simultaneously. This limitation often surprises users who want to quickly apply consistent effects across an entire timeline. However, there are some workarounds and tools you can use to speed up the process.
One automated option is the Magic Movie mode available on iPhone and iPad. When you create a Magic Movie project, iMovie automatically inserts transitions between clips, providing a polished look without manual effort. This mode is convenient for quick edits but offers limited control over transition styles and timing.
If you prefer working on a Mac and want more control while still saving time, you can manually add transitions efficiently using keyboard shortcuts. For example, select a clip boundary in the timeline and press Command+T to add the default transition. Repeating this step at each cut is faster than dragging transitions individually.
Advanced users sometimes turn to third-party tools or AppleScript scripts that batch-add or manage transitions. These solutions require additional setup and technical knowledge and may not always be compatible with all iMovie versions. Use them cautiously and back up your projects first.
| Method | Batch Transition Adding | Control Over Transitions | Ease of Use |
|---|---|---|---|
| Manual Adding with Keyboard Shortcuts (Mac) | No, but faster than drag-and-drop | Full control of style and timing | Moderate |
| Magic Movie Mode (iPhone/iPad) | Yes, automatic | Limited control | Easy |
| Third-Party Tools/Scripts | Possible with setup | Depends on tool | Advanced |
Example: When creating a Magic Movie project, you select your clips, and iMovie automatically adds transitions between them. You see smooth dissolves appear without further action. In contrast, on Mac, you can click each clip junction and press Command+T to insert transitions one by one more quickly than dragging.
How to edit in iMovie: refining your transitions and timeline
After adding transitions, refining them within your timeline is essential to create a smooth video flow. iMovie lets you preview transitions by clicking the transition icon between clips; a quick skim will show you how the video flows from one clip to the next. If a transition feels rushed or too slow, adjust the length of the adjacent clips to give the transition enough room to play naturally without abrupt cuts.
To fix awkward transition points, use the split and trim tools. For example, if a transition interrupts important action, split the clip near that moment, then trim the ends to reposition the transition at a less distracting spot. This hands-on tweaking ensures your video maintains continuity.
Combine transitions with other effects like titles or audio fades to enhance storytelling. For instance, fading audio gently while a dissolve transition plays between scenes can create a more polished and immersive experience. However, avoid overusing transitions; too many can disrupt pacing and feel distracting.
- Select a transition icon in the timeline and press the spacebar to preview; you should see the transition effect play between clips.
- Click a clip near the transition and drag its edge to lengthen or shorten it; the transition duration will adjust accordingly.
- Use the split tool (Modify > Split Clip) near a transition point to create finer control; trim the newly split clips to reposition the transition smoothly.
- Add a title or audio fade from the respective browser and place it near your transition; play the sequence to confirm the combined effect looks and sounds cohesive.
- Watch the entire edited segment and remove or replace transitions that feel excessive or disrupt video pacing for a natural flow.
How to use iMovie shortcuts for transitions on Mac
Using keyboard shortcuts in iMovie on Mac can significantly speed up adding and managing transitions, especially in large projects. Instead of dragging and dropping transitions manually, shortcuts let you insert default transitions quickly, reducing editing time. This section lists essential shortcuts, explains customization options, and highlights their advantages and limitations.
| Action | Shortcut |
|---|---|
| Insert default transition between clips | Command + T |
| Open Transitions browser | Shift + Command + 5 |
| Play/Pause preview | Spacebar |
| Undo last action | Command + Z |
To insert the default transition quickly, select the edit point between two clips in your timeline, then press Command + T. You will see the standard cross dissolve transition appear immediately. This method is much faster than dragging the transition from the browser, which can take several seconds per clip. For example, adding transitions manually to 10 clips may take a few minutes, while using shortcuts can reduce it to under a minute.
- Click the timeline to position the playhead between two clips where you want a transition.
You should see the edit point highlighted. - Press Command + T.
The default transition appears between the clips. - Press Spacebar to preview the transition.
The video plays the transition effect. - Press Command + Z to undo if needed.
The transition is removed.
While iMovie for Mac does not provide extensive built-in options to customize these shortcuts, you can modify some system-wide shortcuts via macOS Keyboard settings under System Preferences > Keyboard > Shortcuts > App Shortcuts. However, changing iMovie-specific shortcuts may be limited.
Note that keyboard shortcuts for transitions are not available on iPhone and iPad versions of iMovie. These mobile apps rely on touch controls, so shortcuts cannot speed up transition editing there, making Mac the preferred platform for rapid transition workflow.
How to find free video clips for iMovie transitions and enhance your projects
Using free video clips can add creative flair to your iMovie transitions, making your videos more dynamic and professional. Several reputable websites offer free stock videos that are compatible with iMovie's supported formats, such as MP4 and MOV. Popular sources include Pixabay Videos, Pexels Videos, and Videvo. These platforms provide clips under licenses that allow free personal and commercial use without attribution, but always double-check each clip's license terms before use.
- Download a free video clip from one of the recommended sites in a format supported by iMovie.
After downloading, the clip should appear in your device’s Downloads folder or chosen location. - Open your iMovie project and click the Import Media button.
You should see a file browser window to select your downloaded clip. - Select the downloaded clip and click Import Selected.
The clip will be added to your iMovie media library. - Drag the imported clip onto your timeline to use it as a visual filler between two clips or as an overlay to enhance your transition effect.
The clip will appear in the timeline where you placed it, ready for editing. - Adjust the duration and position of the clip to seamlessly blend with your transition, ensuring smooth flow.
For example, inserting a short free clip of a light flare or bokeh effect between scenes can create a stylish transition. Remember to keep these clips subtle to avoid distraction. Using free video clips thoughtfully can expand your transition options and enrich your storytelling without extra cost or complexity.
Troubleshooting common issues when adding transitions in iMovie
Sometimes, transitions might not appear or be greyed out between clips. This usually happens when your clips are not adjacent on the timeline. To fix this, make sure your clips are placed directly next to each other without gaps. Transitions won’t apply if there’s empty space or overlapping clips.
On iPhone and iPad, you might find that adjusting the transition duration isn’t possible. This limitation is normal since iMovie on these devices offers only preset transition lengths. If you need more control, consider editing on Mac or using Magic Movie for automated transitions.
Video playback glitches after adding transitions can be caused by too many effects or long clips in your project. Try trimming clips or reducing the number of transitions to improve performance. If iMovie crashes or slows down, especially when many transitions are added, closing background apps and restarting your device can help stabilize the app.
Below is a step-by-step approach to resolving common transition issues:
- Check the timeline to ensure clips are adjacent. When fixed, the transition icon should become active.
- Restart iMovie and your device if playback glitches or crashes occur; the app should run smoother afterward.
- Trim long clips or remove unnecessary transitions; video playback should be more stable.
- On iPhone or iPad, accept the fixed transition durations or switch to Mac for finer adjustments; you’ll see the duration controls enabled on Mac.
Common error messages like “Cannot add transition here” indicate non-adjacent clips, while “Project is too large to process” suggests performance limits. Following these steps helps you manage transitions effectively and avoid typical pitfalls.
Frequently asked questions
How to add transitions in html?
Adding transitions in HTML involves using CSS to smoothly animate changes in element properties like color, size, or position. You define the transition with the transition property in your CSS, specifying which properties to animate, duration, timing function, and delay. For example, use transition: all 0.3s ease; on a button to animate changes when hovered. HTML itself does not support transitions directly; it relies on CSS for visual effects.
How to add transitions on imovie on iphone?
To add transitions on iMovie for iPhone, open your project and tap the timeline where two clips meet. You will see a small square icon representing the transition. Tap that icon to open transition options, then select the style you want, such as Cross Dissolve or Slide. Adjust the duration if needed, then tap outside to confirm.
How to add transitions in iMovie on iPhone?
In iMovie on iPhone, transitions are added by tapping the gap between two clips in the timeline. A transition menu appears where you can choose from several styles. After selecting your preferred transition, you can tap the duration icon to change how long it lasts. This method lets you customize transitions between clips easily.
How to add transitions in iMovie on Mac?
On iMovie for Mac, open your project and look between two clips on the timeline. Click the small transition icon that appears there or drag a transition from the Transitions browser onto the timeline between clips. You can adjust the transition duration by double-clicking the transition icon and entering a new time in seconds, which helps tailor the pacing of your edits.
How to add transitions in iMovie on iPad?
To add transitions in iMovie on iPad, tap the timeline between clips to reveal the transition icon. Tap this icon to open the transitions menu, then select the transition style you want. You can adjust the duration by tapping the transition icon again and choosing a different length, allowing precise control over how your video flows.
What This Guide Does Not Cover
This guide does not cover advanced video transition effects available in professional editing software beyond iMovie’s built-in options. If you need complex transitions like 3D effects, custom animations, or third-party plugins, consider dedicated video editors such as Final Cut Pro or Adobe Premiere Pro. Batch adding transitions is limited in iMovie and requires manual application clip by clip or using Magic Movie mode, which automatically applies transitions but may not fit all editing styles or give you full control. Additionally, some transition features differ between Mac and iOS versions of iMovie, which might affect your workflow depending on your device.
For your next step, focus on experimenting with the transition options available in your version of iMovie. Try adding and adjusting a few different transitions between clips to see how they affect the flow of your video. This hands-on approach will build your confidence in managing transitions and help you create polished, professional-looking videos tailored to your unique style and project needs.
See also: How to Split a Clip in iMovie: Step-by-Step Editing Guide · How to Detach Audio from Video in iMovie: Step-by-Step Guide · How to Add Background Music in iMovie: A Step-by-Step Guide · How to Export Your iMovie Project in 4K: A Step-by-Step Guide



