
How to Block Websites Using Screen Time on Mac: A Clear Step-by-Step Guide
Discover clear steps to block websites using Screen Time on Mac for better focus and parental controls.
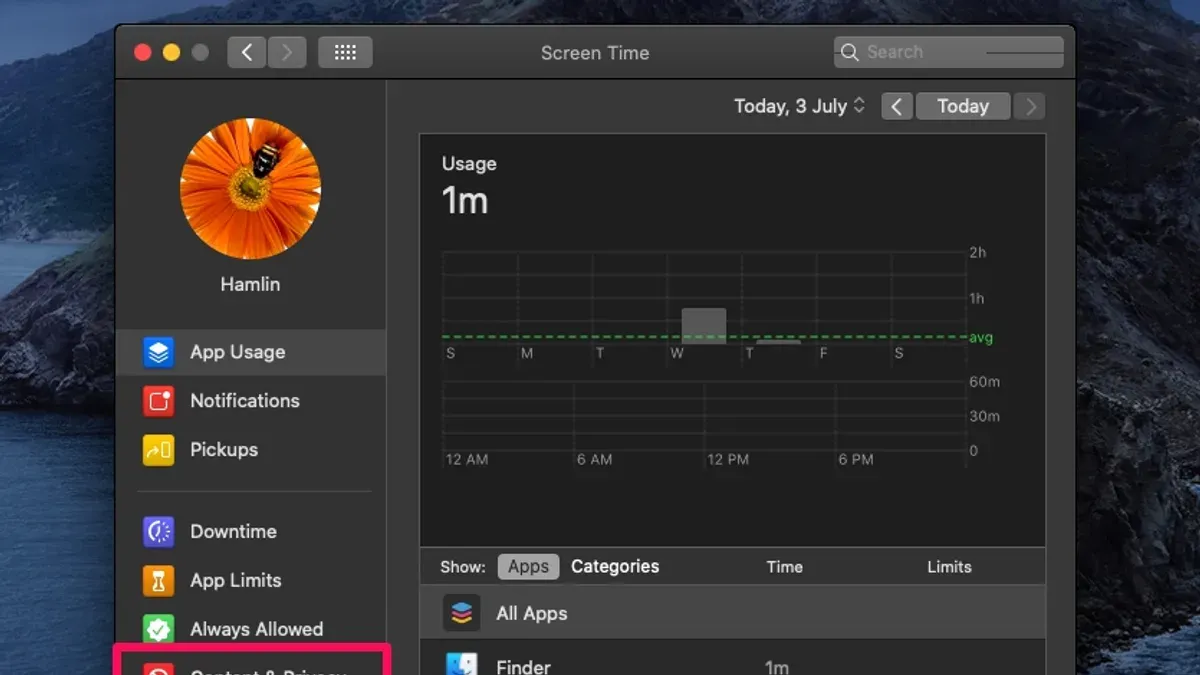
You might find yourself wanting to limit access to distracting or inappropriate websites on your Mac, whether for work focus or to protect younger users. The built-in Screen Time feature on macOS offers a straightforward way to block websites, but it can be tricky to set up correctly across different browsers and user accounts.
This article explains how to block websites in Screen Time on Mac with clear, step-by-step instructions. You'll also learn about specific considerations for MacBook Pro users, syncing restrictions with iPhone, alternative methods for browsers like Chrome, and how to troubleshoot common issues. By the end, you’ll have practical control over which sites can be accessed on your Mac.
Key takeaways
- Screen Time allows you to block websites by adding them under Content & Privacy Restrictions in System Settings.
- Blocking works differently on Safari versus third-party browsers like Chrome, requiring additional steps or tools.
- Syncing Screen Time settings across Apple devices ensures consistent website restrictions.
- You can remove or adjust blocked websites anytime through Screen Time’s Web Content settings.
- Alternative blocking methods include using router-level controls or browser extensions when Screen Time is insufficient.
Before you start: What you need to know and prepare
Screen Time is a built-in feature integrated into macOS that helps you monitor and control device usage, including blocking websites. To adjust Screen Time settings on your Mac, you must be signed in with an administrator account, as standard user accounts cannot make these changes. Before you begin, ensure your macOS is updated to the latest version available to benefit from the newest Screen Time features and security improvements. Most Mac users run versions that support Screen Time well, but older macOS versions may lack some controls or have bugs.
Screen Time blocks websites primarily on Apple’s native browsers, like Safari. If you use other browsers such as Chrome or Firefox, the blocking may not apply unless you use additional methods or workarounds. This is an important limitation to keep in mind when planning your restrictions.
Before setting up website blocks, decide which websites you want to restrict and whether you prefer full blocking or time limits. For example, you might want to completely block social media sites or set daily time limits on entertainment. Having a clear list and understanding your goal will streamline the setup process.
Here is a simple checklist to prepare:
- Confirm you are logged into an administrator account — you will see “Admin” under your user name in System Preferences > Users & Groups.
- Update macOS via System Preferences > Software Update — the latest version ensures full Screen Time capabilities.
- Make a list of websites to block and decide on blocking type (full block or time limits).
- Know which browsers you use most, as Screen Time works best with Safari.
How to block websites on Mac using Screen Time
- Open System Settings from the Apple menu. You should see a sidebar with various options; locate and click Screen Time. The main pane will show Screen Time settings.
- If Screen Time is off, click Turn On to enable it. Then, click Options at the bottom left and select Use Screen Time Passcode. Set a passcode to prevent others from easily changing your restrictions. You will be prompted to enter it twice.
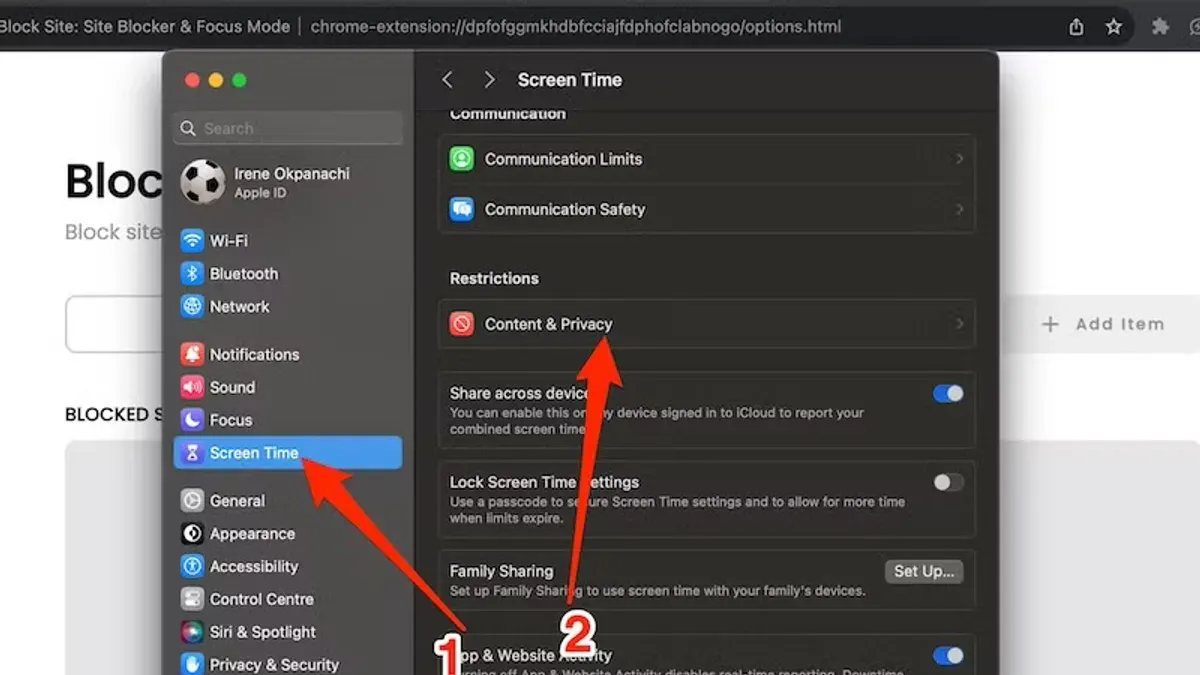
- Back in the Screen Time pane, click Content & Privacy in the sidebar. Toggle on Content & Privacy Restrictions at the top of the main pane. This enables control over web content and other settings.
- Click Content Restrictions just below. Scroll down to the Web Content section where you will find three options: Unrestricted Access, Limit Adult Websites, and Allowed Websites Only.
- Choose Limit Adult Websites to automatically block many adult and inappropriate sites. Below, use the Never Allow section to add specific URLs you want to block, such as www.youtube.com or www.facebook.com. Click the + button to add each site.
- If you prefer stricter control, select Allowed Websites Only. This lets you specify exactly which sites can be visited. Use the Allowed Websites list to add trusted sites by clicking the + button. Any site not on this list will be blocked.
- After adding sites, close System Settings. Open Safari and try visiting a blocked website like YouTube or Facebook. You should see a message stating the page is restricted by Screen Time.
- If you want to test or adjust the blocking, return to Screen Time settings and update the lists as needed. Changes apply immediately without restarting your Mac.
This process allows you to effectively block distracting or harmful websites using built-in Mac tools without third-party software.
How to block websites on MacBook Pro specifically with Screen Time
The Screen Time feature on MacBook Pro operates the same way as on other Mac devices running macOS Catalina or later. You can access Screen Time via System Preferences and configure website restrictions identically, with no MacBook Pro-specific menus or settings needed. This uniformity means the steps you follow on any Mac apply fully to your MacBook Pro.
One consideration for MacBook Pro users is battery life and performance. While enabling Screen Time and website restrictions generally has a minimal impact, continuous monitoring can slightly increase background activity. On MacBook Pro models with advanced processors and efficient battery management, this effect is usually negligible but worth noting if you rely heavily on battery endurance during travel.
Screen Time settings sync across your Apple devices signed in with the same Apple ID. This includes iPhones and iPads, allowing you to maintain consistent website blocking rules across your ecosystem. Your MacBook Pro’s Touch Bar does not influence Screen Time controls, so no additional setup is required for it.
| macOS Version | Supported Mac Models | Screen Time Compatibility |
|---|---|---|
| Catalina and later | MacBook Pro (2012 and newer) | Full Screen Time features including website blocking |
| Mojave and earlier | MacBook Pro (varies) | Screen Time unavailable or limited |
Performance benchmarks indicate that Screen Time’s background processes use minimal CPU and memory on recent MacBook Pro models. This means you can block websites without worrying about noticeable slowdowns.
- Open System Preferences and select Screen Time. The Screen Time dashboard appears.
- Click Content & Privacy in the sidebar, then select the Content tab.
- Enable Content & Privacy Restrictions if not already active.
- Click Web Content and choose Limit Adult Websites or Allowed Websites Only, then add specific websites to block or allow.
- Close System Preferences. Your website restrictions are now active on your MacBook Pro and will sync to other devices using your Apple ID.
How to block screen time on iPhone and syncing restrictions across devices
Screen Time is designed to work seamlessly across your Apple devices that share the same Apple ID, including Mac, iPhone, and iPad. This means when you block websites on your Mac, those restrictions can sync and apply to your iPhone as well. However, syncing depends on having Screen Time enabled on all devices with the same Apple ID and iCloud syncing turned on specifically for Screen Time.
Here’s how to verify that content restrictions from your Mac are syncing to your iPhone:
- Open Settings on your iPhone.
- Tap Screen Time.
- Scroll down and select Use Screen Time Passcode if not already set, to match your Mac’s setup.
- Tap Content & Privacy Restrictions and ensure it is enabled.
- Check Content Restrictions > Web Content and confirm the blocked websites list matches what you set on your Mac.
To block websites directly on your iPhone using Screen Time, follow these steps:
- Go to Settings > Screen Time.
- Tap Content & Privacy Restrictions and enable it.
- Select Content Restrictions > Web Content.
- Choose Limit Adult Websites or Allowed Websites Only, then add websites to block or allow.
Sometimes syncing may fail due to iCloud account issues, Screen Time settings not activated on all devices, or network problems. If your blocked sites don’t appear on your iPhone, try signing out and back into iCloud, ensure all devices are updated, and verify Screen Time is enabled on each device. According to Apple’s official notes, Screen Time data syncs via iCloud, so consistent network connectivity is crucial.
For example, if you add a site to the blocked list on your Mac and don’t see it on your iPhone, double-check the Apple ID on both devices and that Screen Time syncing is active. When syncing works, changes on one device reflect within minutes on others, giving you unified control of website access across your Apple ecosystem.
How to block a website in Chrome on Mac using Screen Time or alternatives
Screen Time primarily restricts Safari because it integrates directly with macOS’s system settings. Blocking websites in Google Chrome requires indirect methods or third-party solutions, as Screen Time’s web content restrictions do not directly filter Chrome traffic. You can attempt to block sites in Chrome using Screen Time’s network content filtering, but it may not be fully effective across all browsers.
For more consistent results, Chrome extensions designed to block websites offer flexible options. Popular extensions like "BlockSite" or "StayFocusd" allow you to specify websites to block and schedule restrictions. They provide immediate feedback in Chrome, but they rely on browser settings and can be bypassed if the extension is disabled or removed.
- Open Google Chrome on your Mac and go to the Chrome Web Store.
- Search for "BlockSite" or "StayFocusd" in the search bar and select the extension you prefer.
- Click "Add to Chrome" and then confirm by clicking "Add extension." You should see the extension icon appear near the address bar.
- Click the extension icon and open its settings or options page.
- Add the websites you want to block by entering their URLs. Save or apply the changes.
- Test by trying to visit a blocked website; the extension should display a blocking message or prevent loading.
Below is a comparison of Screen Time’s network content restrictions and popular Chrome extensions for blocking websites:
| Method | Effectiveness | Browser Coverage | Ease of Setup | Bypass Difficulty |
|---|---|---|---|---|
| Screen Time Network Content Restrictions | Moderate (works best with Safari) | Mostly Safari; limited on Chrome and others | Medium (requires macOS settings navigation) | Medium (can be bypassed by using other browsers or VPNs) |
| Chrome Extensions (e.g., BlockSite, StayFocusd) | High within Chrome | Only Chrome | Easy (install via Chrome Web Store) | Low to Medium (disabled or removed extensions bypass restrictions) |
For comprehensive website blocking on Mac, consider managing restrictions across all browsers you or your family members use. Combining Screen Time for system-level control with browser extensions in Chrome can increase effectiveness but requires monitoring extension use and settings.
How to remove websites from Screen Time on Mac
If you need to reverse or adjust website blocks set in Screen Time, you can easily manage the list of restricted sites. This allows you to unblock specific websites or modify your restrictions when your blocking needs change. Follow the steps below to navigate Screen Time’s Web Content settings and remove unwanted blocked sites.
- Open System Settings from the Apple menu and click Screen Time. You should see the Screen Time overview panel.
- Click Content & Privacy on the sidebar, then select Web Content. This opens the website restrictions menu where you can manage blocked or allowed sites.
- Under the section Never Allow, locate the website you want to unblock. Select the website entry and click the Remove (–) button below the list. This deletes the block for that specific site.
- To verify that the site is unblocked, open your preferred browser (Safari, Chrome, etc.) and try visiting the website. It should now load without restriction.
- If you want to completely disable Screen Time and remove all restrictions, return to the main Screen Time panel and click Turn Off in the upper right corner. This stops all content restrictions and tracking.
- Remember to manage your Screen Time passcode carefully to avoid accidental changes by yourself or others. You can change or remove the passcode under the Options section in Screen Time.
By following these steps, you can confidently modify your website blocks or disable Screen Time restrictions when needed, ensuring your Mac browsing experience matches your current preferences.
How to block websites on Mac without using Screen Time
If you want to avoid Screen Time or need more flexible controls, there are several alternative methods to block websites on your Mac. These options vary in complexity and scope, so understanding their pros and cons will help you choose the best fit.
Modifying the Hosts File to Block Websites System-Wide
The hosts file on your Mac can redirect or block websites by mapping domain names to a local IP address such as 127.0.0.1. This method blocks websites across all browsers but requires some technical steps.
- Open the Terminal app from Applications > Utilities.
- Type
sudo nano /etc/hostsand press Enter. You will be prompted to enter your administrator password. - In the hosts file editor, add a new line like
127.0.0.1 www.facebook.comto block Facebook. - Repeat for other sites you want to block by adding lines with
127.0.0.1followed by the website URL. - Press Control + O to save, then Control + X to exit.
- Flush the DNS cache by typing
sudo dscacheutil -flushcache; sudo killall -HUP mDNSResponderin Terminal and pressing Enter. - Try accessing the blocked site in any browser; it should no longer load.
Note: This method blocks sites system-wide but needs manual editing for each site and technical comfort with Terminal commands.
Using Third-Party Parental Control Apps
Apps like Qustodio, Net Nanny, and Norton Family offer user-friendly interfaces for blocking websites, scheduling access, and monitoring usage. They often include additional features like time limits and activity reports.
These apps provide more granular control than Screen Time in some cases and usually support multiple browsers. They require installation and may involve subscription fees.
Router-Level Website Blocking
Blocking websites directly on your home router can enforce restrictions on all devices connected to your network, including Macs. Most modern routers have parental control settings accessible via their admin panel, where you can blacklist sites by URL or keyword.
This method protects every device on your network but depends on your router’s capabilities and requires access to its configuration interface. It also won’t work when devices use mobile data or other networks.
Comparing Alternatives to Screen Time
- Hosts file editing is free and system-wide but technical and static.
- Third-party apps offer ease of use and advanced features but may cost money and require installation.
- Router blocking covers all devices on your network but depends on router features and only works at home.
Each alternative has trade-offs in ease, scope, and flexibility compared to Screen Time. Choose based on your technical comfort and control needs.
Troubleshooting common issues when blocking websites on Mac with Screen Time
If you find blocked websites still accessible in browsers like Chrome, remember Screen Time primarily restricts Safari. To enhance blocking in Chrome, use dedicated extensions or alternative methods. If Screen Time passcode is forgotten or not accepted, you can reset it via System Settings > Screen Time > Change Screen Time Passcode > Forgot Passcode?, following the prompts to reset using your Apple ID credentials. For syncing issues across devices, ensure all devices use the same Apple ID and have Screen Time enabled with "Share Across Devices" active in System Settings > Screen Time.
Users may bypass restrictions by using private browsing modes or VPNs, which Screen Time cannot fully control. To minimize this, educate users about these workarounds and consider router-level restrictions for network-wide control. In Macs with multiple user accounts, Screen Time settings apply individually per account, so blocking must be set up on each user profile separately.
Step-by-step fixes for common problems
- Check browser compatibility: Open the blocked website in Safari and Chrome. If blocked in Safari but not Chrome, install a Chrome blocking extension.
Success: Website is blocked in both browsers. - Reset Screen Time passcode: Go to System Settings > Screen Time, click Change Screen Time Passcode > Forgot Passcode?, then reset it using your Apple ID.
Success: You can now change restrictions. - Enable syncing: On all devices, go to System Settings > Screen Time and enable "Share Across Devices."
Success: Restrictions update across your devices. - Address VPN/private browsing bypass: Disable VPN apps when blocking is needed or configure router-level blocks.
Success: Websites remain blocked despite VPN or private browsing. - Configure Screen Time on each user account: Log into each user profile and set up Screen Time blocking individually.
Success: Restrictions apply per user as intended.
For further assistance, consult Apple's official support pages on Screen Time at https://support.apple.com/en-us/HT208982.
Frequently asked questions
How to block a website chrome mac?
To block a website in Chrome on your Mac, Screen Time can be used to restrict access across all browsers, including Chrome. Alternatively, you can install Chrome-specific extensions like "BlockSite" or "StayFocusd" that let you add websites to a block list directly within Chrome. Keep in mind that extensions only work when Chrome is in use and can be disabled, so Screen Time offers a more system-wide and robust solution.
How to block websites on screen time apple?
On Apple devices, you block websites via Screen Time by opening System Preferences, selecting Screen Time, then choosing Content & Privacy Restrictions. Enable restrictions and go to the Content tab, where you can add specific websites to the "Never Allow" list. This method works across Safari and most other browsers on your Mac, providing centralized control.
How to block websites on screen time?
Start by opening Screen Time settings on your Mac. Navigate to Content & Privacy Restrictions, then to the Content section. From there, select "Limit Adult Websites" or add particular URLs under "Never Allow" to block them. Remember that these settings apply to all browsers and users on the Mac account where Screen Time is enabled.
How to block websites on safari without screen time?
Without using Screen Time, you can block websites in Safari by modifying the Mac’s Hosts file to redirect specific URLs to localhost. This requires using Terminal and administrator access, so it’s more technical. Alternatively, third-party apps like Cold Turkey or Focus offer website blocking specifically for Safari and other browsers without relying on Screen Time.
how to block websites on macbook pro
Blocking websites on a MacBook Pro is the same as on other Macs—use Screen Time's Content & Privacy Restrictions to block sites system-wide. Open System Preferences > Screen Time, enable Content & Privacy Restrictions, and add websites to the "Never Allow" list. You can also use browser-specific extensions or edit the Hosts file for additional control, but Screen Time provides the most straightforward and integrated approach.
Understanding the Limits of Website Blocking on Mac
Screen Time restrictions primarily affect Safari and other Apple ecosystem apps, so if you use different browsers like Chrome or Firefox, you’ll need to explore alternative methods or third-party apps to block websites effectively. Keep in mind that none of these approaches guarantee foolproof blocking, especially for advanced users who can bypass restrictions using VPNs, proxy servers, or other tools. Additionally, modifying system files such as /etc/hosts to block websites requires familiarity with command-line tools and administrator privileges, and incorrect changes may impact system stability or cause other issues.
For those looking for comprehensive and robust website blocking, solutions that combine device-level and network-level controls, such as router-based filtering or specialized parental control software, might be more suitable. These options often provide broader coverage across all browsers and devices connected to the network.
To get started with practical control over distracting or inappropriate websites on your Mac, focus first on setting up Screen Time correctly and adding the websites you want to block in the Content & Privacy Restrictions > Web Content > Limit Adult Websites > Never Allow list. This step is usually overlooked but crucial for effective blocking within Safari and supported apps.
See also: How to Set App Limits in Screen Time on Mac: A Step-by-Step Guide · How to Sort by Due Date in Reminders on Mac: A Clear Step-by-Step Guide



