How to Clear Media Cache in Premiere Pro on Mac: Step-by-Step Guide
This guide shows you how to clear media cache in Premiere Pro on Mac to improve performance and free up disk space safely and efficiently.
You’ve noticed Adobe Premiere Pro running slower or your Mac’s storage filling up unexpectedly. These issues often stem from accumulated media cache files, which Premiere Pro creates to speed up editing but can grow large over time.
This guide explains how to clear media cache in Premiere Pro on Mac, detailing the step-by-step process to remove these files safely. You’ll also learn why clearing the cache matters, how to manage cache settings efficiently, and what problems clearing cache can actually solve.
Key takeaways
- Media cache files speed up playback and rendering but can consume significant disk space.
- Clear cache via Premiere Pro’s Preferences under Media Cache for a safe, automated method.
- Manual deletion requires locating cache folders, typically in ~/Library/Application Support/Adobe/Common.
- Regular cache management helps maintain Premiere Pro’s performance and prevents storage issues.
- Clearing cache fixes playback glitches and slowdowns but won’t resolve corrupted project files.
Before you start: What you need to know about media cache
Media cache in Adobe Premiere Pro is a collection of files that includes conformed audio and peak files created to enhance playback and editing speed. These files allow Premiere Pro to access audio waveforms and other data quickly without reconforming or recalculating each time you open a project.
On a Mac, the media cache folder is stored by default in your user Library under ~/Library/Application Support/Adobe/Common/Media Cache Files. Depending on your editing habits and project size, this folder can grow to several gigabytes after moderate usage.
Before clearing the media cache, make sure you save all your projects and close Premiere Pro to prevent file corruption or unexpected behavior. This precaution ensures Premiere Pro can safely delete or rebuild cache files when restarted.
If you have previously changed the cache location in Preferences under Media Cache, check this path first, as clearing cache in the wrong folder will not affect the files Premiere Pro uses.
How to clear media cache Premiere Pro Macbook
- Open Adobe Premiere Pro on your MacBook. Once the app is fully loaded, click Premiere Pro in the top menu bar.
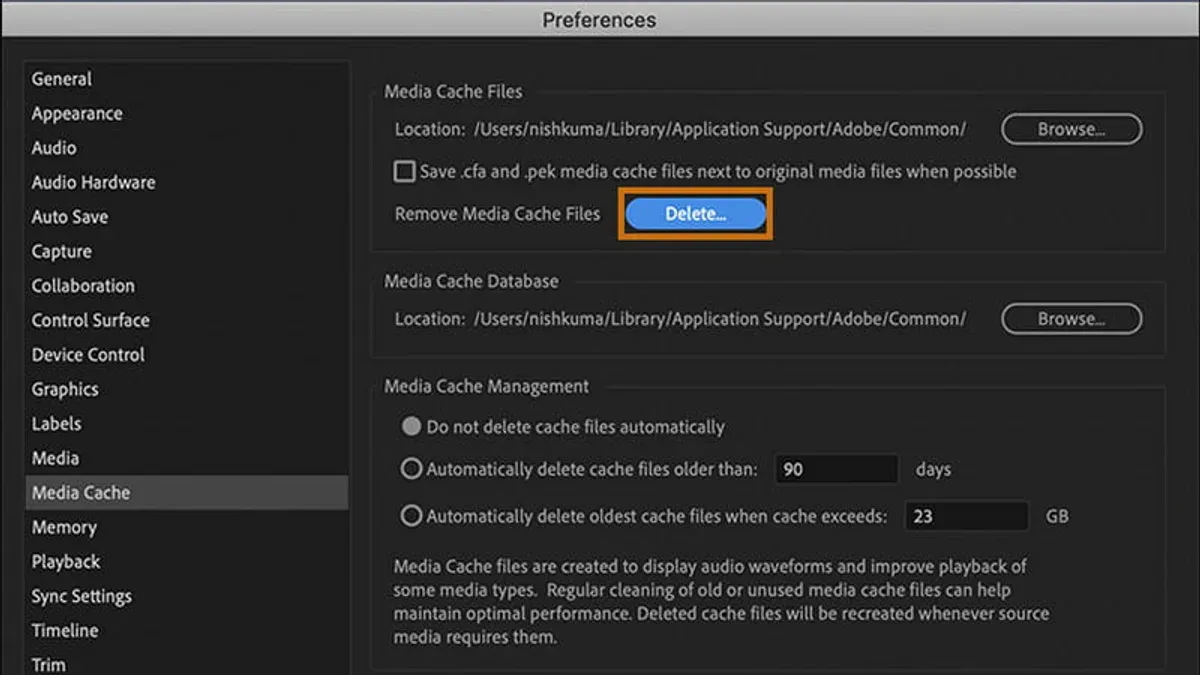
- From the dropdown, select Preferences and then click Media Cache. This opens the Media Cache settings window where you manage cache files.
- In the Media Cache preferences, you will see two options: Delete Unused Media Cache Files and Delete (which clears all cache files). Choose Delete Unused Media Cache Files to remove only files not currently linked to any project, or Delete to clear all cache files.
- Click the appropriate button for your choice. A confirmation dialog will appear—confirm your decision to proceed with the deletion.
- After confirmation, Premiere Pro will clear the selected cache files. You may notice the Media Cache folder size reduce significantly if you check it in Finder before and after.
- Restart Premiere Pro to apply changes fully. When the app relaunches, cache files will be rebuilt as you open and work on projects, improving performance and freeing storage space.
Clearing cache through preferences affects your current projects immediately by removing temporary files that may slow down playback or editing. However, it does not delete your original media or project files.
How to delete media cache Premiere Pro mac manually
When Premiere Pro’s built-in cache clearing doesn’t resolve issues or you want direct control, you can manually delete media cache folders on your Mac. This approach targets cache files stored outside the app, freeing space or fixing corrupted cache problems.
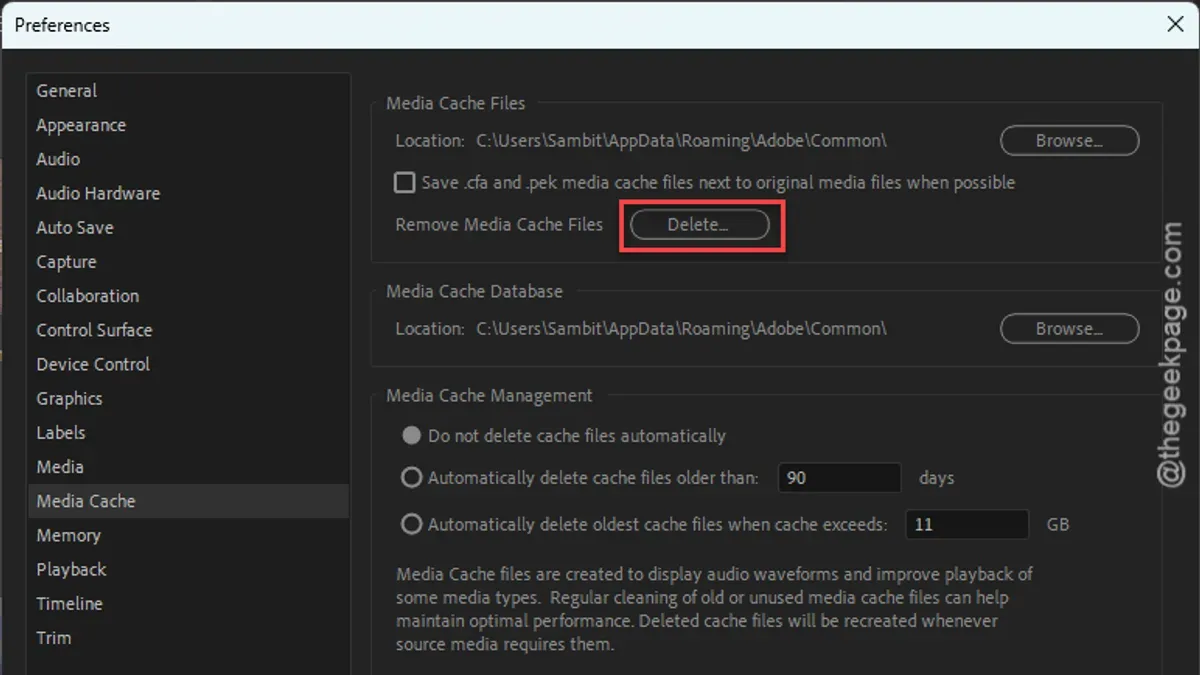
- Open Finder and navigate to the media cache folder, typically located at /Users/yourusername/Library/Application Support/Adobe/Common/Media Cache Files. You should see cache files and subfolders here.
- Before deleting, ensure Premiere Pro is closed and you have saved all projects to avoid data loss. Deleting cache files will not affect your original media or project files, only cache data.
- Select all files and folders inside the Media Cache Files directory and move them to the Trash. For example, this folder might occupy several gigabytes before deletion.
- Empty the Trash to permanently remove the cache files. After this, the folder size should reduce to nearly zero, confirming successful deletion.
- Restart Premiere Pro; the cache will rebuild as needed, often improving performance if the previous cache was corrupted.
Manual deletion is useful when corrupted cache causes crashes or when the automatic method fails. However, avoid deleting project assets or media files outside the cache folders. Only remove contents within the designated Media Cache Files directory to prevent accidental loss.
How to clear media cache Premiere Pro for ongoing workflow efficiency
Managing your media cache proactively helps maintain Premiere Pro's performance and prevents storage overload. You can set the application to automatically delete cache files older than a specified number of days, reducing manual maintenance.
- Open Premiere Pro and go to Preferences > Media Cache. You should see options for cache management.
- Locate the setting labeled Automatically Delete Cache Files Older Than and enter a number of days, such as 30. This schedules automatic clearing of older cache files, helping to save disk space regularly.
- To improve disk management, click Browse next to the Media Cache Files location and select a dedicated folder on a drive with ample space. This allows you to isolate cache files from system storage.
- Apply the changes and restart Premiere Pro. You will notice smoother operation as the cache is managed without manual intervention.
- Balance the cache clearing frequency with your editing needs: shorter intervals free space faster but may require more frequent re-caching, potentially slowing down playback initially; longer intervals keep cache data longer, supporting faster renders but consuming more disk space.
Using these settings can prevent common playback or rendering issues caused by overloaded or corrupted cache. While clearing cache regularly saves disk space, too frequent clearing may temporarily affect editing speed as files are recreated.
How to clear Premiere Pro cache Mac when facing common issues
If you notice lag, crashes, or incorrect previews in Premiere Pro on your Mac, clearing the media cache is often a helpful first step. These symptoms typically indicate corrupted or overloaded cache files affecting performance and playback accuracy.
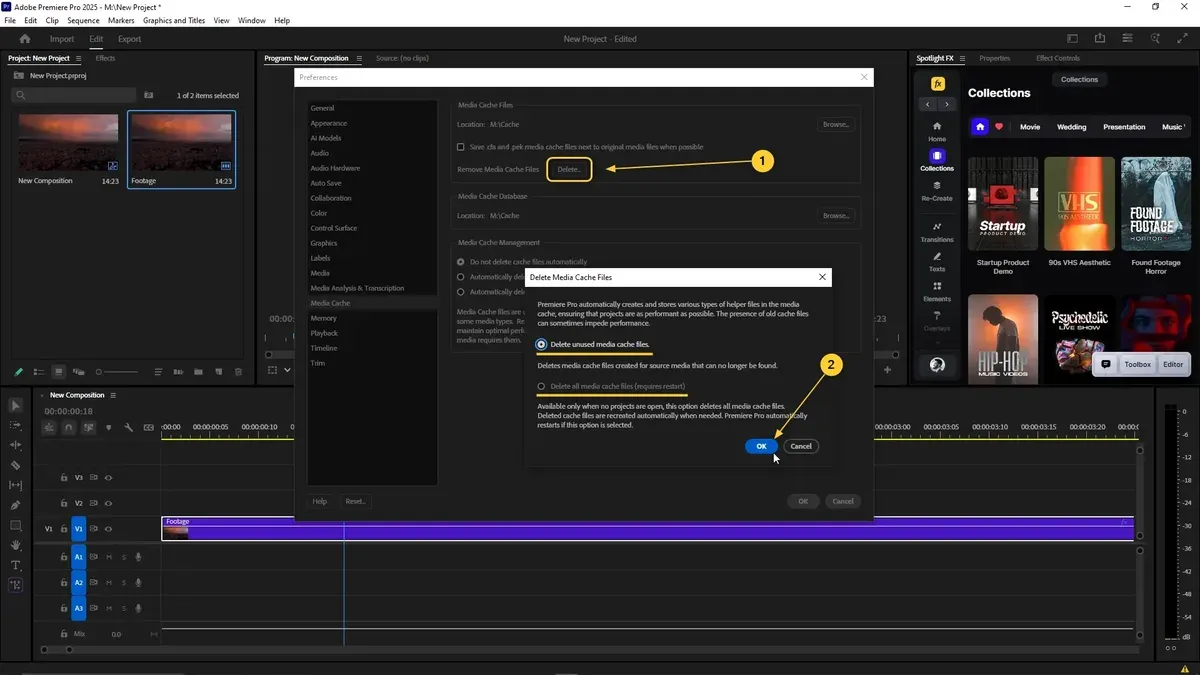
Follow these steps to clear the cache when facing issues:
- Open Premiere Pro and go to Premiere Pro > Preferences > Media Cache. Select Delete Unused cache files and confirm. You should see improved responsiveness and resolved playback errors.
- If problems persist, manually delete cache files from the Media Cache folder using Finder, then restart Premiere Pro. This often fixes deeper corruption.
- Still encountering issues? Reset preferences by holding Option while launching Premiere Pro until you see a prompt. This resets settings without affecting projects.
- If resetting does not help, consider reinstalling Premiere Pro. This addresses installation-related faults beyond cache and preferences.
Note that clearing cache does not fix issues like missing media, software bugs, or hardware failures. For example, corrupted project files or outdated GPU drivers require other solutions.
Cache clearing is effective early in troubleshooting but should be combined with resetting preferences or reinstalling if problems continue. Typical cases resolved by cache clearing include timeline lag after heavy editing and distorted previews from cache conflicts.
- How to Fix Premiere Pro Lagging Playback on Mac: Step-by-Step Guide
- How to Use Hardware Encoding in Premiere Pro on Mac
Frequently asked questions
how to clear media cache premiere pro macbook
To clear media cache on a MacBook in Premiere Pro, open the app and go to Premiere Pro > Preferences > Media Cache. Click the button labeled “Delete Unused” to remove cache files not linked to current projects or choose “Delete” to clear all cache files. Restart Premiere Pro after clearing to ensure changes take effect.
how to delete media cache premiere pro mac
You can delete media cache manually on a Mac by navigating to the cache folder location, usually found in /Users/username/Library/Application Support/Adobe/Common/Media Cache Files. Quit Premiere Pro first, then delete the contents of this folder to free up space. Be aware that clearing the cache may increase load times for existing projects initially.
how to clear media cache premiere pro
In Premiere Pro, clearing media cache is done via the Preferences menu under Media Cache. Use the “Delete Unused” option to remove cache files no longer in use or “Delete” to clear everything. This process helps resolve playback issues and reclaim disk space but does not fix corrupted project files.
how to clear premiere pro cache mac
On a Mac, access Premiere Pro’s preferences under Premiere Pro > Preferences > Media Cache. From there, you can delete cache files safely by selecting “Delete Unused” or “Delete All.” For ongoing workflow, consider setting cache locations on a high-speed external drive to optimize performance.
What clearing media cache does not solve and who should seek other solutions
Clearing media cache can free up disk space and improve performance by removing temporary files, but it does not repair corrupted project files or resolve hardware-related problems like faulty storage drives or insufficient RAM. If you encounter persistent crashes, missing media, or error messages unrelated to cache buildup, consider troubleshooting your project files or consulting Adobe support. Hardware diagnostics or system upgrades may be necessary for ongoing issues.
For the most effective next step, regularly monitor your media cache folder size via Preferences > Media Cache and set the cache to automatically delete unused files older than 30 days. This practice maintains workflow efficiency and prevents unnecessary disk space consumption without manual intervention.