How to Export Notes to PDF in the Notes App: A Step-by-Step Guide
Discover easy steps to export notes to PDF in the Notes app on iPhone, iPad, and Mac for seamless sharing and printing.
You have a collection of important notes on your iPhone, iPad, or computer, and now you want to share or print them conveniently. Converting your notes into PDF format is a straightforward way to preserve formatting and ensure compatibility across devices. If you are wondering how to export notes to PDF in Notes app, this guide will walk you through clear, step-by-step instructions tailored for Apple Notes on both iOS and macOS, as well as exporting from Microsoft Notes and OneNote.
This article covers device-specific methods to export your notes efficiently, including tips for sending PDFs directly from the Notes app. We also touch on importing PDFs into note-taking apps and troubleshooting common issues, so you can choose the best approach for your note-taking ecosystem.
Key takeaways
- Use the Share menu on iPhone and iPad to create PDFs from Apple Notes quickly.
- On Mac, export Apple Notes as PDFs via the File menu or print-to-PDF option.
- Export Microsoft Notes or OneNote pages to PDF using their built-in export or print features.
- Send PDFs directly from the Notes app using email, messaging, or AirDrop for easy sharing.
- Import PDFs into note apps to annotate or organize your documents alongside your notes.
Before you start: What you need to export notes to PDF
Before exporting your notes to PDF, ensure that the Notes app is installed and updated on your device. This includes iPhone, iPad, or Mac running the latest compatible operating system versions. Check the App Store or system updates to confirm you have the current version of the Notes app, as outdated apps may lack export features.
Next, verify that your notes are synced and accessible on the device from which you want to export. For Apple Notes, this typically means your device is signed in to iCloud with Notes syncing enabled under Settings > [your name] > iCloud > Notes. You should see your notes appear consistently across devices. For Microsoft Notes or OneNote, make sure you are signed in to the relevant Microsoft account and that the notebooks you want to export are fully downloaded and accessible.
Identify the type of notes you plan to export. Exporting Apple Notes differs from exporting Microsoft Notes or OneNote notes, so knowing which app your content is in will help you follow the correct steps. Additionally, have a PDF viewer or file manager app ready on your device to open and manage the exported PDF files.
Finally, consider how you plan to share or store the exported PDFs. Common options include email, AirDrop for Apple devices, or cloud storage services like iCloud Drive, OneDrive, or Google Drive. Knowing your sharing preferences upfront streamlines the export and distribution process.
- Open the Notes app on your device and confirm you see your notes synced and up to date across your devices.
- Check that you have the latest version of the Notes app by visiting the App Store or Mac App Store and applying any available updates.
- Confirm you can open a PDF document on your device with your preferred PDF viewer or file manager.
- Decide which note-taking app your notes are in: Apple Notes, Microsoft Notes, or OneNote, so you can follow the appropriate export instructions later.
- Review your preferred method for sharing or saving PDFs—email, AirDrop, or cloud storage—and ensure you have the necessary accounts or apps set up.
How to export Apple Notes to PDF on iPhone and iPad
To export a note as a PDF using your iPhone or iPad, start by opening the Notes app and selecting the note you want to convert. Once inside the note, tap the Share button, which looks like a square with an arrow pointing upward. From the share options, choose Print to access the printing interface.
In the Print Preview screen, perform a pinch-out gesture on the preview image, as if zooming in with two fingers. This action converts the note into a PDF document. You should now see the note displayed as a PDF, ready for further sharing or saving.
Tap the Share icon again in this PDF view. From here, you can save the PDF to the Files app for archiving, or send it directly via email, messaging apps, or other supported services. This process preserves the formatting and content of your note in a shareable PDF format.
If you want to export multiple notes at once, return to the main Notes list, tap Edit, then select multiple notes by tapping their circles. After selecting, tap the Share button to export all selected notes using the same print-to-PDF method, though this may combine them into a single PDF or send them individually depending on your chosen app.
How to export Apple Notes to PDF on Mac
- Open the Notes app from your Dock or Applications folder. Select the note you want to export; it will appear in the main window.
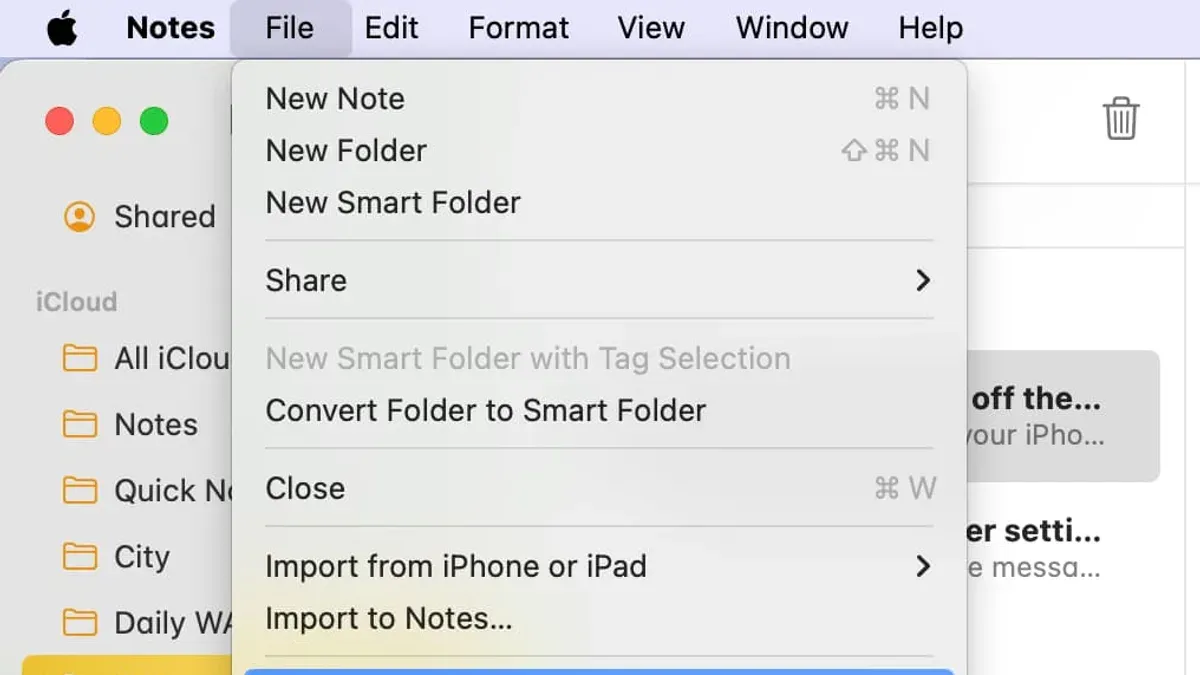
- Go to the File menu in the menu bar at the top of the screen. If you see an option labeled Export as PDF, click it. A Save dialog will appear where you can choose the destination folder and enter a filename for your PDF. Confirm by clicking Save. The note is now saved as a PDF file in your chosen location.
- If Export as PDF is not available, select Print from the File menu or press Command + P. In the Print dialog, click the PDF button in the lower-left corner and choose Save as PDF. Choose the folder and filename, then click Save.
- To export multiple notes, you can either export individual notes one by one or copy the content of several notes into a single new note and export that combined note as a PDF. Alternatively, export entire folders by selecting all notes within a folder, copying them into one note, then exporting.
- For faster access, use keyboard shortcuts: Command + P opens the Print dialog, and Command + A selects all text within a note to copy or export. You can also drag a note from the Notes list directly onto your desktop or a Finder folder; this action creates a text file which you can then convert to PDF using Preview or other apps.
How to export Microsoft Notes and OneNote notes to PDF
Microsoft offers two main note-taking apps: Sticky Notes and OneNote, which differ significantly in functionality and export options. Sticky Notes are simple digital post-it notes without built-in PDF export, whereas OneNote is a robust note organizer with better export capabilities.
To export Sticky Notes to PDF, you first need to transfer the content to an app that supports PDF export, such as Microsoft Word or OneNote. Copy the text from your Sticky Note, paste it into a Word document or a OneNote page, then export that document or page as a PDF.
Exporting OneNote pages or sections to PDF on desktop
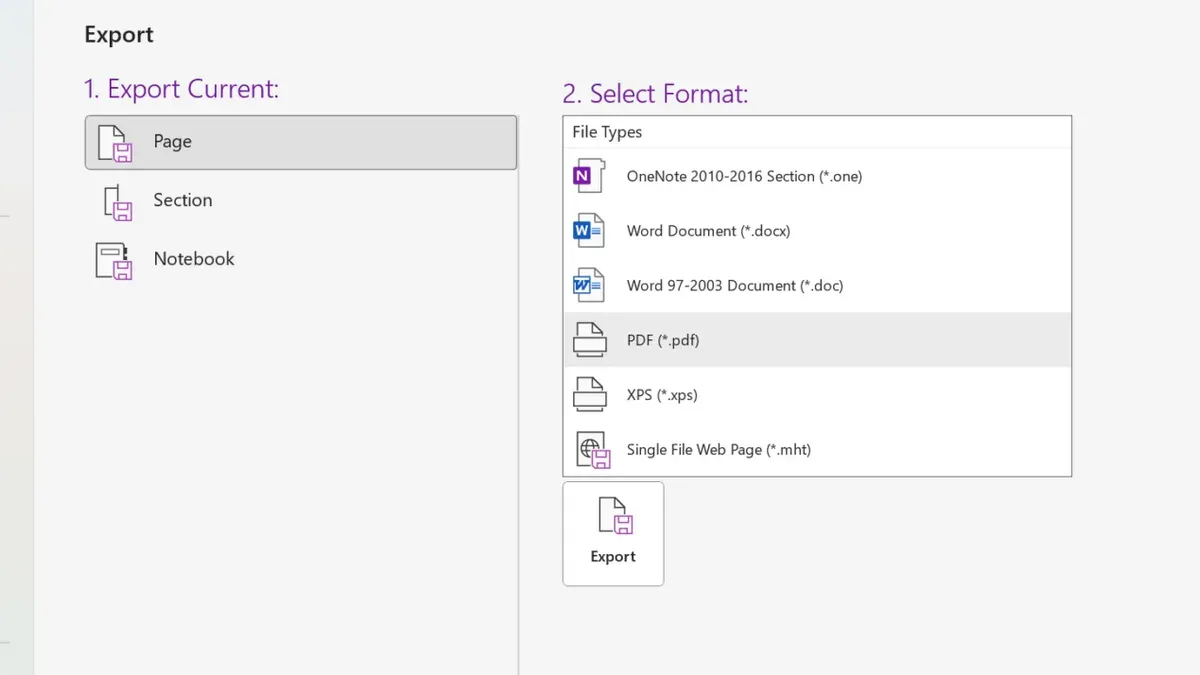
- Open your OneNote desktop app and navigate to the page or section you want to export.You should see your notes displayed clearly.
- Click on File in the menu bar, then select Export.
- Choose whether to export the Page, Section, or Notebook.This lets you select the scope of export.
- Under Select Format, pick PDF (*.pdf).PDF is now the selected export format.
- Click Export, then choose the destination folder and file name, and click Save.
- Open the saved PDF to confirm your notes exported correctly with proper formatting.
Note that the OneNote mobile apps currently do not support direct PDF export. For mobile users, exporting to PDF requires syncing notes to the desktop app or using a workaround like printing to PDF via share options.
Before exporting, organize your notes with clear headings and consistent formatting within OneNote. This improves the structure and readability of the resulting PDF, especially for longer pages or sections.
| Feature | Sticky Notes | OneNote (Desktop) | OneNote (Mobile) |
|---|---|---|---|
| Native PDF export | No | Yes | No |
| Export scope | Copy content only | Page, Section, Notebook | Not available |
| Formatting preservation | Low (copy-paste only) | High | Limited |
How to send a PDF from the Notes app
After you have exported your note as a PDF, sending it directly from the Notes app or your device is straightforward using the Share sheet. This allows you to choose from several options like email, AirDrop, messaging apps, or cloud storage services. Before sharing, ensure your PDF file is named clearly to help recipients understand its content easily.
- Open the note you exported as a PDF on your iPhone, iPad, or Mac.
- Tap or click the Share button (a square with an upward arrow) to open the Share sheet; you should see options like Mail, Messages, AirDrop, and apps for cloud storage such as Dropbox or Google Drive.
- Select your preferred method of sharing:
- Mail: Choosing Mail opens a new email with the PDF attached. Enter the recipient's email address and add a subject line that reflects the content of the note before sending.
- AirDrop: Select a nearby Apple device to send the PDF instantly. The recipient will receive a prompt to accept the file.
- Messaging apps: Apps like Messages or WhatsApp allow quick sharing of PDFs with contacts.
- Cloud storage: Upload the PDF to Dropbox, Google Drive, or similar apps for sharing links or archiving.
- After selecting your sharing option, confirm the action and wait for the file to send or upload, ensuring you see a confirmation or progress indicator.
Keep security in mind when sharing PDFs containing sensitive information. Use encrypted email services or password-protect your PDFs if possible. Avoid sending confidential notes over unsecured or public networks to protect your data.
How to export notes from iPad and iPhone Notes app efficiently
Exporting notes on your iPad or iPhone can be made faster and more organized by using device-specific features and automation. On iPad, multitasking lets you open the Notes app side-by-side with the Files app or an email client, allowing you to drag-and-drop exported PDFs directly without switching apps. This reduces steps and helps you manage files more smoothly.
While the Notes app does not natively support batch exporting multiple notes as PDFs, you can work around this by grouping notes into a folder and exporting them one by one or using third-party shortcuts. Selecting multiple notes and sharing them together usually results in an export of text or notes content, but not PDFs. To streamline exporting, consider using the Shortcuts app to create an automation that converts selected notes to PDFs and saves them to Files or uploads to cloud storage automatically.
Managing your exported PDFs is easier when you organize them within the Files app. Create folders with clear names like “Exported Notes” so you can quickly find your documents. If you encounter missing export options or incomplete PDFs, check that your Notes app is updated, your device has enough storage, and that you are not trying to export locked or corrupted notes.
- Open the Notes app and select a note to export; you should see the note content displayed.
- On iPad, swipe up from the bottom to reveal the Dock, then drag the note out to open it in Split View alongside the Files app or Mail app.
- Use the Share button in Notes, then choose “Print” and perform the pinch-out gesture on the print preview to create a PDF.
- Drag the PDF preview from Notes or the print preview directly into the Files app or an email draft; the PDF should appear in the destination app.
- To batch export, open the Shortcuts app and create or download a shortcut that converts multiple notes to PDFs and saves them; running this shortcut should generate PDFs in your chosen location.
- In the Files app, navigate to your export folder to confirm that your PDFs are stored and accessible.
How to make notes from PDF and import PDFs into note-taking apps
Many note-taking apps like Apple Notes and Microsoft OneNote support importing PDFs, allowing you to annotate and organize your study or reference materials directly within your notes. This capability turns static documents into interactive resources where you can highlight, add comments, and draw.
To import a PDF into Apple Notes and start annotating, follow these steps:
- Open the Notes app and create or select a note where you want to add the PDF. You should see the note's editing interface ready.
- Tap the camera icon above the keyboard and choose Scan Documents or Import from Files. Selecting Import from Files lets you browse and pick a PDF saved on your device or cloud storage.
- After selecting the PDF, it will embed inside the note. Tap the PDF to open it and reveal annotation tools like highlighter, pen, eraser, and text insertion.
- Use these tools to mark up the document as needed. Close the PDF view to save your annotations within the note.
Having PDFs inside your notes keeps all relevant information in one place, improving your workflow when reviewing or studying. However, Apple Notes' PDF annotation features are basic compared to dedicated PDF apps, and it does not support editing PDF text or advanced markup.
OneNote offers more advanced annotation options and better organization of PDF pages within sections but requires the desktop app for full export functionality.
To convert annotated PDFs back into shareable formats, you can export the note or page as a PDF from the note app (Apple Notes requires sharing the annotated PDF separately), ensuring your markups remain intact when sending or archiving.
Troubleshooting common problems when exporting notes to PDF
If the Print to PDF option is missing or greyed out, first check if your device’s printing services are enabled. On iOS or macOS, go to Settings > General > Print & Scan or the equivalent to confirm printer availability. If no printer is configured, the PDF creation option may not appear. Restarting your device can also refresh system services and restore this feature.
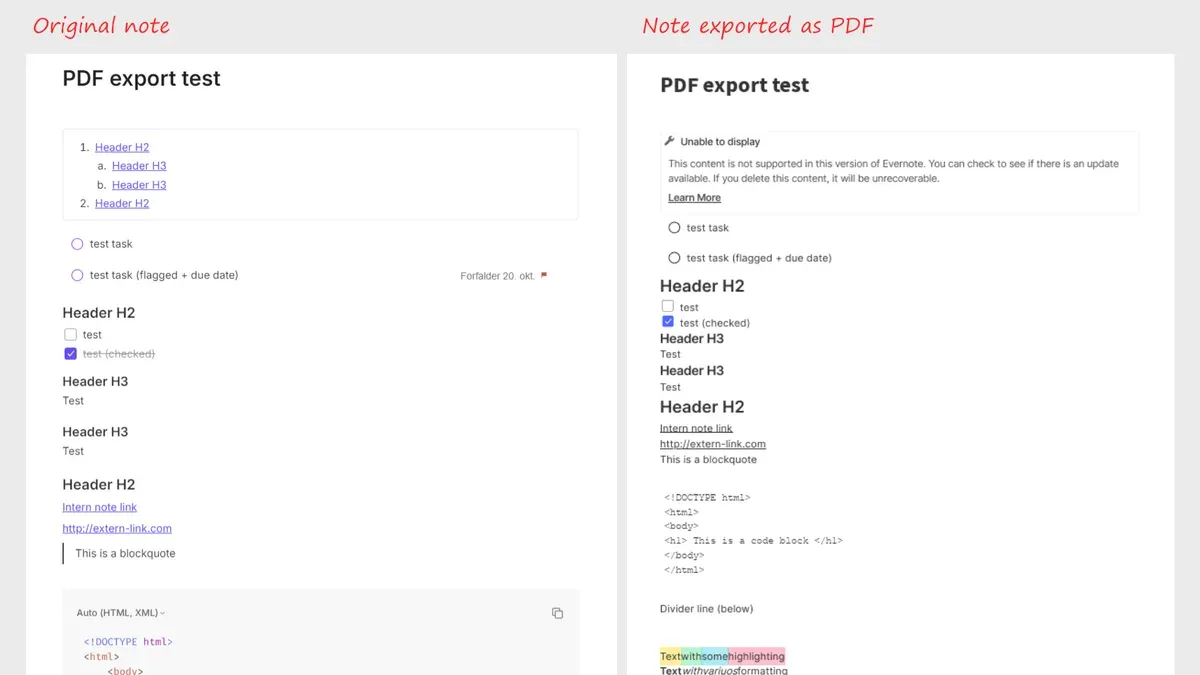
Notes containing images, rich media, or complex formatting sometimes fail to export correctly or omit content. To fix this, try copying the note’s content into a new plain-text note and then export. Alternatively, export the note in smaller parts or remove unsupported media before exporting.
Export errors can occur due to app glitches or OS bugs. Common error messages include "Export failed," "Unable to complete operation," or sudden app crashes. Resolving these often involves force-quitting the Notes app, updating it, and ensuring your operating system is current. If issues persist, reinstalling the app or rebooting the device may help.
When exporting large notes or multiple items, crashes or freezes may happen. Export notes individually or in small groups to reduce memory load. Saving notes to the Files app before exporting can improve stability.
- Check printer status and availability in Settings; the Print to PDF option should become accessible.
- Copy note content to a new note without images; export to verify if media caused the issue.
- Force-quit the Notes app and reopen it; attempt export again to see if the error clears.
- Update your Notes app and OS; successful export should follow after updates.
- Export notes one by one if bulk export fails; you should see each PDF saved without app crashes.
Frequently asked questions
How to convert notes app to pdf?
To convert notes from the Notes app to PDF, open the note you want to convert, tap the Share button, and select Print. On the Print Options screen, use the pinch-out gesture on the preview to create a PDF version. Then tap the Share button again to save or send the PDF.
How to send pdf from notes app?
After converting your note to PDF using the Print > Pinch-out method, tap the Share icon to open sharing options. From here, choose Mail, Messages, or any compatible app to send your PDF file directly from the Notes app.
How to export notes ipad?
On iPad, open the Notes app and select the note to export. Tap the Share button, then choose Print and perform a pinch-out gesture on the preview to turn it into a PDF. You can then save it to Files or share it via other apps.
How to export notes from iphone?
Exporting notes on iPhone follows a similar process: open the note, tap Share, select Print, and pinch out the preview to create a PDF. Use the Share button to save or send the PDF as needed.
How to save notes to pdf?
Saving notes to PDF involves opening the note, tapping Share, selecting Print, and then zooming in on the print preview with a pinch-out gesture. From the resulting PDF view, use the Share icon to save the file to your device or cloud storage.
Honest Limits of This Guide
This guide does not cover third-party note-taking apps beyond Microsoft Notes and OneNote. If you use other popular apps like Evernote, Notion, or Google Keep, you should consult the specific instructions provided by those developers for exporting notes to PDF. Additionally, some advanced PDF export features—such as editing PDF content, merging multiple PDFs, or adding annotations—require dedicated PDF software beyond what the Notes app offers. For these tasks, consider using apps like Adobe Acrobat, PDF Expert, or similar tools designed specifically for PDF management.
The most useful next step is to practice exporting a simple note to PDF on your preferred device following the steps outlined here. This hands-on approach will help you become comfortable with the menus and options, making it easier to share, print, or archive your notes whenever needed.
See also: How to Add and Customize Tables in the Notes App: Step-by-Step · How to Create a Checklist in the Notes App: Step-by-Step Guide · How to Share a Note to Collaborate in the Notes App · How to Lock a Note with Password in Notes App: Step-by-Step Guide