
How to Install Minecraft Java Edition on Your Mac Step-by-Step
Step-by-step guide to downloading and installing Minecraft Java Edition on your Mac, including Java setup and troubleshooting tips.
You’ve just bought a new Mac and want to dive into Minecraft Java Edition, but the installation instructions seem confusing or incomplete. Maybe you’ve tried before and ran into issues with Java compatibility or performance hiccups that left you frustrated.
This article guides you through how to install Minecraft Java on Mac, focusing on the specific Java requirements and macOS compatibility details many generic guides miss. You’ll get clear, step-by-step instructions to successfully download, install, and run Minecraft Java Edition on your Mac or MacBook, including advice on managing Java versions and troubleshooting common problems.
Key takeaways
- Download Minecraft Java Edition from the official Minecraft website to ensure authenticity and security.
- macOS requires a suitable Java Runtime Environment (JRE) version; Minecraft typically uses its bundled Java but sometimes manual installation is needed.
- Check your Mac model and macOS version for compatibility to avoid performance issues.
- Adjust security settings in System Preferences to allow Minecraft to run smoothly.
- Regularly update Minecraft and Java to maintain optimal performance and security.
Before you start: What you need to install Minecraft Java on Mac
To run Minecraft Java Edition smoothly on your Mac, your system must meet specific hardware and software requirements. Officially, Minecraft Java requires macOS 10.12 Sierra or later. Macs with at least 4GB of RAM are recommended, but 8GB or more ensures better performance, especially if you plan to run mods or resource-intensive worlds. A multi-core processor is beneficial, as Minecraft is optimized for multiple threads.
You must have a valid Minecraft account to download and play the game. Additionally, an active internet connection is necessary for downloading the launcher, game updates, and for online multiplayer access.
While Minecraft Java Edition requires Java, it includes its own bundled Java Runtime Environment (JRE). This means you generally do not need to install Java manually on your Mac. Installing a separate Java version can sometimes cause conflicts or version mismatches, so it's best to rely on the game's integrated runtime unless troubleshooting specific issues.
It’s important to distinguish Minecraft Java Edition from Minecraft Bedrock Edition on Mac. Minecraft Bedrock is not officially supported on macOS, limiting options to the Java Edition for native Mac players. Java Edition offers more extensive modding support and customization but may feel less optimized than Bedrock on other platforms.
- Check your Mac’s macOS version by clicking the Apple menu > About This Mac. You should see macOS 10.12 or newer to proceed. If your OS is older, update via System Preferences > Software Update.
- Verify your Mac’s RAM by selecting About This Mac > Memory. Aim for at least 4GB, ideally 8GB or higher for better gameplay.
- Ensure you have a stable internet connection for downloading Minecraft and updates. Open a browser to test connectivity.
- Create or log into your Mojang/Microsoft Minecraft account at minecraft.net to purchase or access Minecraft Java Edition.
- Confirm no separate Java installation is active by opening Terminal and typing java -version. The game uses its bundled Java, so manual Java setup is unnecessary unless troubleshooting.
How to download Minecraft Java Edition on your Mac
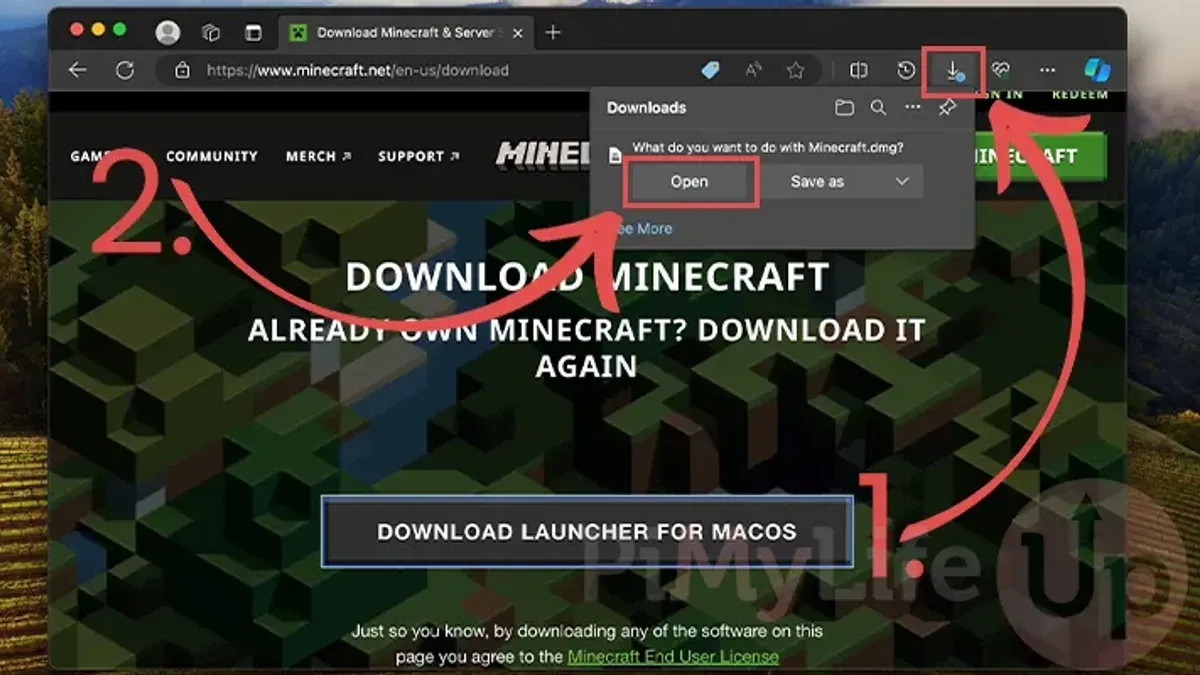
- Open your preferred web browser and go to the official Minecraft website at https://www.minecraft.net/en-us/download. You should see a page dedicated to Minecraft download options.
- Locate the section labeled "Minecraft: Java Edition" and click the download button specifically for macOS. This button is usually clearly marked with a Mac icon and the text "Download for Mac". Once clicked, your browser will begin downloading a file named something like Minecraft.dmg, typically around 140 MB in size.
- After the download completes, verify the file size matches the expected range to ensure a complete download. The file should be roughly 140 to 150 MB; significantly smaller sizes may indicate an incomplete or corrupted file.
- To confirm the installer’s authenticity, check that the download source URL begins with https://www.minecraft.net/, and ensure your browser’s security indicators show a valid SSL certificate. Avoid downloading Minecraft from third-party sites to prevent malware risks.
- Once verified, double-click the Minecraft.dmg file to open the installer package. You should see a window prompting you to drag the Minecraft icon into your Applications folder. This step prepares the game for installation.
- Drag the Minecraft icon to the Applications folder shortcut in the same window. This action copies the game to your Mac’s Applications directory, making it ready to launch.
- After copying completes, eject the installer image by clicking the eject icon next to Minecraft in the Finder sidebar or right-clicking and selecting "Eject". You now have the Minecraft launcher installed on your Mac.
How to install Minecraft Java Edition on your Mac
- Locate the downloaded Minecraft.dmg file, usually in your Downloads folder. Double-click it to open the disk image. You should see a window with the Minecraft app icon and the Applications folder shortcut.
- Drag the Minecraft icon onto the Applications folder shortcut. This copies the app to your system's main Applications directory. You can confirm success by opening the Applications folder and seeing Minecraft listed there.
- Open the Applications folder and double-click the Minecraft app to launch it. The first time you open it, macOS may show a security prompt stating the app is from an unidentified developer or asking for permission to open it.
- If a security warning appears, click Cancel. Then, go to System Preferences > Security & Privacy > General. At the bottom, you will see a message that Minecraft was blocked. Click Open Anyway.
- Return to the Minecraft app and open it again. This time, macOS will ask you to confirm. Click Open to proceed. The app should now launch without further warnings.
- When Minecraft opens, you will be prompted to log in. Use your Mojang account credentials or Microsoft account linked to your Minecraft purchase. After successful login, the launcher will update and prepare the game files.
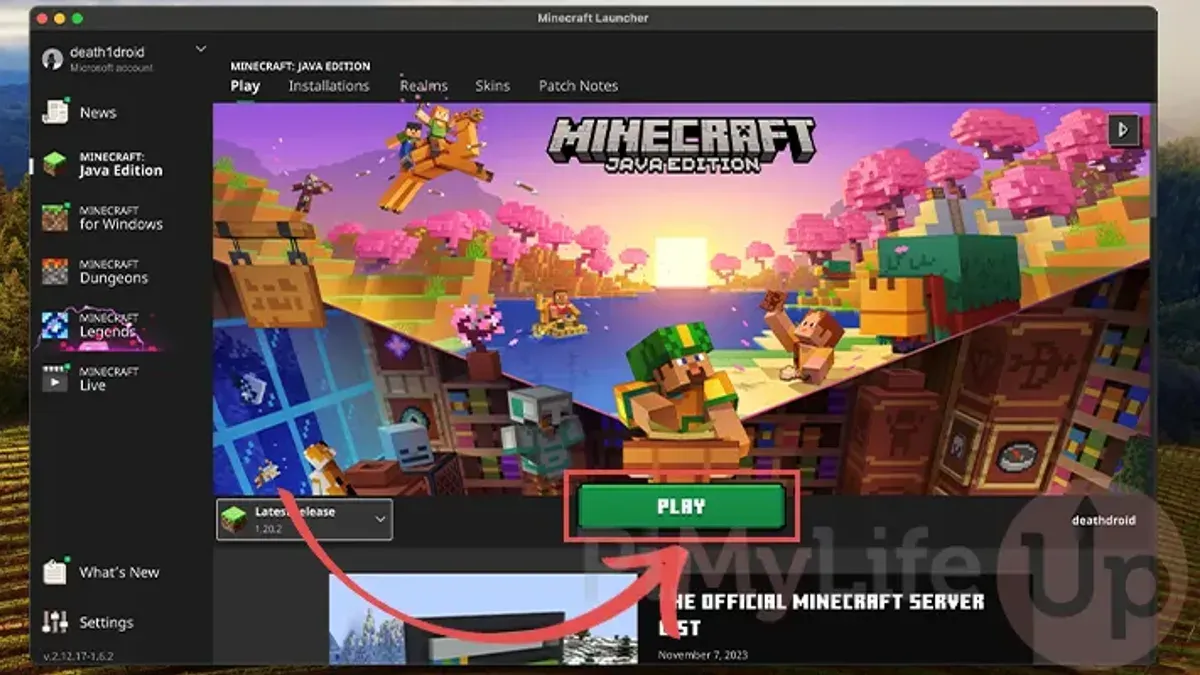
- Wait for the launcher to complete updates and download the necessary game assets. Once finished, you can click Play to start Minecraft Java Edition on your Mac.
Throughout this process, screenshots of the Minecraft.dmg window, macOS security dialogs, and launcher login screen help confirm each step. Being aware of macOS's security prompts avoids confusion and ensures a smooth installation.
How to install Java on Mac for Minecraft if needed
Minecraft Java Edition includes its own Java runtime, so most users do not need to install Java separately. However, certain mods or custom launcher setups may require a specific Java version to work correctly. In these cases, installing Java manually on your Mac becomes necessary.
To ensure compatibility, identify which Java version your mod or launcher requires. Many Minecraft mods work best with Java 8 or Java 17. You can verify compatibility by consulting mod documentation or community forums.
Follow these steps to install Java manually on your Mac:
- Visit the official Oracle Java download page at oracle.com/java/technologies/downloads/ or the OpenJDK builds at adoptium.net. Choose the Java version compatible with your mods.
- Download the macOS installer (usually a.dmg or.pkg file). Once downloaded, open the installer and follow the on-screen instructions to complete the installation. You should see confirmation when Java installs successfully.
- After installation, open Terminal and run
java -versionto verify the installed version. The output should display the chosen version number. - If your mod or launcher requires a specific Java path, you may need to set the JAVA_HOME environment variable. For example, add
export JAVA_HOME=$(/usr/libexec/java_home -v 17)to your shell profile file (such as~/.zshrcor~/.bash_profile). Reload the profile by runningsource ~/.zshrcor restart Terminal. - Launch Minecraft or your modded launcher, ensuring it points to the manual Java installation if required. Some launchers allow you to specify the Java executable path in their settings.
Manually managing Java versions can improve mod compatibility but may require occasional updates. Always download Java installers from official sources to avoid security risks.
How to run Minecraft Java Edition on different Mac models
Minecraft Java Edition performance and compatibility vary significantly depending on your Mac model and its hardware. Understanding these differences can help you optimize your gameplay experience.
MacBook Air vs. MacBook Pro vs. iMac
MacBook Air models, especially those with lower-tier processors and integrated graphics, tend to run Minecraft with lower frame rates and may require reduced graphics settings. The MacBook Pro, with better CPUs and dedicated or higher-performing integrated GPUs, generally offers smoother gameplay at higher settings. iMacs usually feature stronger GPUs, making them suitable for higher resolutions and more demanding Minecraft mods.
Apple Silicon (M1/M2) Macs vs. Intel-based Macs
Apple Silicon Macs (M1 and M2 chips) run Minecraft Java Edition using Rosetta 2 translation for Intel-based software, which can introduce slight performance overhead but overall offers good compatibility and efficiency. Native ARM optimizations are limited but improving. Intel Macs run Minecraft natively without translation, which can be advantageous for certain mods or Java versions. However, Apple Silicon Macs often have better power efficiency and thermal performance.
Optimizing Minecraft settings for lower-spec Macs
If you use a MacBook Air or an older Intel Mac with limited RAM or graphics capabilities, adjusting Minecraft’s video settings can improve performance. Lower the render distance to 8 chunks or less, disable fancy graphics and smooth lighting, and reduce particle effects. Using the “Fast” graphics setting and turning off V-Sync can also help increase frame rates. Allocating 2 to 4 GB of RAM to Minecraft in the launcher settings strikes a balance between performance and system stability.
Troubleshooting common issues installing or running Minecraft Java on Mac
If the Minecraft launcher fails to open or crashes, first check that macOS security settings allow the app to run. You might see an error like “"Minecraft.app" can’t be opened because Apple cannot check it for malicious software.” To fix this, go to System Preferences > Security & Privacy > General, then click Open Anyway next to the blocked app message.
Authentication or login errors often show messages such as “Failed to login: Bad login” or “Authentication servers are down.” Confirm your internet connection is stable and your Minecraft account credentials are correct. If problems persist, visit the official Minecraft status page to check server availability.
Java-related errors like “Java runtime not found” or “Unsupported Java version” usually indicate a missing or incompatible Java installation. For modded Minecraft setups requiring Java, ensure you install the correct Java version, typically Java 17 or the specific version recommended by your mods.
How to update Minecraft and Java safely
- Open the Minecraft launcher; it should prompt you if an update is available. Click Update and wait for the process to complete.
- To update Java, visit the official Oracle or OpenJDK website, download the latest macOS installer matching your needs, and run it.
- Restart your Mac after updating Java to ensure changes take effect.
Dealing with macOS security blocks
macOS may block Minecraft or Java apps from unidentified developers, showing a warning like “App cannot be opened because it is from an unidentified developer.” To bypass this:
- Attempt to open the app, then dismiss the warning.
- Navigate to System Preferences > Security & Privacy > General.
- Look for a message that the app was blocked and click Allow Anyway.
- Try opening the app again; a new prompt will appear. Click Open to confirm.
Following these steps resolves most common installation and running issues on Mac. For persistent problems, consult the official Minecraft help center or Apple support for system-specific advice.
How to keep Minecraft Java Edition updated and running smoothly on Mac
The Minecraft launcher automatically checks for updates to the game and installs them when you start it, ensuring you run the latest version without manual intervention. However, before applying major updates, backing up your saved worlds and important game data prevents data loss if an update causes unexpected issues.
- Open Finder and navigate to ~/Library/Application Support/minecraft/saves. You should see folders named after your saved worlds.
- Copy these folders to a safe location, such as your Desktop or an external drive. A successful backup means your saved worlds are duplicated outside the Minecraft folder.
- Launch the Minecraft launcher. On the Installations tab, you can see the current version installed and select the latest release.
- Start the game. The launcher will download and apply updates if available. When the main menu appears, the update succeeded.
If you manually installed Java to run mods or custom versions, periodically check for Java updates through System Preferences > Software Update or your chosen Java distribution’s update mechanism. Keeping Java current ensures compatibility and security.
When using mods or resource packs, verify their compatibility with the Minecraft version you have installed. Mod developers often release updates aligned with new Minecraft versions. Running incompatible mods can cause crashes or performance issues.
Regularly reviewing your mods and resource packs, and updating or removing those that are outdated, helps maintain smooth gameplay and prevents conflicts after game updates.
- How to Delete Your Epic Games Account Permanently: A Step-by-Step Guide
- How to Install Avast on Mac: A Clear Step-by-Step Guide
- How to Install Malwarebytes on Mac: A Clear Step-by-Step Guide
- How to Install Dropbox on Mac: A Clear Step-by-Step Guide
Frequently asked questions
How to play java minecraft on mac?
To play Minecraft Java Edition on your Mac, first download the official Minecraft launcher from Minecraft.net. After installation, launch the app, log in with your Mojang or Microsoft account, and select the Java Edition profile. Ensure your Mac meets the minimum system requirements and has Java installed if prompted.
Can you get java minecraft on macbook?
Yes, you can get Minecraft Java Edition on a MacBook by downloading the Minecraft launcher from the official website. The launcher supports macOS and installs the Java Edition, allowing you to play on your MacBook as long as it meets performance and compatibility standards.
Can you run java minecraft on mac?
Minecraft Java Edition runs on macOS but requires compatible hardware and software. Macs with Intel or Apple Silicon chips can run the game, but Apple Silicon models may use Rosetta 2 to ensure compatibility. You might need to install or update Java if the game prompts for it.
Can i play minecraft java on mac?
Yes, you can play Minecraft Java Edition on a Mac by downloading the Minecraft launcher and installing it. Make sure your macOS version supports the launcher and that Java is installed or updated if required for smooth gameplay.
Can a mac run java minecraft?
Most modern Macs can run Minecraft Java Edition, provided they meet the minimum system requirements including sufficient RAM and graphics capabilities. Macs using macOS Big Sur or later handle Minecraft well, but always verify Java is installed or updated to avoid launch issues.
What this guide does not cover
This guide does not cover installing Minecraft Bedrock Edition or running Minecraft Java Edition on unsupported or very old macOS versions that may lack necessary security updates or hardware capabilities. If your Mac cannot run macOS versions compatible with the latest Java Runtime Environment or Minecraft launcher, you might encounter persistent issues that require alternative solutions or hardware upgrades.
If you are looking to play Minecraft on a Mac with very limited resources or outdated software, consider using the Bedrock Edition on supported devices or explore cloud gaming services that can stream Minecraft without relying on local hardware capabilities.
The most useful next step is to ensure your Mac’s Java installation matches the version required by the Minecraft launcher. Check System Preferences under Java Control Panel or run java -version in Terminal to confirm, and update or install Java from the official AdoptOpenJDK or Oracle website if needed. This verification will help you avoid common runtime errors and improve game stability.



