
How to Merge Cells in Numbers: A Clear Step-by-Step Guide
Discover clear, practical steps to merge cells in Numbers on Mac and iPad without losing data or formatting.
You've created a table in Numbers and now want to combine multiple cells to better organize your data. Maybe you wish to center a title across columns or consolidate adjacent cells for clarity. If you’ve wondered how to merge cells in Numbers, this guide will walk you through the exact steps on both Mac and iPad.
This article covers practical methods for merging cells without losing data or formatting, clarifies the difference between merging cells and merging values, and highlights how Numbers’ approach differs from Excel. You’ll gain a clear understanding of when and how to merge cells effectively in Apple Numbers.
Key takeaways
- Merging cells in Numbers combines their space but retains only the upper-left cell’s content.
- To merge values from multiple cells, you need to use formulas or copy-paste methods instead of simple merging.
- Numbers on Mac and iPad provide similar merging options through the Format sidebar or contextual menus.
- Unlike Excel, Numbers does not automatically sum or number merged cells, so plan accordingly.
- Always check merged cells for formatting and data loss to maintain clarity in your spreadsheet.
Before you start: What you need to know about merging cells in Numbers
When you merge cells in Apple Numbers, you create a larger cell that spans multiple rows or columns. However, merging cells does not automatically combine or concatenate the values inside those cells. Instead, only the value in the top-left cell remains visible after merging; other cell contents are removed. This behavior is different from Excel, where merging cells sometimes involves options to keep or combine values.
Numbers offers merging capabilities on both Mac and iPad, but the options and interface vary slightly between devices. For example, on Mac, you can use the Format sidebar to merge cells, while on iPad, merging is accessed through the toolbar menu. Some advanced merging features available in Excel, such as merging and centering or concatenating values during merge, are not present in Numbers.
Before merging cells, it is important to back up your spreadsheet or duplicate the table. Since merging removes all but one cell's data, you risk losing information if you merge without preparation. Apple’s official support documentation also emphasizes saving your work before merging to avoid accidental data loss.
| Feature | Mac | iPad |
|---|---|---|
| Merge cells spanning rows/columns | Yes, via Format sidebar | Yes, via toolbar menu |
| Automatic value concatenation | No | No |
| Advanced merge options (like Excel) | No | No |
How to merge cells in Numbers on Mac
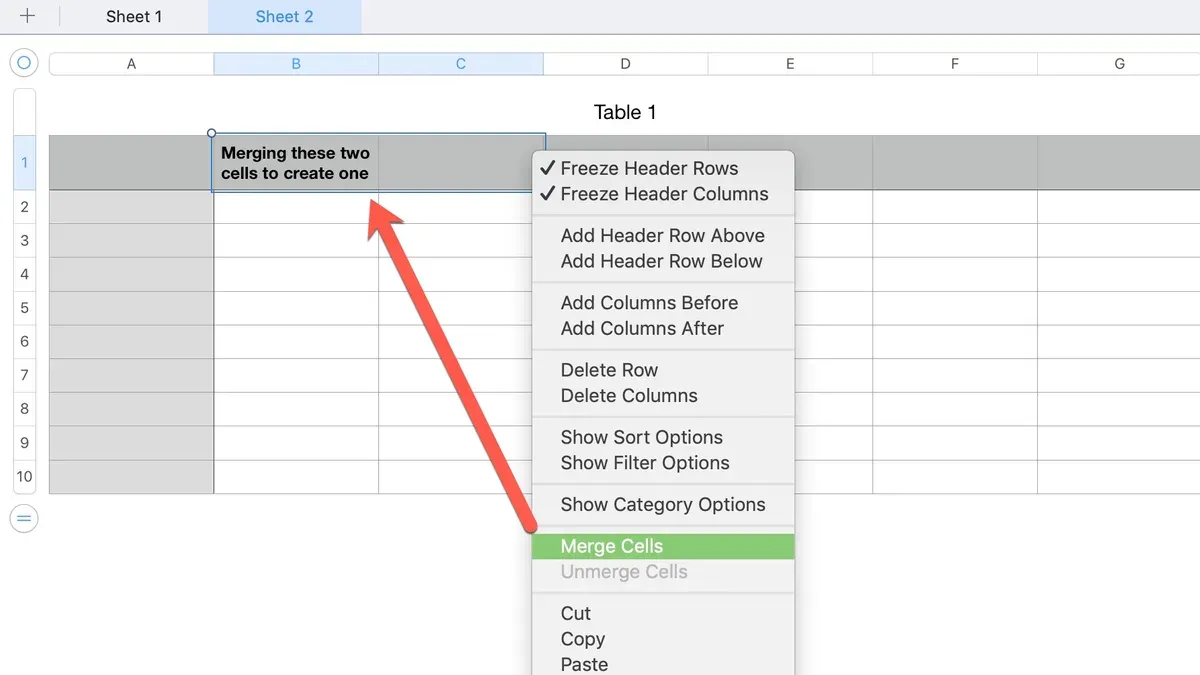
To merge cells in Numbers on your Mac, start by selecting the adjacent cells you want to combine. You can merge cells horizontally, vertically, or both, as long as they form a continuous block. For example, select cells A1, A2, and A3 to merge vertically, or A1, B1, and C1 to merge horizontally.
Once your cells are selected, look to the right side of the Numbers window for the Format sidebar. If it’s not visible, click the Format button on the toolbar. In the sidebar, find the Cell tab, which holds options for cell formatting. Near the bottom of this tab, you will see a button labeled Merge Cells. Click this button to merge your selected cells.
When cells merge, only the content from the upper-leftmost cell remains visible. Any other data in the merged cells is removed, so ensure you copy any important information before merging. If you decide to undo the merge, select the merged cell, return to the Format sidebar, and click Unmerge Cells to restore the original separate cells with only the upper-left content preserved.
This process creates a larger cell that spans the area of the selected cells, useful for titles or grouping data visually. For example, merging cells B2, B3, and C2 creates one cell covering that area, holding the content originally in cell B2.
How to merge cells in Numbers on iPad
Merging cells on iPad in Numbers involves using touch gestures and accessing commands through the contextual menu or the Format panel. The iPad interface is more streamlined than on Mac, so some options are located differently, and the process relies heavily on touch interaction.
- Select the cells: Tap and hold on one cell, then drag the blue selection handles to include all adjacent cells you want to merge. You will see a light blue highlight over the selected cells.
- Open the contextual menu: After selecting the cells, tap the selection to bring up the contextual menu. Look for the Merge Cells option here. If it isn’t visible, tap the paintbrush icon in the top-right corner to open the Format panel.
- Merge the cells: In the Format panel under the Cell tab, scroll down to find the Merge Cells button and tap it. The selected cells will merge into one larger cell, showing only the content of the upper-left cell.
- Unmerge cells: To unmerge, select the merged cell, then tap the Merge Cells button again (which now acts as an unmerge toggle). The cell will split back into individual cells, but only the original content in the merged cell remains.
Unlike the Mac version, the iPad does not offer advanced merging options or keyboard shortcuts. The UI is more compact, so finding the merge command sometimes requires opening the Format panel. Remember, only adjacent cells can be merged, and merging does not combine cell values automatically.
For example, if you select three adjacent cells in a row containing "Sales," "Q1," and "$500," merging them will keep only "Sales" visible. The other values will be removed from view but not permanently deleted until you save or exit without undoing.
How to merge cell values into one cell in Numbers
Since Numbers’ merge cells feature only combines the appearance of cells without joining their contents, you need to use formulas to actually combine values into a single cell. The functions you will use are CONCATENATE or its simpler alternative, CONCAT. These formulas let you join text from multiple cells, and you can insert separators like spaces or commas between values to keep the result readable.
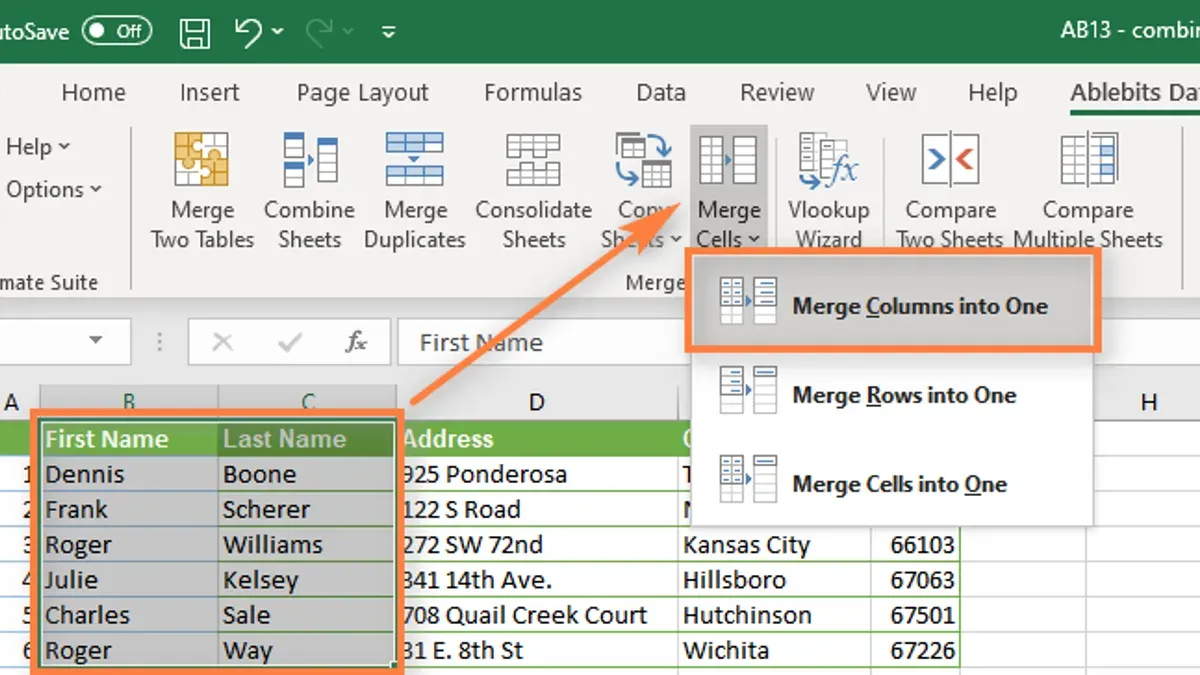
Here’s a basic example: if you have cells A1 containing "John" and B1 containing "Doe", the formula =CONCATENATE(A1, " ", B1) will produce "John Doe" in the cell with the formula. Using CONCAT, the formula would be =CONCAT(A1, " ", B1), which works similarly.
- Select the cell where you want the combined text to appear.
- Enter the formula starting with an equal sign = followed by CONCATENATE or CONCAT.
- Type the cell references you want to join, separated by commas, adding text strings for separators in quotes. For example: =CONCATENATE(A1, ", ", B1).
- Press Return or Enter. The cell now shows the combined values with separators.
- If you change the contents of the referenced cells, the combined cell updates automatically.
Note that this method creates a dynamic formula, so you cannot edit the combined text directly. To convert the formula result to fixed text, you must copy the cell and paste it as values. This approach also doesn’t merge formatting from different cells—only the text content.
How to merge many cells in Excel versus Numbers: What you need to know
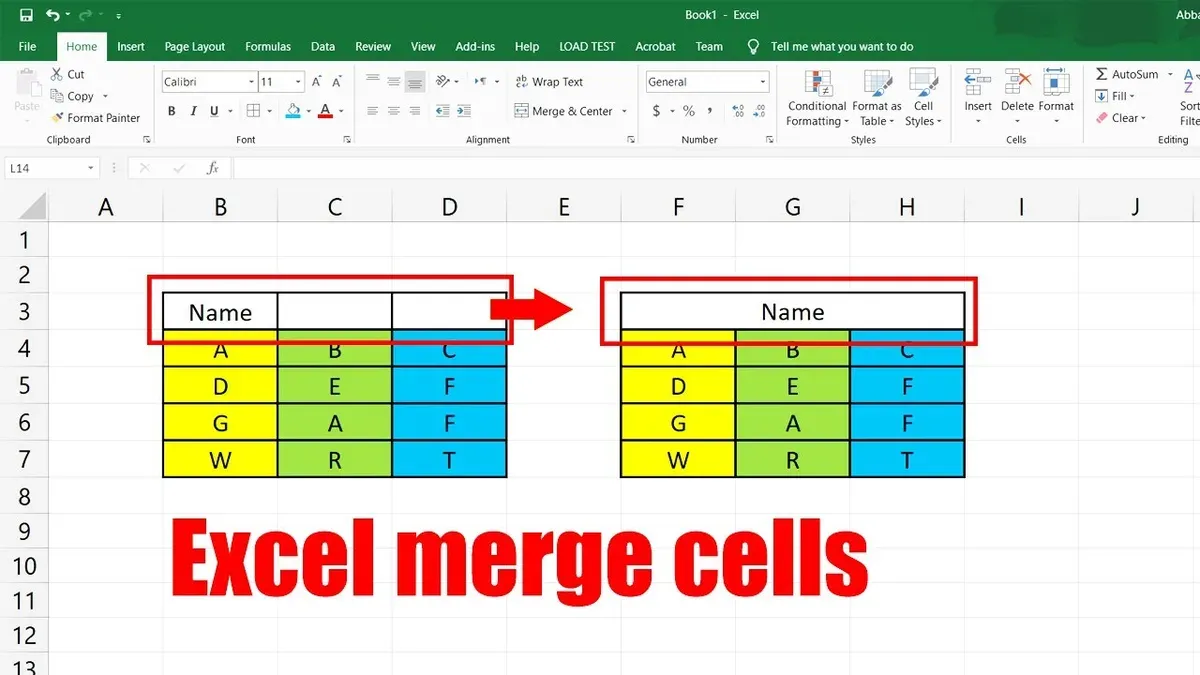
When working with multiple cells, Excel and Numbers handle merging differently, which can affect your workflow if you switch between these apps. Excel offers several merge options, including Merge & Center and Merge Across. Merge & Center combines selected cells into one and centers the content, while Merge Across merges cells in each row individually without combining rows. Numbers, however, merges cells into a larger single cell but does not have a direct equivalent to Excel’s Merge Across feature.
Excel also allows more advanced merging behaviors, like conditional formatting and VBA scripts that can treat merged cells with identical values uniquely, which Numbers does not support. Additionally, numbering merged cells is achievable in Excel by using custom formulas or VBA to generate sequential numbers across merged areas. Numbers lacks built-in features for numbering merged cells, requiring manual workarounds or separate columns.
| Feature | Excel | Numbers |
|---|---|---|
| Merge Options | Merge & Center, Merge Across, Merge Cells | Merge Cells only (no Merge Across) |
| Combining Cell Values | Needs formulas or VBA | Use CONCAT or CONCATENATE formulas |
| Conditional Formatting on Merged Cells | Supported | Not supported |
| Numbering Merged Cells | Possible with formulas/VBA | Not directly possible |
For example, to number merged cells in Excel:
- Select the merged cells where you want numbering.
- Enter a formula like =ROW()-ROW($A$1)+1 in the first merged cell. This creates a sequential number based on the row.
- Copy the formula to other merged cells. You should see consecutive numbers filling each merged area.
This approach helps track merged cells with unique identifiers, which is not natively supported in Numbers, emphasizing a key functional difference between the two apps.
How to number merged cells in Excel: A brief overview
When working with merged cells in Excel, users often want to maintain sequential numbering for lists or reports. Unlike Numbers, Excel allows some flexibility in handling numbering within merged cells, but it still requires specific techniques. Since merged cells occupy multiple columns or rows as one cell, Excel does not automatically number each merged area, so users rely on helper columns or formulas referencing the merged range.
One common approach is to use a helper column adjacent to the merged cells, where you enter a formula that generates numbers corresponding to each merged area. For example, if column A contains merged cells spanning multiple rows, you can number them in column B using a formula like =IF(A2="",B1,B1+1). This formula checks if the current merged cell is empty; if so, it repeats the previous number, otherwise increments it, effectively numbering each merged block.
Numbers users need workarounds because the app doesn’t support numbering merged cells within the merged areas themselves. Instead, you can place numbers in adjacent cells or use formulas that dynamically refer to the merged groups, preserving clarity without losing data.
- Select the first merged cell or merged area you want to number and place your cursor in the adjacent helper column; this should be in the first row of your merged block.
You should see the cell ready to enter a formula or number. - Enter 1 in this cell to start your numbering sequence.
The number 1 appears in this helper cell. - In the next cell below, enter the formula =IF(A2="",B1,B1+1) (adjusting references to match your columns).
This formula will show 1 if the adjacent merged cell is empty, or increment by 1 when a new merged cell starts. - Copy this formula down the column alongside all merged cells.
The helper column now shows sequential numbering corresponding to each merged cell or block. - Use this helper column for your list numbering or reports to maintain clarity without altering merged cells themselves.
Your list now has clear numbering aligned with merged cells.
Troubleshooting common issues when merging cells in Numbers
When you merge cells in Numbers, you might notice that data from all but the top-left cell disappears. This happens because Numbers retains only the content from the upper-left cell, discarding the rest to maintain a single, unified cell. To avoid losing important information, copy or consolidate data before merging.
If the Merge Cells option is greyed out or missing, check if you have selected adjacent cells. Non-adjacent or entire row/column selections disable merging. Also, ensure the cells aren’t part of a table with special restrictions, like header rows or filtered views that might limit editing options.
Sorting or filtering data that includes merged cells can cause unexpected behavior. Merged cells may prevent proper sorting or filtering because Numbers treats them as single units spanning multiple rows or columns. To handle this, unmerge cells before sorting or filtering, then merge them again afterward if needed.
To prevent accidental data loss, always back up your spreadsheet before merging cells. If you need to preserve multiple values, consider combining them using functions like CONCATENATE or CONCAT instead of merging cells directly.
- Select the cells you want to merge, ensuring they are adjacent. You should see the selection highlight cover all chosen cells.
- Check the Format sidebar or contextual menu for the Merge Cells option. It should be clickable if selection and table conditions are correct.
- If the option is disabled, verify the cells are not headers, part of a filtered view, or non-adjacent. Adjust selection accordingly.
- Before merging, copy values from cells you want to keep or use a formula to combine them into one cell.
- Click Merge Cells. The content from the top-left cell remains visible, confirming a successful merge.
- For sorting or filtering, unmerge cells first by selecting the merged cell and clicking Unmerge Cells. Perform sorting or filtering, then re-merge as needed.
Best practices for merging cells in Numbers without losing data or clarity
When deciding whether to merge cells, consider if you need to preserve data structure for calculations or sorting. Merging cells is best reserved for headers or labels where visual clarity matters more than data manipulation. For example, instead of merging cells in a table used for calculations, use center alignment across selected cells by adjusting the text alignment settings. This maintains individual cell integrity while achieving a centered appearance.
Using formulas like CONCAT or CONCATENATE to combine values is preferable when you want to display combined content without affecting underlying data. This approach keeps your spreadsheet functional and dynamic. For instance, in a customer list, concatenate first and last names in a separate column rather than merging their cells.
When working collaboratively, clearly document merged areas by adding comments or creating a legend sheet explaining merged cell purposes. This helps prevent confusion and accidental data overwrites. Apple’s user guides recommend limiting merges in shared tables to avoid misinterpretation.
Examples of well-structured tables show that merged cells work well for title rows or section headers, while detailed data tables remain unmerged for ease of filtering and formula use. Balancing visual design with data usability ensures that your spreadsheet remains both attractive and functional.
Frequently asked questions
How to merge cell values in excel?
In Excel, merging cell values into one cell is done using the CONCATENATE function or the newer CONCAT or TEXTJOIN functions. These combine text from multiple cells without losing data, unlike the Merge Cells feature which only keeps the upper-left cell's content. To merge values, select a cell, enter a formula like =CONCATENATE(A1, " ", B1), and press Enter.
How to merge cells to one cell?
To merge cells into one cell, select the cells you want to join, then find the Merge Cells option. On Mac, in Numbers, click the Format button, go to the Table tab, and click Merge Cells. This combines the selected cells into a single cell. Note that if the cells contain data, Numbers will preserve only the data from the upper-left cell, discarding other values.
How to merge multiple cells?
Merging multiple cells works similarly whether you select two or many cells. Highlight the range of cells you want to merge, then use the Merge Cells button found in the Format sidebar under Table. Remember, merging is one operation, but if you want to keep all values, you need to merge cell contents first or manually copy them before merging.
How to merge cell values in Excel?
To merge cell values in Excel, use text functions like CONCAT, TEXTJOIN, or CONCATENATE to join the contents into one cell. These functions allow you to include separators such as spaces or commas. Avoid using the Merge Cells button if you want to keep all data intact, as it only retains the top-left cell's content.
How to merge cells to one cell in Numbers?
In Numbers on Mac or iPad, select the cells you want to merge, then click the Format button and choose Table. Click Merge Cells to combine them into a single cell. Be aware that Numbers keeps only the value from the upper-left cell when merging; other cell contents will be lost unless you combine them manually first.
What This Advice Does Not Cover
This article does not cover advanced automation or scripting for merging cells in Numbers, which requires AppleScript or third-party tools and is beyond the scope of typical user needs. If you need to automate merging across large datasets or integrate this process into workflows, exploring scripting options or specialized apps may be necessary. Additionally, this guide focuses exclusively on Apple Numbers and does not address similar functionality in other spreadsheet apps beyond a brief comparison with Excel.
To continue improving your use of Numbers, try practicing merging cells with different data types and formatting. Pay close attention to how Numbers handles cell content when merging to avoid losing important information. Experimenting with these steps in a test spreadsheet helps build confidence before applying them to critical documents.
See also: How to Sort Data Alphabetically in Numbers: A Step-by-Step Guide · How to Make a Pie Chart in Numbers: A Clear Step-by-Step Guide · How to Make a Monthly Budget in Numbers: A Step-by-Step Guide for 2026



