
How to Use the Keyer Tool for Flawless Green Screen in Final Cut Pro
Master the Keyer tool in Final Cut Pro to remove green screen backgrounds and create seamless video composites with professional results.
You're working on a project where your subject was filmed against a green screen, and now you need to replace that background seamlessly. Achieving a clean key can be challenging without the right approach, but Final Cut Pro's Keyer tool offers powerful controls to help you get professional results.
This article explains how to use the keyer for green screen in Final Cut Pro, guiding you through each step from applying the effect to refining the matte and integrating your new background. You'll learn practical techniques to progressively improve your composite and avoid common pitfalls.
Key takeaways
- Apply the Keyer effect from the Effects browser under Keying to start removing the green background.
- Use the Sample Color and Strength controls in the Video Inspector to fine-tune the matte edges.
- Adjust spill suppression settings to eliminate unwanted green reflections on your subject.
- Match your background’s color and lighting to create a realistic composite.
- Export with ProRes 422 for optimal quality without excessive file size.
Prepare Your Green Screen Footage and Project Settings
Before applying the Keyer tool, ensure your green screen footage is well-lit and free of wrinkles or shadows, as these imperfections make clean keying difficult. For example, a shot with even lighting and a smooth backdrop will yield a cleaner key than one with visible creases or uneven shadows.
Next, import your footage into Final Cut Pro and set up your timeline so that the green screen clip is above the background layer. This layer order is crucial for the Keyer effect to function correctly.
Check your project settings under Final Cut Pro > Preferences > Playback to confirm color space and HDR settings support advanced keying. For instance, using the standard Rec. 709 color space often produces more predictable results than HDR when working with keyed footage.
- Inspect your green screen footage for consistent lighting and minimal wrinkles; a well-prepared shot should show a uniform green color without shadows.
- Import your clips into your library and drag them into the timeline, placing the green screen clip on the upper track and the intended background clip below; you should see the green screen clip overlaying the background.
- Open Final Cut Pro > Preferences > Playback and verify the color space is set to Rec. 709 or an appropriate standard for your footage; this ensures color processing aligns with keying requirements.
- Organize your clips in the timeline so that any adjustment layers or effects related to keying are applied directly to the green screen clip; this maintains effect control and clarity.
When these preparations are done correctly, your keying results will have fewer artifacts, and the edge details will look cleaner compared to footage that is poorly lit or improperly set up.
Add and Apply the Keyer Effect to Your Clip
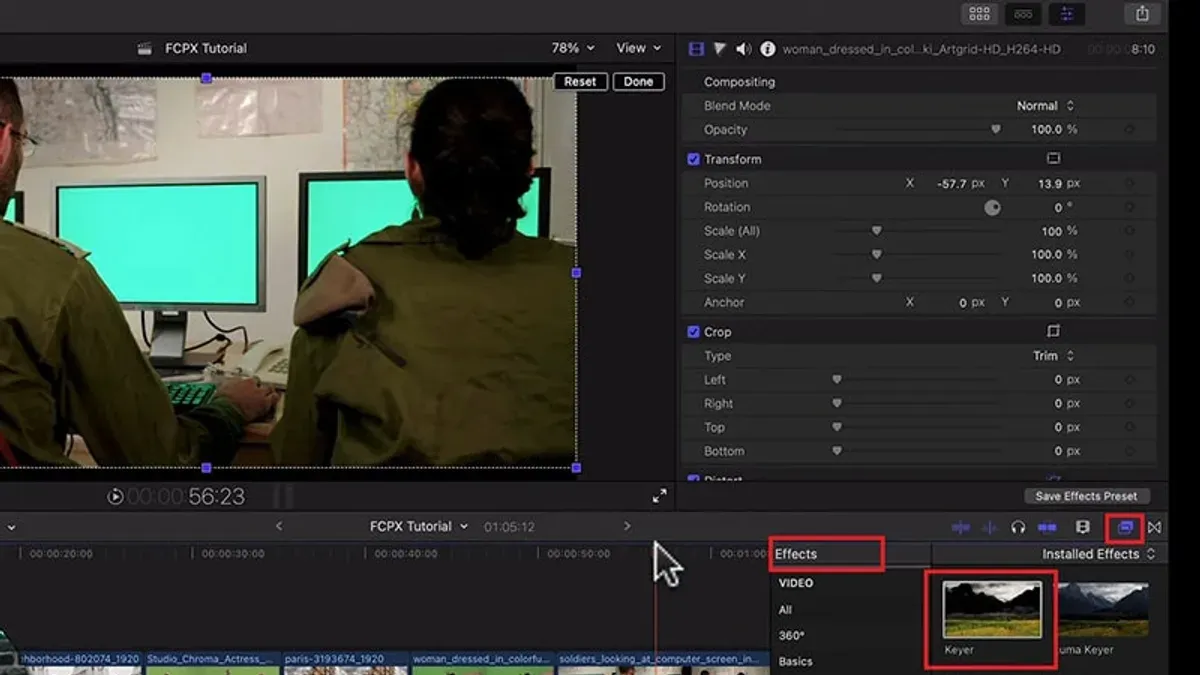
To start removing the green screen background, you need to apply the Keyer effect to your clip in Final Cut Pro. You can find the Keyer effect in the Effects Browser under the Keying category. Open the Effects Browser by clicking the Effects button on the right side of the toolbar or pressing Command-5.
- Locate the Keyer effect within the Keying section of the Effects Browser.
- Drag and drop the Keyer effect directly onto your green screen clip in the timeline. Alternatively, select your clip, then double-click the Keyer effect to apply it.
- Watch the Viewer window as Final Cut Pro automatically detects and removes the green background. You will see the subject isolated with the green replaced by transparency.
- Check for an immediate before-and-after effect by toggling the clip’s effects off and on using the V key. The keyed clip should show a clear separation of the subject from the green background.
The default Keyer settings provide a solid first pass, automatically sampling the green tones and generating a rough matte. This initial key will remove most of the green background but often leaves some artifacts or edges needing refinement. Understanding this baseline result helps you recognize where further adjustments will improve your composite.
Refine the Matte to Remove Green Screen Artifacts
After applying the Keyer effect, you’ll often notice green spill, shadows, or uneven edges around your subject. To clean these up, start by adjusting the Strength slider under the Keyer effect controls. Increasing Strength tightens the matte, sharpening edges and eliminating subtle green fringing. Next, use Fill Holes to close small gaps in the matte, which helps avoid transparent patches on your subject.
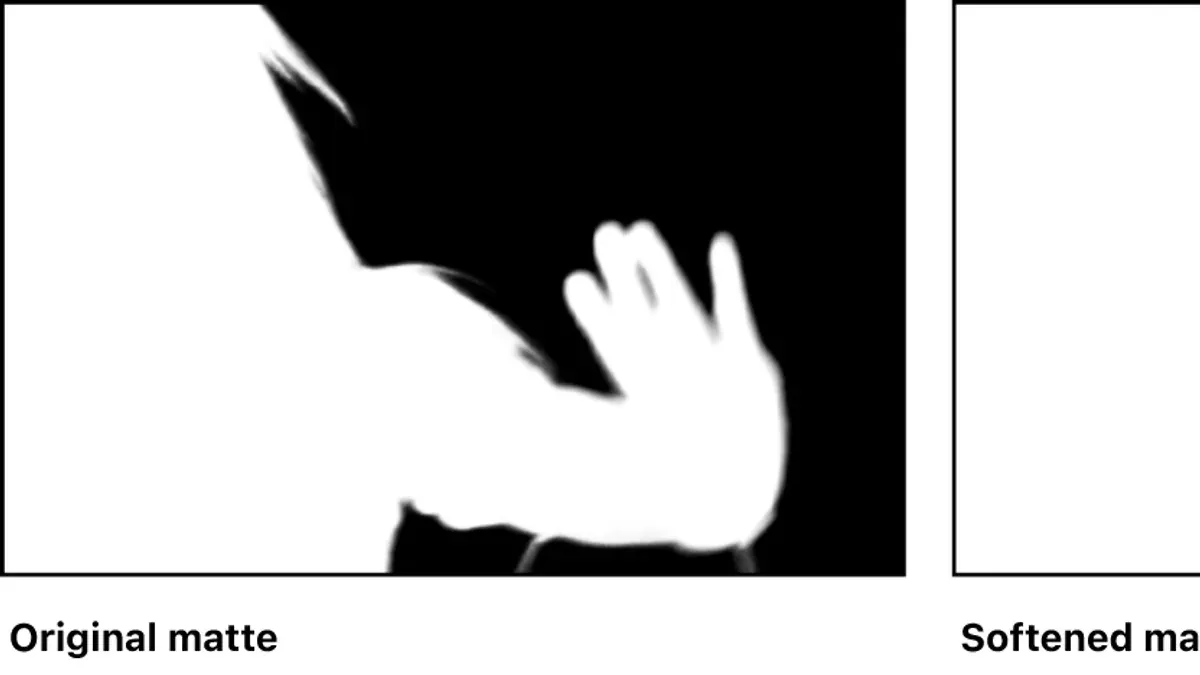
Moving on, the Edges controls let you soften or choke the edge to reduce harsh outlines. For example, slightly choking the edges can eliminate leftover green halos without cutting into fine details like hair.
- Open the Keyer effect controls and increase Strength until edges look crisp but not overly harsh. You should see cleaner separation from the background.
- Enable Fill Holes to close any small transparent spots visible inside your subject.
- Adjust the Edges sliders—start by choking the edges slightly and soften if edges become too sharp. The matte should look smooth and natural.
- Use Sample Color to click on any stubborn green spill areas in the viewer; this refines the color range Keyer targets.
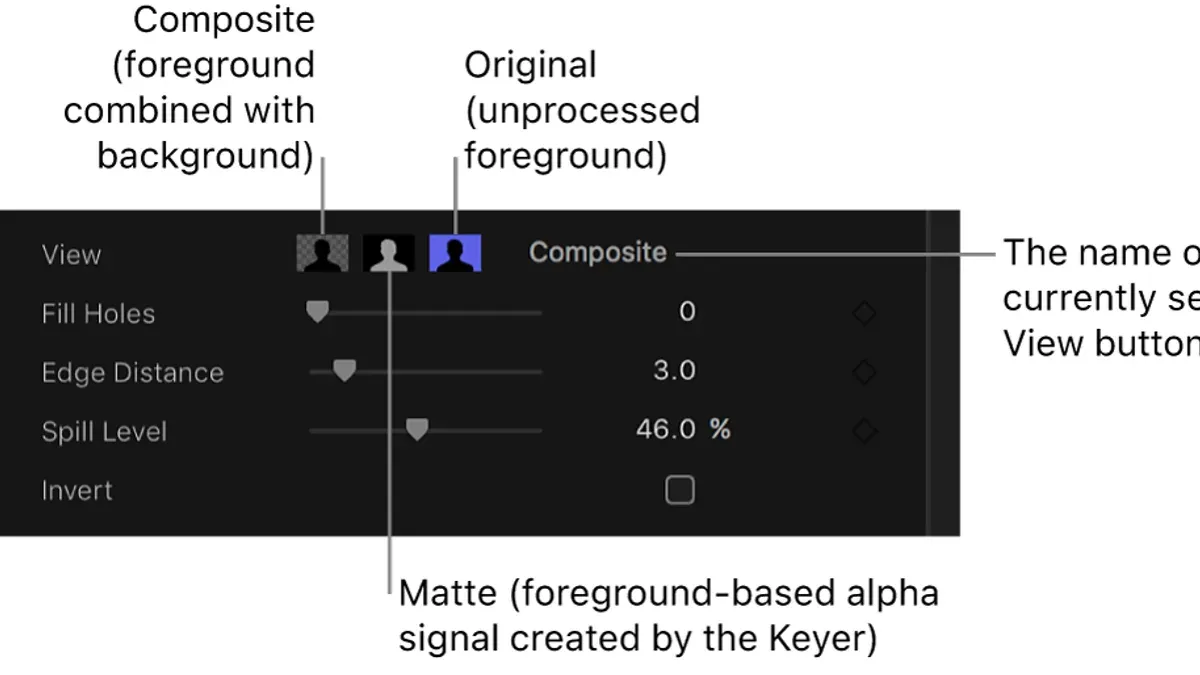
- Lower the Spill Level slider to reduce green tint on your subject’s edges, aiming for natural skin tones or fabric colors.
- If needed, create a mask over unwanted areas like shadows or objects that Keyer missed, then feather the mask edges for smooth blending.
- Open the Matte Tools section and experiment with Luma and Chroma controls to fine-tune transparency based on brightness or color differences. Use Spill Suppression here as a final step to remove residual color spill.
For example, a clip with a green spill around hair improved significantly by first increasing Strength to 80%, enabling Fill Holes, then choking edges by 5% and reducing Spill Level to about 10%. Masking a shadow on the shoulder cleaned up the final composite. Matte Tools’ Luma control helped preserve subtle hair transparency while removing faint green hues.
Following these steps progressively refines your key, turning a rough matte into a professional-quality composite.
Match and Integrate the Background to Achieve a Realistic Composite
After keying out the green screen, your next step is to blend the foreground subject with the new background seamlessly. Start by applying color correction separately to both layers. For example, use the Color Board on the foreground clip to slightly adjust exposure and saturation, reducing saturation by about 10% if it looks too vivid against the background. Similarly, tweak the background clip’s brightness or contrast to match the lighting conditions of your subject.
- Select the foreground clip, open the Color Board (Window > Show in Workspace > Color Board), and adjust Exposure by -0.1 and Saturation by -0.1. You should see the subject's colors align better with the background tones.
- On the background clip, apply subtle Contrast and Exposure changes to harmonize the lighting. For example, increase Exposure by +0.05 if the background appears too dark compared to the subject.
- Add a Light Wrap effect by duplicating the background layer, placing it above the keyed subject, and applying a gaussian blur of about 15 pixels. Set the blend mode to Screen and reduce opacity to around 30%. This simulates ambient light wrapping around edges, softening the cutout boundaries.
- Use the Edge Feather control in the Keyer effect to blur the edges softly, typically between 0.5 and 2 pixels. This smooth transition prevents harsh outlines and creates a more natural integration.
- Check the scale and perspective by zooming out and adjusting the Transform controls on the foreground clip. Ensure the subject’s size and angle match the background scene—for instance, reduce Scale to 95% if the subject appears oversized.
Side-by-side, you’ll notice the original keyed footage looks separate and artificial, while after these adjustments, the subject fits naturally into the scene with consistent lighting, color, and spatial coherence.
Export Your Final Composite with Optimal Settings
Exporting your keyed video with the right settings is crucial to maintaining the quality of your green screen composite. Start by choosing a high-quality codec such as Apple ProRes 422 or ProRes 4444. ProRes 422 offers a good balance of quality and file size, preserving sharp edges and color integrity, while ProRes 4444 supports alpha channel exports for retaining transparency.
To avoid compression artifacts that degrade matte edges, avoid highly compressed formats like H.264 or HEVC for your master export. These codecs often introduce color banding and edge halos, which can make your keyed footage look less professional. Instead, prioritize a codec that supports higher bit depth and less compression.
When exporting with an alpha channel, select ProRes 4444 from the Video Codec menu and enable the “Export Alpha Channel” option. This ensures your transparency is preserved for further compositing or motion graphics work.
Preserving color accuracy is key: check that your color space settings match your project—typically Rec. 709 for HD footage—and avoid unnecessary color profile conversions. This helps maintain the natural look of your composite and prevents color shifts between Final Cut Pro and the exported file.
- Go to File > Share > Master File (Default) and click Settings.
- Set Format to Video and Audio.
- Choose Video Codec: select Apple ProRes 422 for high-quality full video, or ProRes 4444 if exporting with alpha channel.
- If using ProRes 4444, enable the checkbox for “Export Alpha Channel”.
- Confirm Color Space is set to Rec. 709 to preserve color accuracy.
- Click Next, choose your destination, then click Save. After export, review the video for clean edges and accurate colors.
Troubleshoot Common Keyer Issues and How to Fix Them
If you notice green spill remaining after applying the Keyer, begin by lowering the Spill Level slider in the Keyer controls. This reduces unwanted green reflections on your subject. If edges appear jagged or fuzzy, increase the Edge Distance slightly and use the Smooth slider under Matte Tools to soften harsh boundaries without losing detail.
When the background does not replace properly or shows through your subject, check the Fill Holes option to close transparent gaps. Also, verify that your background clip is placed correctly beneath the keyed layer in the timeline. If performance slows or Final Cut Pro crashes during keying, reduce playback quality in the View menu or disable background rendering under Preferences > Playback.
Follow this diagnostic checklist:
- Adjust Spill Level until green reflections disappear; you should see natural skin tones without green hues.
- Refine edges by increasing Edge Distance and smoothing; edges should become cleaner and less pixelated.
- Enable Fill Holes to fix background leaks; the subject silhouette should be solid without background bleed.
- Confirm background clip placement below keyed clip; the background should fully replace the green screen area.
- Lower playback quality or disable background rendering if lag or crashes occur; Final Cut Pro should run more smoothly during edits.
Using example clips with noticeable green spill or edge artifacts can help you identify which control adjustments yield the best results. Patience and incremental tweaks will lead to a professional composite free from common keying issues.
Frequently asked questions
Why is there still a green halo around my subject after using the Keyer?
A green halo usually appears when some green spill remains on the edges of your subject. To fix this, adjust the "Spill Level" and "Spill Suppression" sliders in the Keyer effect’s controls. You can also use the "Edge Distance" parameter to soften the edges and reduce the halo. Additionally, applying a slight "Edge Feather" helps blend your subject more naturally with the background.
Can I key out colors other than green with the Keyer tool?
Yes, the Keyer in Final Cut Pro can also key out blue screen backgrounds by changing the Keyer’s color selection. However, it works best with green or blue as they contrast more clearly with human skin tones. For other colors, manual masks or custom chroma key plugins might provide better results.
How do I fix if parts of my subject become transparent after keying?
This usually happens when the Keyer over-removes colors similar to your subject’s clothing or features. Use the "Fill Holes" and "Shrink/Expand" controls in the Keyer settings to restore missing areas. You can also sample new matte colors with the "Sample Color" tool to exclude parts of your subject from being keyed out accidentally.
What is the best lighting setup to use when shooting green screen footage?
Use even, diffused lighting on your green screen to avoid shadows and hotspots, which cause keying issues. Position separate lights on your subject to create consistent exposure without casting green light onto them. A three-point lighting setup—key light, fill light, and backlight—helps separate the subject from the background and reduces spill.
What This Guide Does Not Cover
This guide assumes you are working with well-lit, professionally shot green screen footage. It does not cover advanced compositing techniques needed for footage with extreme lighting issues, uneven or non-uniform green screens, or complex color spill scenarios. If your footage suffers from severe shadows, reflections, or inconsistent screen colors, consider specialized third-party keying plugins or dedicated compositing software like Adobe After Effects. Additionally, this tutorial does not address multi-layer composites or 3D camera tracking.
The single most useful next step is to practice refining the Keyer effect’s controls such as the Spill Suppression, Matte Tools, and Edge Distance on your own footage. Experiment with these parameters while previewing the alpha channel to identify and clean up any remaining green screen artifacts. This hands-on adjustment will build your confidence and help you achieve a clean, professional composite every time.
See also: How to Use Keyframes in Final Cut Pro: Step-by-Step Guide · Master Object Tracking in Final Cut Pro: Step-by-Step Guide · How to Create Compound Clips in Final Cut Pro: A Step-by-Step Guide · How to Use Green Screen in iMovie: A Step-by-Step Guide



