How to Create a Custom Theme in Keynote: Step-by-Step Guide
Discover how to create a custom theme in Keynote to streamline your presentations with consistent style and branding.
You've just opened Keynote to prepare a presentation, but the default themes don't quite match your style or branding. Instead of adjusting each slide individually, creating a custom theme can save you time and ensure consistency throughout your work.
This article explains how to create a custom theme in Keynote, guiding you through each step from setting up a new presentation to editing master slides. You'll learn how to save and reuse your theme, add text and multimedia elements effectively, and even adapt themes from other platforms for a polished, personalized look.
Key takeaways
- Create a new presentation and access master slides via View > Edit Master Slides.
- Customize backgrounds, fonts, and placeholders to reflect your brand or style.
- Save your theme using File > Save Theme for easy reuse in future presentations.
- Add multimedia elements like music or videos to enhance engagement.
- Import themes from Google Slides or PowerPoint by opening the file directly in Keynote.
Before you start: What you need to create a custom Keynote theme
Creating a custom Keynote theme requires preparation to ensure a smooth design process. First, verify that you have the latest version of Keynote installed on your Mac or iPad. To check your version, open Keynote and click Keynote in the menu bar, then select About Keynote. The version number will appear in a small window. Having the most recent update ensures access to all current features and stability improvements.
Next, gather your brand assets. This includes your logos in high-resolution formats such as PNG or SVG, the exact color codes from your brand palette (hex codes or RGB values), and the specific fonts your brand uses. For example, a professional theme might include a logo file named brand-logo.png, hex colors like #0047AB and #E1E1E1, and font files or names such as Helvetica Neue or Roboto. Having these ready saves time and maintains consistency throughout your theme.
Finally, familiarize yourself with how Keynote’s slide master system works. Every theme is built around master slides that control the layout and style of your slides. Understanding which parts of a master slide you can edit, such as placeholders and background elements, is key to customizing your theme effectively. Decide on the overall style and purpose of your theme before starting: whether it is formal, creative, minimal, or tailored to another tone. This clarity will guide your design decisions as you proceed.
How to create a Keynote presentation from scratch
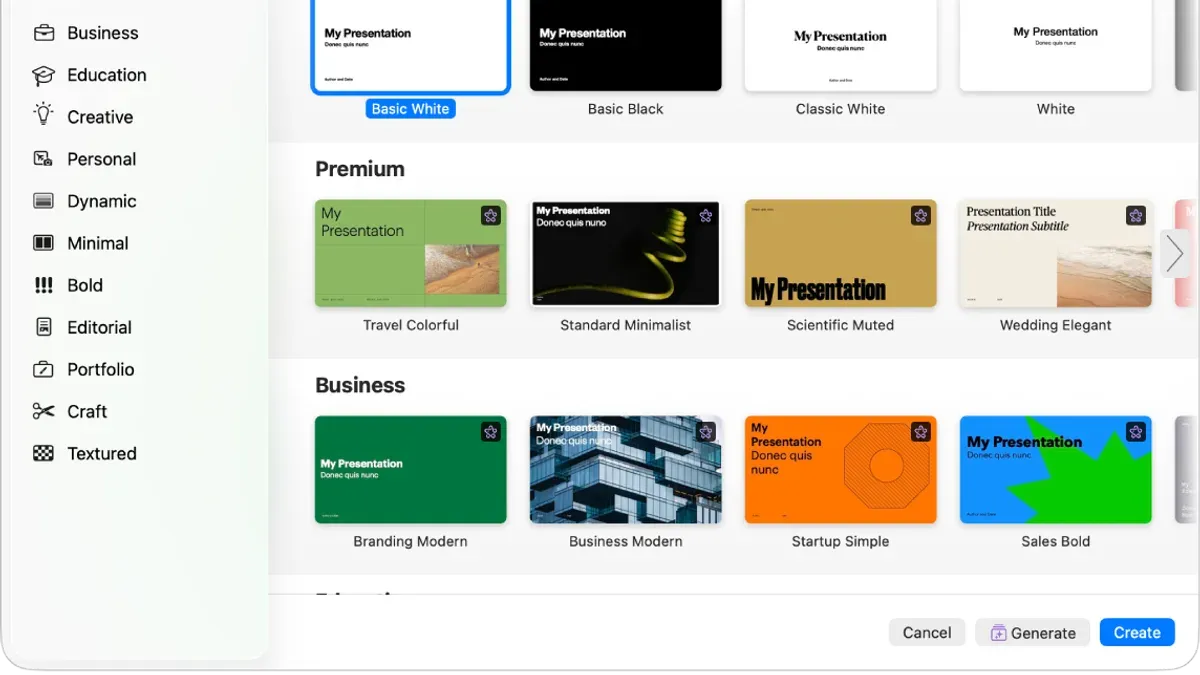
Starting your custom theme begins with creating a new presentation from a blank or basic template. This ensures you are not inheriting preset styles that could conflict with your design. Open Keynote and select File > New Presentation. In the template chooser, scroll to find and select the Blank or Basic theme, then click Create. This gives you a clean slate.
Next, set your presentation size and orientation to match the intended display setting. Go to Document > Slide Size in the toolbar. Choose from standard options like Standard (4:3) or Widescreen (16:9), or select Custom Slide Size to input exact dimensions. Adjusting this early avoids layout issues later.
After setting your slide size, add placeholder slides to establish the typical structure your theme will support. Use the + (Add Slide) button to insert slides with layouts such as title slides, content slides, and section dividers. This helps you visualize and build the reusable components your theme requires.
- Open Keynote and select File > New Presentation. You should see the template chooser appear.
- Choose the Blank or Basic template and click Create. A new presentation with a plain slide opens.
- Click Document in the upper right corner, then select Slide Size. Pick a preset size or choose Custom Slide Size to enter your preferred dimensions. Confirm that the slide dimensions update accordingly.
- Use the + (Add Slide) button on the toolbar to add new slides. Select different layouts as needed to represent your typical presentation structure. You should see each new slide added to the sidebar.
How to create a custom theme in Keynote by editing master slides
To define the look and layout of your custom theme, you need to edit the master slides. These are the underlying templates for different slide types in your presentation. Start by opening the master slide editor, where you can modify layouts, backgrounds, and placeholders to suit your style and branding.
- Click View in the menu bar, then select Edit Master Slides. The master slide editor will open, displaying all available master slide layouts.
- Select a master slide layout to customize. You will see its current background, text placeholders, and any graphic elements.
- To change the background, click Format on the right sidebar, then choose Background. You can pick a solid color, gradient, or image that matches your brand’s palette or style. After applying this, the background updates immediately on the master slide.
- Add or adjust text placeholders by selecting existing ones or choosing Insert > Text Box. Set your preferred font, size, color, and style using the Format sidebar. These default styles will apply when you use the theme.
- Insert your logo or other fixed graphics by going to Insert > Choose and selecting the image file. Position and size it on the slide where you want it to appear on every slide of that layout.
- Create multiple master slide layouts by duplicating existing ones or adding new layouts via the + button. Design each for common slide types like title slides, bullet lists, and image-focused slides to cover various presentation needs.
- When finished editing, click Done at the bottom of the slide navigator. Your customizations now define the theme’s slide styles and will appear whenever you apply that layout.
For example, changing a master slide background from plain white to a soft gradient and adding a logo in the bottom corner makes every slide consistent and branded. Adjusting text placeholders to use your company’s font and color ensures uniform style across titles and body text. These edits in the master slide editor save time and maintain professional appearance throughout your presentations.
How to save and reuse your custom theme in Keynote
Once you have customized your Keynote presentation to your satisfaction, saving it as a custom theme ensures you can easily apply the same look and feel to future presentations. This process helps maintain consistency and saves time by avoiding repeated formatting tasks.
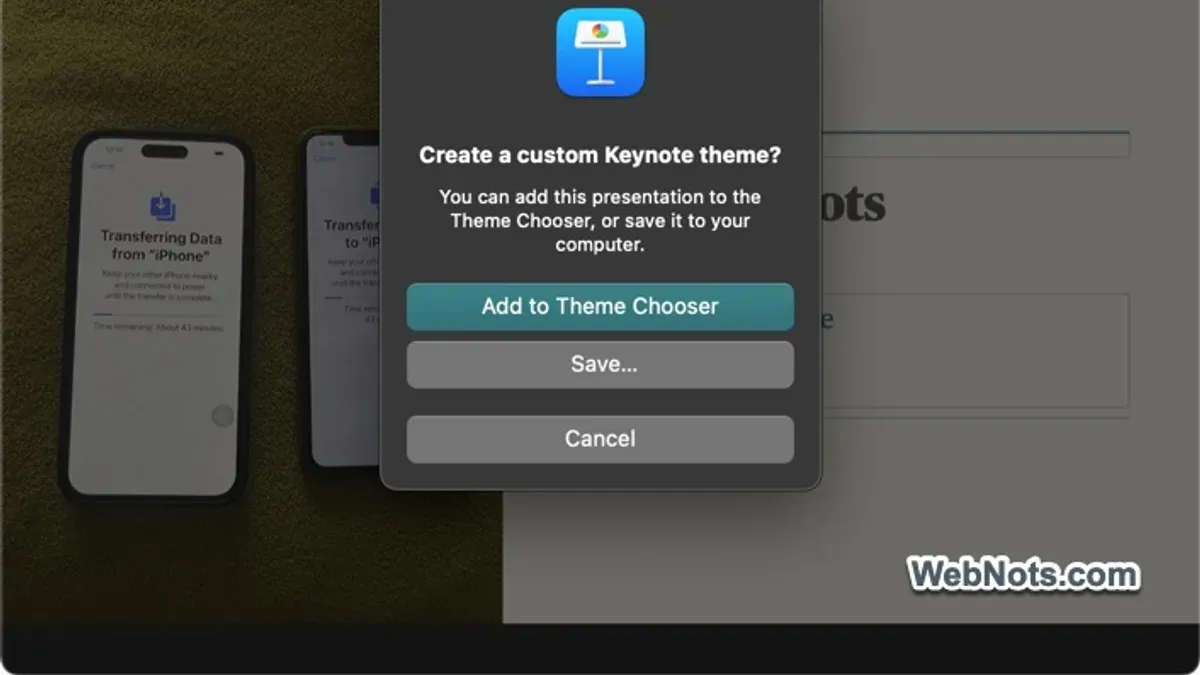
- With your customized presentation open, go to the File menu and select Save Theme.... A dialog box will appear prompting you to name your theme.
- Enter a clear, descriptive name for your theme, such as "Company Branded Theme" or "Classroom Style," then click Save. The theme is now stored in Keynote's theme library and will appear under the My Themes section in the theme chooser.
- To use your custom theme in a new presentation, open Keynote and choose New Document. In the theme chooser window, select the My Themes tab and click on your saved theme. You will see your branding and styles applied to the new presentation.
- If you want to share your theme with colleagues or transfer it to another device, locate the theme file by navigating to ~/Library/Containers/com.apple.iWork.Keynote/Data/Library/Application Support/Keynote/Themes in Finder. Copy the theme file (.kth) and send it or move it to the same folder on the other device.
- To update your custom theme later, open the original theme file, make your changes, and repeat the Save Theme... process using the same name. Keynote will prompt you to replace the existing theme—confirming will update the theme without affecting presentations already created with it.
How to add text and other elements effectively in your custom theme
Designing clear and purposeful placeholders is key to making your custom theme easy to use. Begin by adding text placeholders that guide users on what content to insert—labels like “Title,” “Subtitle,” or “Main Point” provide direction. Set default text styles for these placeholders by selecting the text box, then using the Format sidebar to choose font, size, color, and alignment. For example, a heading might use a bold 36-point font, while body text could be a regular 24-point font with a softer color. This ensures consistency across all slides created with your theme.
In addition to text, include multimedia placeholders such as image or video frames. Use the “Insert” menu to add a media placeholder, then position and size it appropriately. This makes it simple for users to replace placeholders with their own media without disrupting the layout.
To maintain a cohesive design, add and position objects like shapes or icons consistently on master slides. For instance, place a logo icon in the bottom corner or a decorative shape behind text blocks. Use alignment guides and snapping features to keep elements uniformly spaced. This approach balances style with flexibility, letting users focus on content while preserving your theme’s visual identity.
- Open the master slide you want to edit and select Insert > Text Box. You should see a new text placeholder appear.
- Click inside the placeholder and type example text like “Title Here” to guide users. The placeholder remains editable.
- With the text box selected, open the Format sidebar and set the font style, size, and color. The text should update to the new style.
- Insert a multimedia placeholder by choosing Insert > Choose > Media Placeholder. Position it where images or videos should go. The placeholder appears as a frame labeled for easy identification.
- Add any shapes or icons using Insert > Shape or Insert > Choose > Image, and align them consistently using alignment guides. Objects should snap into place for uniform spacing.
How to add music and multimedia to enhance your Keynote presentations
Adding audio and multimedia elements can make your Keynote presentations more engaging and dynamic. While music and sound effects add atmosphere, remember that these are added to each presentation individually, not embedded within the custom theme itself. This means you will need to add audio files each time you create a new presentation, even if based on your custom theme.
- Open your Keynote presentation and select the slide where you want to add audio. You should see the slide highlighted in the sidebar.
- Go to the Insert menu and choose Choose under Audio. Browse to locate your audio file, which can be in formats like MP3, AAC, or WAV. Once inserted, you will see a small speaker icon appear on the slide.
- To add background music that plays throughout the presentation, click Document in the upper right, then select the Audio tab. Click the + button to add a music file. This audio will play across all slides unless you adjust playback settings.
- Adjust audio playback options such as looping, volume, and whether the sound starts automatically or on click by selecting the audio icon and checking the Format sidebar under Audio.
- Keep in mind that adding large audio files can significantly increase your presentation’s file size. For instance, a typical 3-minute MP3 might add around 3-5 MB, which could affect sharing and loading times.
Balance is key when using multimedia. Ensure audio supports your message without overwhelming your content or distracting your audience. Use sound effects sparingly and test playback on the devices where you plan to present to verify compatibility and sound quality.
How to import and adapt themes from other platforms like Google Slides or PowerPoint
Importing presentations from Google Slides or PowerPoint into Keynote allows you to reuse existing themes but requires careful adjustments to ensure compatibility. Keynote supports importing PowerPoint files (.pptx) and can open Google Slides if exported as PowerPoint or PDF formats.
- Export your Google Slides presentation: In Google Slides, go to File > Download > Microsoft PowerPoint (.pptx). You should see the file saved to your device.
- Open the PowerPoint file in Keynote: Launch Keynote, choose File > Open, then select the downloaded.pptx file. Keynote will convert and open the presentation, showing slides with imported content.
- Review slide layouts and formatting: After import, examine each slide for text misalignment, missing fonts, or altered colors. Common issues include shifted placeholders and unsupported animations.
- Fix formatting and style issues: Use Keynote’s Format sidebar to adjust text styles, reposition elements, and replace missing fonts. Reapply master slides if needed to restore consistency.
- Modify the theme structure: Access View > Edit Master Slides to customize the master slides imported with the presentation. This helps align the theme with Keynote’s design system and enables reuse.
- Compare design capabilities: Keynote offers advanced animation and transition options but handles some PowerPoint features differently. Simplify complex PowerPoint animations to maintain smooth playback in Keynote.
- Save your adapted theme: Once edits are complete, save the presentation as a Keynote theme via File > Save Theme for future use.
Before adaptation, an imported PowerPoint theme might show disorganized text boxes and altered colors. After fixing, you will have a clean, consistent Keynote theme tailored for your presentations.
- Common issues: font substitutions, misplaced text boxes, unsupported animations, and color profile shifts.
- Tip: Keep a backup of the original file before making changes.
Troubleshooting common issues when creating and using custom Keynote themes
When working with custom Keynote themes, you might encounter problems such as missing fonts, misaligned placeholders, or theme files that won’t save properly. These issues can interrupt your workflow but are often fixable with systematic steps. Common error messages include “Font not found,” “Placeholder missing,” and “Unable to save theme.” Addressing these quickly helps you maintain your presentation’s consistency.
Fix missing fonts or incompatible font styles
- Open the Keynote presentation and go to Format > Fonts > Show Fonts. You should see all fonts used in the theme.
- If you receive a “Font not found” warning, click Replace Fonts in the warning dialog.
- Select an available font from your system to replace the missing one. When done, the text should display correctly without warnings.
Resolve placeholder misalignment or disappearing elements
- Switch to View > Edit Master Slides and check all master slides for misplaced or missing placeholders.
- Use the alignment guides to reposition placeholders precisely. If elements are missing, re-add them with Insert > Placeholder.
- Exit the master slide editor and verify that placeholders appear correctly on regular slides.
Handle theme file corruption or failure to save
- Try saving your theme with a new name via File > Save Theme As. If saving fails, close Keynote and reopen your presentation.
- If the problem persists, export your presentation as a Keynote file to a different location and reopen it.
- As a last resort, create a new blank presentation and import slides from the problematic file using Insert > Slide from. This can recover most content.
Reset slides or start a new theme when problems persist
If errors continue despite troubleshooting, consider resetting individual slides by selecting them and choosing Slide > Reset Slide. This often fixes layout glitches. For severe or recurring issues, starting a new theme from scratch might be the most reliable solution to prevent corrupted elements or conflicting settings from affecting your work.
Frequently asked questions
How to make a custom theme?
To make a custom theme in Keynote, start by creating a new presentation or opening an existing one. Then, go to the Slide Navigator and select Edit Master Slides from the Slide menu. Customize backgrounds, fonts, colors, and placeholders as needed. When finished, save your theme by selecting File > Save Theme, giving it a name for easy reuse.
How to make a keynote presentation?
Open Keynote and choose New Presentation to start from a template or a blank slate. Add slides by clicking the + button and select layouts that fit your content. Insert text, images, charts, or other media using the toolbar. Use the Format panel to adjust styles and transitions to suit your presentation flow.
How to put to keynote?
If you mean how to import content into Keynote, you can drag and drop files like images, PDFs, or videos directly onto slides. You can also paste text or graphics copied from other applications. For importing entire presentations, use File > Open and select supported formats like PowerPoint or PDF.
How to add text in keynote?
To add text, click the Text button in the toolbar or press Command-T to insert a text box. Click inside the box to type or paste your content. Use the Format sidebar to adjust font type, size, color, alignment, and spacing for better readability and style consistency.
How to add custom keynote in revit?
Revit does not support importing Keynote themes directly. However, you can export Keynote slides as images or PDFs and then import those files into Revit as references or sheets. For linking notes, Revit uses its own Keynote system, which requires creating or importing keynote files specific to Revit’s format.
What This Guide Does Not Cover
This guide does not cover advanced scripting or automation within Keynote themes, which require different tools or workflows beyond the standard theme editor. If you need highly interactive presentations or those rich in multimedia elements beyond basic audio and video, consider whether Keynote’s theme system fully supports your needs before investing significant time in creating a custom theme.
For users seeking complex animations, interactive quizzes, or integration with external data sources, specialized software or plugins may provide better options than Keynote’s built-in theme customization.
Your Next Step
After you’ve created and saved your custom theme, the most useful next step is to apply it consistently across all your presentations. Open a new Keynote document, select your custom theme from the theme chooser, and begin adding your content. This habit ensures a unified look and feel, saving you time and reinforcing your branding or style. Regularly update your theme as your needs evolve, checking master slides for necessary tweaks to keep your presentations fresh and polished.
See also: How to Add Animations in Keynote: A Step-by-Step Guide · How to Use Presenter Notes in Keynote: A Step-by-Step Guide · How to Use Magic Move in Keynote: Step-by-Step Guide to Smooth Transitions · How to Record a Presentation in Keynote: A Step-by-Step Guide