
How to Set Up an Auto Reply in Mail App: A Clear Step-by-Step Guide
Discover clear steps to set up an auto reply in Mail app and Outlook app to manage your emails effortlessly while you're away or busy.
You're about to leave for a vacation or expect to be busy for a few days, but you don't want your emails to pile up unanswered. Setting up an automatic reply helps you manage expectations and keeps your contacts informed without needing to check your inbox constantly. If you've wondered how to set up an auto reply in Mail app, this guide will walk you through clear, step-by-step instructions for both the Mail app and Outlook app.
You'll learn how to activate auto replies on various email accounts, including Gmail, directly within these apps. The article also covers how to craft professional messages, troubleshoot common issues, and disable auto replies when you're back. By following these steps, you can ensure smooth communication even when you're away or occupied.
Key takeaways
- Auto replies can be set up directly in the Mail app and Outlook app through their settings menus.
- Different email providers may require specific configurations within the apps.
- Crafting a clear, professional message helps maintain good communication.
- Common issues include incorrect account setup and forgetting to turn off auto replies.
- Disabling auto reply involves reversing the activation steps in the app settings.
Before you start: What you need to set up an auto reply
Setting up an automatic reply in your Mail or Outlook app requires some preparation to ensure it works smoothly. First, verify that your email accounts configured in these apps support auto-replies. Some accounts, especially those based on IMAP or POP, may not support built-in auto-replies, or may require additional server-side configuration.
It’s important to understand the difference between how the Mail app and Outlook app handle automatic replies. The Mail app often relies on rules or vacation responder features that are supported only by certain email providers, while the Outlook app includes a dedicated automatic replies feature that works primarily with Exchange, Microsoft 365, and Outlook.com accounts.
Before proceeding, have your auto reply message ready. This should include a clear greeting, the reason for your absence or delay, and any instructions or alternative contacts if necessary. Preparing this text in advance helps streamline the setup process.
Lastly, know whether your email provider requires setting auto-replies directly on their server (server-side rules) or if client-side settings within the Mail or Outlook app will suffice. This distinction affects where and how you configure the auto reply and can influence reliability.
| Feature | Mail App | Outlook App |
|---|---|---|
| Supported Account Types | iCloud, Exchange, some IMAP with rules | Exchange, Microsoft 365, Outlook.com |
| Auto Reply Method | Rules or vacation responder (provider dependent) | Built-in Automatic Replies feature |
| Server-side or Client-side | Depends on provider; often server-side preferred | Usually server-side for Exchange-based accounts |
| Mobile Auto Reply Support | Limited, often manual rules needed | Yes, with dedicated settings |
- Check your email account type and settings within the Mail or Outlook app. You should see account details and server information confirming support for rules or automatic replies.
- Prepare your auto reply message text in a note or document. This text will be ready to paste or enter during setup.
- Review your email provider’s documentation or settings to determine if auto replies must be configured on the server or if app-based rules are supported. Look for vacation responder or automatic reply options.
How to put auto reply on email in the Mail app
Setting up an auto reply in the Mail app involves creating a rule that automatically responds to incoming messages or using a vacation responder if your email provider supports it. The Mail app itself doesn’t have a built-in vacation responder, so rules are the primary method here. This method works best if your Mail app is open and running on your Mac.
- Open the Mail app on your Mac.
- Go to the menu bar and select Mail > Preferences.
- Click the Rules tab to view existing rules or create new ones.
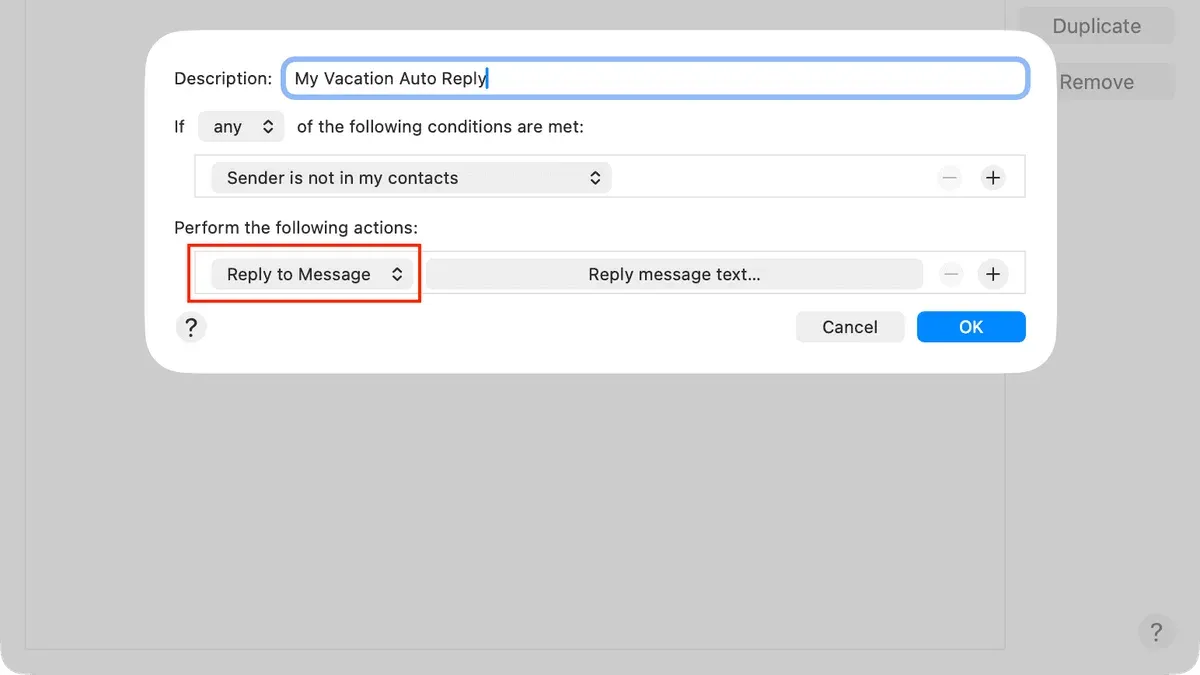
- Click Add Rule. A new window will open for rule creation.
- Give the rule a name, such as "Auto Reply".
- Under If, set the condition to Every Message to respond to all incoming emails.
- Under Perform the following actions, choose Reply to Message.
- Click Reply message text... and enter your custom auto reply message, for example, "Thank you for your email. I am currently out of the office and will respond upon my return." Click OK.
- Click OK again to save the rule.
- When prompted, choose whether to apply the rule to existing messages or only new ones.
- Enable or disable the rule anytime by returning to Preferences > Rules and checking or unchecking the rule.
If your email provider supports a vacation responder (such as Gmail or Exchange), you can set this up directly via your provider’s web interface or settings. The Mail app will then automatically handle replies without needing to create a rule.
Keep in mind that Mail app rules only work when the app is running on your device. For continuous auto replies, the vacation responder at the server level is more reliable.
How to create email auto reply in the Outlook app
Setting up automatic replies in the Outlook app is straightforward and allows you to customize messages for internal colleagues and external contacts separately. This distinction is useful if you want to send more detailed information to coworkers while keeping external replies brief and professional.
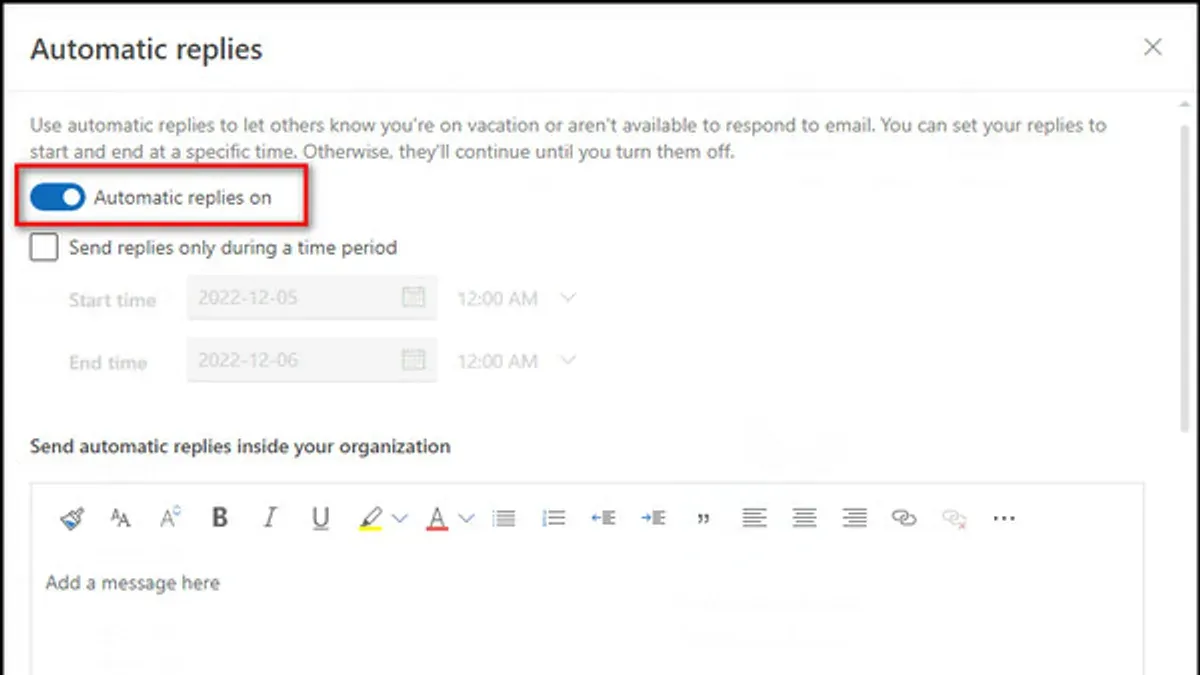
- Open the Outlook app and tap on your profile icon or the gear icon to access Settings. You should see a list of options including Automatic Replies.
- Tap Automatic Replies to enter the auto reply setup screen. Here, toggle the switch to enable automatic replies. Once enabled, you will see fields to enter your messages.
- Enter your message for Internal Senders. This message will be sent to people within your organization. For example, "I am currently out of the office and will respond to your email upon my return."
- Scroll down to the External Senders section and enter a separate message if desired. This can be shorter or more generic, such as "Thank you for your email. I am currently unavailable and will reply as soon as possible."
- Set the Start Date and End Date for your automatic replies. This schedules when your auto reply will be active, so you don’t have to remember to turn it off manually.
- Save your settings. Your automatic replies will now be sent according to your schedule and messages.
- To turn off automatic replies, return to the same Automatic Replies menu and toggle the switch off. This immediately stops auto replies from being sent.
Using these options ensures your contacts receive timely notifications tailored to their relationship with you, whether internal or external. Scheduling your auto replies also helps avoid forgetting to disable them after your absence.
How to set automatic reply on Mail app for Gmail and other accounts
The Mail app's built-in rule system offers limited auto reply functionality with Gmail accounts due to Gmail’s server-side restrictions. Instead, the recommended approach is to configure Gmail’s Vacation Responder directly through the Gmail web interface. This ensures your auto reply is sent consistently regardless of whether you access Gmail via the Mail app or any other client.
- Open your preferred web browser and log into your Gmail account at mail.google.com. You should see your inbox once logged in successfully.
- Click the gear icon in the top-right corner and select "See all settings" from the dropdown menu. The Settings page will appear with multiple tabs.
- Under the "General" tab, scroll down to the "Vacation responder" section. You will find options to turn it on and specify dates.
- Enable the Vacation responder by selecting "Vacation responder on." Enter the start date, and optionally an end date if you want the auto reply to stop automatically. Type your auto reply message in the text box provided.
- Choose whether to send replies only to people in your contacts or everyone who emails you by checking the appropriate box. This controls who receives your auto reply.
- Click "Save Changes" at the bottom of the page. Gmail will now send automatic replies according to the schedule you set.
Once this is set, the Mail app will sync with Gmail’s server settings and display the vacation responder status, but it does not control or modify it. For other providers like Exchange or iCloud, the Mail app may support server-side auto reply settings directly or require using the provider’s web portal or app. For example, iCloud allows configuring vacation replies through its web settings, while Exchange often integrates auto reply settings within the Mail app or Outlook.
Using the Gmail Vacation Responder ensures your auto replies work smoothly across all devices and apps, including Mail. This approach is necessary because Mail's local rule-based auto reply cannot override Gmail’s server-side behavior, preventing duplicate or inconsistent responses.
How to auto reply in Outlook app on mobile devices
Setting up automatic replies using the Outlook app on your iPhone or Android device allows you to manage emails efficiently while on the go. The process is similar on both platforms, but the interface layout may differ slightly. To begin, open the Outlook app and access the settings menu by tapping your profile icon or the gear icon, usually found at the top left or top right of the screen.
- Scroll down and select Settings, then tap on Automatic Replies. On some versions, this might be under an Accounts section.
- Toggle the switch to enable Automatic Replies. You will see a text box where you can enter your custom message. Type a clear, professional auto reply explaining your absence or delay in response.
- Set optional parameters such as start and end times for the auto reply if your app version supports scheduling. If not, you will need to turn off auto replies manually later.
- Choose whether to send replies to everyone or only to people in your organization, depending on your preference and account type.
- Save your settings by tapping the checkmark or Done button. Your auto reply is now active.
The Outlook mobile app syncs these settings with your desktop Outlook and the server, ensuring consistency across devices. However, some advanced features available on desktop, like detailed scheduling or separate replies for internal/external contacts, may be limited or absent on mobile.
Keep in mind that mobile versions may not display confirmation screens after enabling auto reply, so double-check your settings before exiting. If you do not see the Automatic Replies option, confirm your account type supports it or update your app to the latest version.
Below are screenshots from iOS and Android Outlook apps illustrating the Automatic Replies setup screens for your reference.
How to make an auto email reply that sounds professional and clear
Crafting an effective auto reply involves including key elements that inform the sender while maintaining a professional tone. Begin with a polite greeting, followed by a clear explanation of your absence or reason for delayed response. Next, set expectations by specifying when you will be able to reply or when you will return. Finally, provide alternative contacts if urgent assistance is needed. Including these details helps manage the sender's expectations and reduces follow-up emails.
- Start with a friendly greeting. Example: "Hello," or "Thank you for your email." This sets a polite tone.
- State the reason for your absence or delay. Example: "I am currently out of the office on vacation" or "I am experiencing a high volume of emails." This clarifies why you cannot respond immediately.
- Provide an expected response time. Example: "I will respond to your message when I return on [date]" or "I will get back to you within 3 business days." This helps the sender know when to expect a response.
- Offer alternative contacts if applicable. Example: "For urgent matters, please contact [colleague’s name and email]." This ensures urgent issues are addressed promptly.
- Close politely. Example: "Thank you for your understanding." This leaves a courteous impression.
Avoid overly generic messages like "I am currently unavailable" without further details, as they can cause confusion or frustration. Personalizing your message by including your name or position can improve the recipient's experience, making the reply feel less robotic and more considerate.
Vacation auto reply example:
"Hello,
I am currently out of the office on vacation and will return on October 15. During this time, I will have limited access to email. For urgent matters, please contact Jane Doe at [email protected]. Thank you for your understanding."
This example works well because it is clear, sets expectations, and provides an alternative contact.
Busy period auto reply example:
"Thank you for your email. I am currently experiencing a high volume of messages and may take up to 3 business days to respond. If your request is urgent, please reach out to my assistant at [email protected]."
This message explains the delay and directs urgent queries appropriately.
Troubleshooting common issues with auto reply in Mail and Outlook apps
Sometimes auto replies in Mail and Outlook apps do not work as expected. A common issue is that auto replies only send once per sender. This behavior is typical to prevent reply loops, but if you want repeated responses, you will need to adjust server-side settings or use a different method like rules that send replies every time. Another frequent problem is conflicts with other mail rules or server configurations that block or override auto replies. To resolve this, review all active rules in your Mail app or Outlook settings and temporarily disable conflicting ones to isolate the issue.
Auto reply messages may also not appear correctly to recipients. This can happen if your message is filtered into spam or if formatting is incompatible with the recipient’s mail client. Testing by sending messages to multiple accounts helps verify how your auto reply appears. Additionally, IMAP accounts have limitations on auto replies compared to Exchange accounts, which support server-side rules that function even when your device is offline. If you use IMAP, your device must be on and Mail app open for auto replies to send.
To verify if your auto reply is working correctly, follow these steps:
- Send a test email from a different email account to your address with auto reply enabled. You should receive your auto reply promptly.
- Check the Sent or Outbox folder for evidence that the auto reply was generated and sent by your Mail or Outlook app.
- Review your email rules or automatic replies settings to ensure they are active and correctly configured.
- If you do not receive the auto reply, temporarily disable other rules and try again to identify conflicts.
- Consult your email provider’s support resources to confirm whether server-side restrictions or limits on auto replies apply to your account type.
By methodically testing and adjusting your settings, you can resolve most auto reply issues and ensure your messages reach your contacts as intended.
How to turn off auto reply when you’re back
When you return and want to stop automatic replies, it’s important to disable these settings promptly to avoid confusing your contacts. The process varies depending on whether you use the Mail app or Outlook, but the goal is the same: turn off any active rules or vacation responders that send auto replies.
Disable auto reply in the Mail app
- Open the Mail app and go to the Mail menu, then select Preferences. You should see your settings window appear.
- Click the Rules tab to view any active rules. Find the rule that sends the auto reply and uncheck its box or select it and click Delete. After this, no auto reply will be sent from the Mail app.
- If you used a vacation responder via your email provider (like Gmail’s web interface), log into that provider’s webmail and disable the vacation responder to stop auto replies across all clients.
Turn off Automatic Replies in the Outlook app or web interface
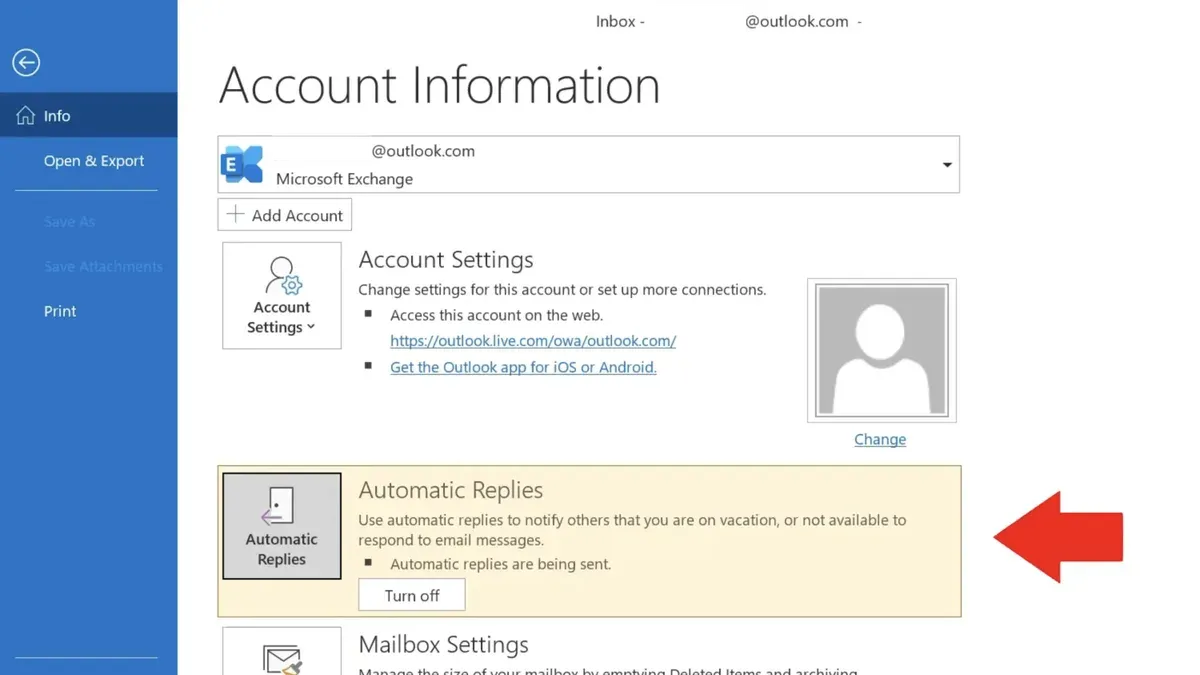
- In the Outlook app, go to File > Automatic Replies (Out of Office). Select Do not send automatic replies and click OK. You should see the auto reply status switch off immediately.
- If you use Outlook on the web, click the gear icon for Settings, then select View all Outlook settings > Mail > Automatic replies. Turn off the toggle for automatic replies. The web interface will confirm that auto replies are disabled.
After disabling, send yourself a test email from a different account to confirm that no auto reply is sent. Doing this helps you catch any lingering settings you might have missed.
Best practice is to turn off auto replies as soon as you’re back to prevent missed messages or confusion. If you anticipate checking emails intermittently, consider temporarily adjusting the message rather than leaving auto replies fully enabled.
Frequently asked questions
How to set auto reply in mail?
To set an auto reply in the Mail app on your device, open the app and go to Settings. Choose the email account you want to configure, then look for the “Automatic Replies” or “Out of Office” option. Toggle it on, set your message, and specify the time range if available. This ensures anyone who emails you during that period gets your predefined response.
How to setup email auto reply?
Setting up an email auto reply involves accessing your email app’s settings and locating the automatic or out-of-office reply section. After enabling it, write a clear message that explains your availability. Remember to save your changes and test by sending yourself a message. Depending on your email provider, the exact location of this setting might differ slightly.
How to set auto-reply in outlook app?
In the Outlook app, tap your profile icon or the menu, then select the gear icon for Settings. Choose the relevant email account, then tap “Automatic Replies.” Turn on automatic replies, enter your message, and set start and end times if needed. Finally, save your settings. This works for both mobile and desktop versions with small interface differences.
How to set up auto reply email?
To set up an auto reply email, go to your Mail or Outlook app settings and find the auto-reply or out-of-office section. Enable the feature, type your response message, and adjust timing if the option exists. Confirm the settings are saved before exiting. This setup helps manage expectations when you're away or busy.
How to auto reply to email?
Auto replying to email requires turning on the automatic replies feature in your email app’s settings. Compose a concise and professional message that informs senders of your status or alternative contacts. Activate the reply, and your app will send this message automatically to incoming emails during the specified period or until you turn it off.
What This Guide Does Not Cover
This guide focuses on setting up auto replies directly within the Mail app and Outlook app on your devices. It does not cover server-side auto replies that some email providers require you to configure via webmail interfaces or dedicated admin portals. If you use corporate or custom email services, you may need to log into your email provider's webmail or contact your IT administrator to set up automatic replies that work across all devices and clients.
For advanced scenarios like rules-based auto replies, exceptions, or integration with calendar events, those settings typically reside on the email server or through your organization's email management system rather than within these apps.
Taking the next step, try setting up a simple auto reply in your Mail or Outlook app now, focusing on the exact account you want to manage. This practical approach will help you get comfortable with the settings and identify any provider-specific limitations early on.
See also: How to Schedule an Email in Mail App and Outlook App: Step-by-Step Guide · How to Unsend an Email in Mail App: Clear Steps for Apple Users · How to Create an Email Signature in the Mail App: Step-by-Step Guide



