How to Record with Webcam Overlay in OBS Studio on Mac
Step-by-step guide to recording videos with a webcam overlay in OBS Studio on Mac, including permissions, setup, and optimization tips.
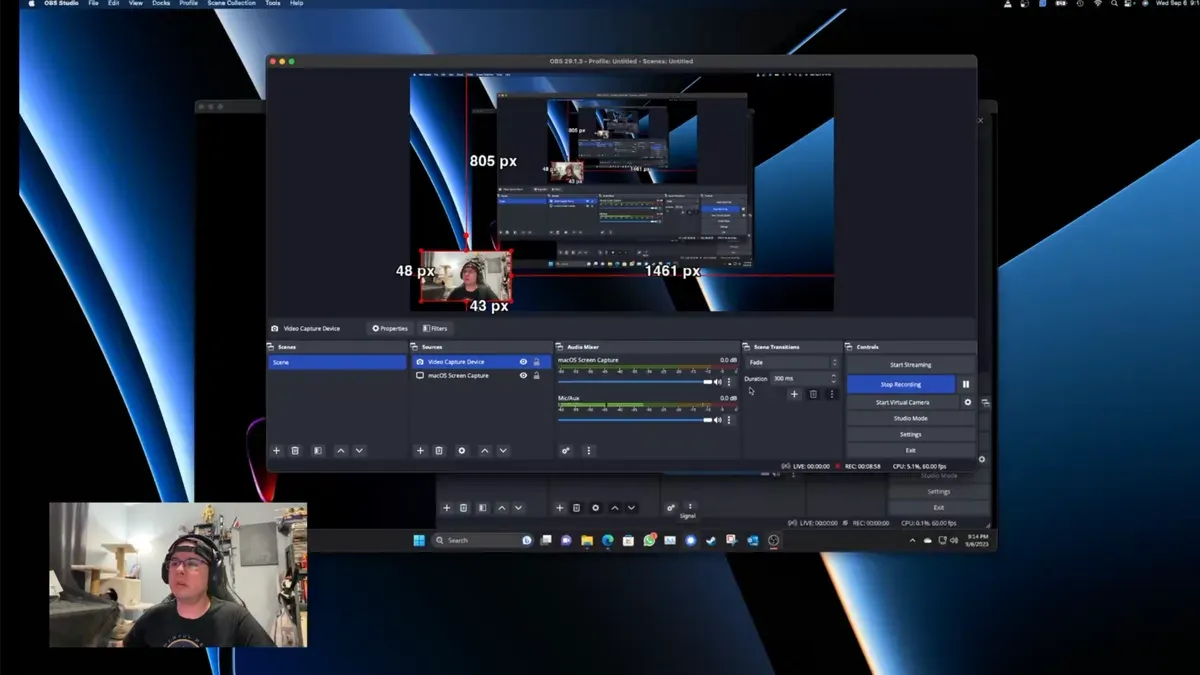
You want to create a polished video with your webcam visible as an overlay while recording on your Mac. Setting this up in OBS Studio can be confusing if you haven’t navigated macOS-specific permissions and source configurations before. This guide explains how to record with webcam overlay in OBS Studio on Mac, focusing on clear, step-by-step instructions tailored to Mac users.
From granting the necessary permissions to positioning your webcam feed over your main content, you will learn how to optimize your scenes and recording settings for professional results. Whether you’re creating tutorials, presentations, or casual vlogs, these tips cover often-overlooked steps to avoid common pitfalls and improve your final video quality.
Key takeaways
- Grant Camera and Microphone permissions in macOS System Preferences before adding your webcam source.
- Add your webcam as a Video Capture Device source and adjust resolution to match your main video output.
- Create a dedicated scene for your overlay to easily position and resize your webcam feed within the canvas.
- Choose the right recording format and bitrate under Output settings for smooth, high-quality video.
- Test your setup before recording to troubleshoot potential macOS-specific issues like black screens or missing audio.
Before you start: What you need to record with webcam overlay in OBS Studio on Mac
To record videos with a webcam overlay in OBS Studio on your Mac, ensure your system meets the software and hardware requirements. OBS Studio supports macOS versions 10.13 High Sierra and later. For smooth recording, a Mac with at least a dual-core processor and 8GB of RAM is recommended.
Install OBS Studio from the official website (obsproject.com) to avoid security risks and ensure you have the latest stable version. Confirm your webcam is connected and recognized by your Mac by checking the System Information or using the FaceTime app.
You should have a basic understanding of the OBS Studio interface, including the concept of sources and scenes, as this will help you configure your webcam overlay efficiently.
Grant OBS Studio the necessary permissions to access your camera and microphone via System Preferences > Security & Privacy > Privacy. Without these permissions, OBS cannot capture your webcam or audio.
- Open System Preferences > Security & Privacy > Privacy tab.
Look for Camera and Microphone in the sidebar. - Ensure OBS Studio is checked in both sections.
If not, click the lock icon to make changes and enable OBS Studio. - Restart OBS Studio if you just granted permissions.
OBS will now have access to your webcam and microphone.
How to add your webcam as a video source in OBS Studio on Mac
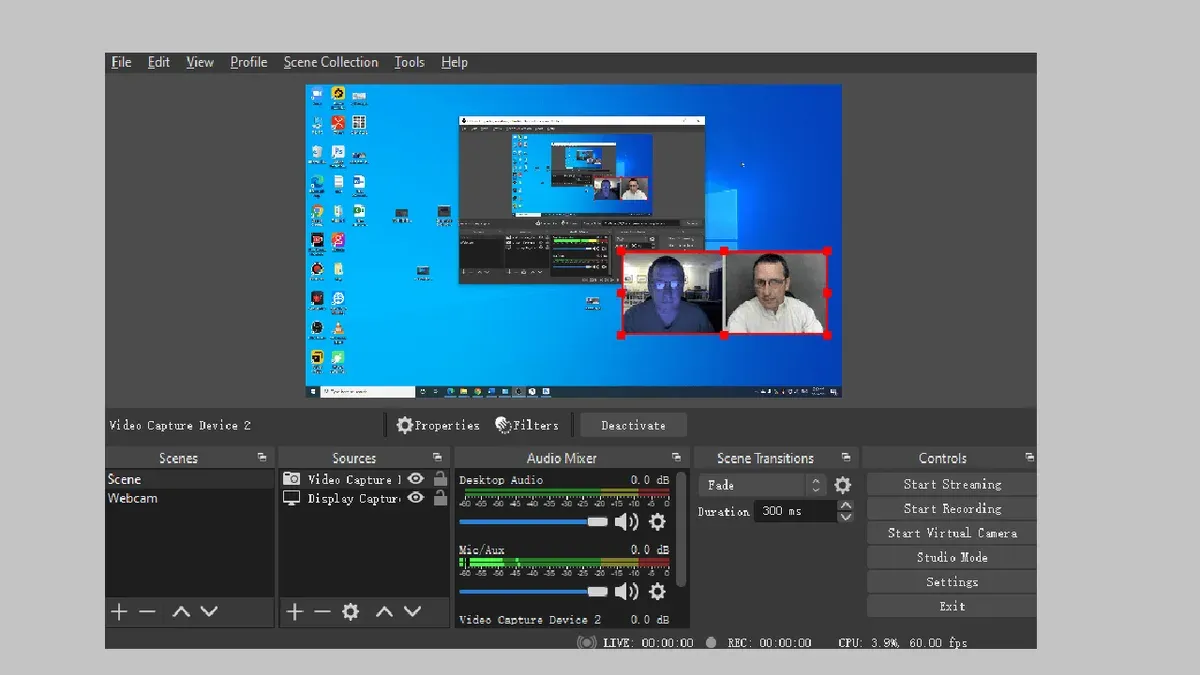
- Open OBS Studio and locate the Scenes panel at the bottom left. Click the + button to create a new scene. Name it appropriately to keep your workspace organized; the new scene will appear in the list.
- In the Sources panel next to Scenes, click the + button and select Video Capture Device from the dropdown menu. This action prompts a dialog box to add a new source.
- Choose Create New and enter a descriptive name for your webcam source, then click OK. You will see a properties window for the device.
- From the Device dropdown, select your Mac’s webcam. If you have multiple cameras connected, ensure you pick the correct one by checking the preview.
- Adjust the resolution and frame rate settings here to balance quality and performance. For smoother videos, 30 fps is standard, while 60 fps provides more fluid motion but demands more resources.
- For resolution, select 1280x720 (720p) for faster processing or 1920x1080 (1080p) for higher detail. The preview window will show how your feed looks with the chosen settings.
- Click OK to confirm. Your webcam feed should now appear in the main OBS preview window within your new scene.
Example: Setting your webcam to 1280x720 at 30 fps provides a good balance for most recordings without overwhelming your Mac’s processing power. If you need higher quality and your system can handle it, 1920x1080 at 60 fps is a solid choice.
Ensure the preview updates smoothly, indicating the webcam is properly connected and configured. If the video feed is frozen or absent, double-check your device selection and permissions.
How to create and position a webcam overlay in your OBS scene
- In OBS Studio, click the "+" button under the "Sources" box and select "Image" to add an overlay graphic like a frame or logo. Name the source clearly and click "OK". You should see the image appear in your preview window.
- Choose an overlay image compatible with OBS, preferably PNG format with transparency, sized around 1920x1080 pixels for full HD scenes to avoid pixelation or distortion when resized.
- To position your webcam feed, click on the webcam source in the "Sources" list, then right-click and select "Transform" > "Edit Transform". Adjust the "Position" and "Size" values to move and resize the webcam window within the scene. The preview updates in real time.
- Arrange the layering order by dragging sources up or down in the "Sources" list. Ensure your overlay image source is above the webcam video source so the overlay is visible on top of your webcam feed.
- Use the red bounding box in the preview window to manually resize or drag sources. Holding the Shift key while dragging ignores the aspect ratio, useful for fine-tuning overlay fit.
Before adding overlays, verify your scene resolution matches your output settings to maintain sharpness. An example setup might position a 320x240 webcam feed in the lower right corner with a semi-transparent PNG frame overlay sized similarly for a clean, professional look.
Before-and-after screenshots of the scene layout typically show the raw webcam video filling the frame versus the webcam neatly framed with a custom overlay graphic layered above it, enhancing the visual presentation.
How to configure recording settings for webcam overlay videos in OBS Studio
Optimizing recording settings ensures your webcam overlay videos balance quality and file size effectively on Mac. Start by choosing an output format compatible with macOS; the MP4 or MOV container is usually best for broad compatibility.
- Open OBS Studio and go to Settings > Output. Set the Output Mode to Advanced to unlock detailed options. You should now see separate tabs for Streaming, Recording, and Replay Buffer.
- Click the Recording tab. Under Recording Format, select mp4 or mov. This ensures your files work smoothly with most Mac video editors.
- Choose the encoder. On Mac, selecting Apple VT H264 Hardware Encoder leverages your system’s hardware for efficient encoding without heavy CPU usage. You should see lower CPU usage during recording.
- Adjust the Bitrate to balance quality and file size. A bitrate between 8000 and 12000 kbps typically delivers clear 1080p video with manageable files. Higher bitrates produce larger files but better quality, while lower bitrates reduce file size at the cost of visual detail.
- Set the Recording Resolution under Video in Settings to match your output needs, commonly 1920x1080. Recording at your base canvas resolution avoids scaling artifacts.
- In Audio settings, ensure your microphone and system audio sources are enabled and set to appropriate sample rates (usually 44.1 or 48 kHz) to keep audio in sync with video.
- Under Advanced in Output, consider disabling Color Space and Color Range overrides unless you have specific color grading needs; these can increase processing load unnecessarily.
- Also, disable Buffering unless you experience frame drops, as buffering adds latency and can affect sync.
For example, recording a 5-minute 1080p webcam overlay video at 10000 kbps in MP4 format typically results in a file size around 350-450 MB, with smooth playback and good detail. Lowering bitrate to 6000 kbps reduces size but may introduce compression artifacts.
How to record your webcam overlay video in OBS Studio on Mac
- Open OBS Studio and select the scene with your webcam overlay. You should see the preview window showing your webcam and overlay elements arranged as configured.
- Click the Start Recording button in the bottom-right corner of the OBS interface. OBS will begin capturing your video with the overlay applied.
- While recording, monitor the Recording Time indicator next to the button to track the length of your video. You will also see a growing file size indication under Stats for the current recording session.
- To stop recording, click the Stop Recording button in the same location. OBS will finalize the video file and save it automatically.
- Locate your recorded video by opening OBS Preferences > Output > Recording Path. By default, videos save to your Movies folder unless changed.
- For smoother recording control, set up hotkeys via OBS Preferences > Hotkeys. Assign keys for Start Recording and Stop Recording to avoid clicking manually during capture. For example, set F9 to start and F10 to stop.
- Before recording, use the preview window to confirm your webcam overlay alignment and scene appearance. Adjust as needed to ensure everything is visible and positioned correctly.
Example hotkey setup will show your chosen keys next to recording actions, allowing quick start/stop without switching windows. Keep an eye on the recording duration and file size displayed to monitor performance and storage.
Troubleshooting common issues when recording webcam overlays in OBS Studio on Mac
If your webcam does not appear in OBS, first check System Preferences > Security & Privacy > Camera and ensure OBS is allowed access. If blocked, OBS cannot detect the webcam, and you might see an error like "No video devices found." After granting permission, restart OBS to see the webcam source.
When overlay graphics don’t show above the webcam video, verify the source order in the Scenes panel. The overlay source must be listed above the webcam source. Drag the overlay source higher if needed; the preview should update immediately.
Poor video quality or lag during recording often results from high bitrate or resolution settings. Try reducing the output resolution under Settings > Video and lowering the bitrate in Settings > Output. Also, check CPU usage in Activity Monitor; high load can cause dropped frames.
If recordings fail to save or are corrupted, confirm that the recording path in Settings > Output is valid and has sufficient disk space. OBS may show errors like "Failed to write to file." Changing the recording format to MP4 or MKV can improve reliability.
- Open System Preferences > Security & Privacy > Camera; enable OBS. You should see your webcam feed in OBS.
- In OBS, drag overlay sources above webcam in the Sources list. The overlay should appear on top in the preview.
- Lower resolution and bitrate in OBS Settings; observe smoother recording with fewer dropped frames.
- Check recording path and disk space; record a short test video to confirm file saves correctly.
Frequently asked questions
Can I use multiple webcams for overlays in OBS Studio on Mac?
Yes, OBS Studio allows you to add multiple webcams as separate video sources in your scene. You can add each webcam by clicking the “+” button under Sources, selecting “Video Capture Device,” and choosing the desired camera. Position and resize each webcam overlay independently to create a multi-camera setup.
How do I make the webcam overlay transparent or add effects?
To add transparency to your webcam overlay, use the “Filters” option on your video source. Select “Image Mask/Blend” to apply transparency or use “Chroma Key” to remove specific colors, such as a green screen background. You can also add effects like color correction or sharpening through the Filters menu to customize your webcam’s appearance.
What are the best video formats to record with OBS Studio on Mac?
OBS Studio supports several video formats, but MP4 and MOV are commonly recommended for Mac users due to broad compatibility. MP4 offers a good balance of quality and file size, but be aware that if OBS crashes, MP4 files may become corrupted. MOV files are more resilient to crashes but can be larger in size.
How do I fix OBS Studio not detecting my Mac’s built-in camera?
If OBS Studio doesn’t detect your built-in camera, first ensure you have granted OBS permission in System Preferences under Security & Privacy > Camera. Restart OBS after adjusting permissions. Also, check that no other application is using the camera, as only one app can access it at a time on macOS.
What this guide does not cover and who should look elsewhere
This guide focuses on recording webcam overlay videos with OBS Studio on Mac and does not cover setting up live streaming or advanced video editing after recording. If your goal is to stream live to platforms like Twitch or YouTube, you should consult dedicated live streaming tutorials that address bitrate optimization, stream keys, and real-time monitoring. For detailed video editing such as multi-track editing, color grading, or adding effects post-recording, professional video editing software guides will better suit your needs.
The single most useful next step is to familiarize yourself with OBS Studio’s audio input settings to ensure your microphone and system sounds are balanced and clear during recording. Proper audio configuration often makes the biggest difference in the professionalism of your final video. Check the “Audio” section under OBS Preferences and adjust sample rates, channels, and device selection before your next recording session.