How to Compress Pictures in PowerPoint on Mac: A Clear Step-by-Step Guide
This guide shows how to compress pictures in PowerPoint on Mac, balancing image quality with smaller file sizes for easy sharing.
You've just finished adding high-quality images to your PowerPoint presentation on your Mac, but the file size is ballooning, making it hard to share or upload. You want to reduce the size without losing the crispness of your visuals. This guide will walk you through how to compress pictures in PowerPoint on Mac effectively, balancing image quality with smaller file sizes.
We'll cover step-by-step methods using PowerPoint’s built-in compression tools, export options, and tips on when to avoid compression to preserve original image quality. You’ll also learn how to optimize media files and external image editing to keep your presentations sharp yet manageable in size.
Key takeaways
- Use PowerPoint’s "Compress Pictures" feature under the Picture Format tab, selecting "Use Document Resolution" for balanced quality and size.
- Export presentations with lower resolution settings via File > Export > File Format to reduce overall size.
- Avoid automatic compression by unchecking "Compress pictures" in Preferences when image fidelity is critical.
- Compress videos and audio separately using PowerPoint’s "Compress Media" option in the File menu.
- External image editors can reduce file size before importing, especially for large or numerous images.
Before you start: What you need to know about images and PowerPoint on Mac
PowerPoint on Mac supports common image formats such as JPEG, PNG, TIFF, and GIF. Each format affects file size differently: JPEG offers good compression for photographs with minimal quality loss, while PNG preserves transparency and sharpness but often results in larger files. TIFF files tend to be large and less common in presentations. Understanding these formats helps you choose images that balance quality and size before compression.
PowerPoint handles image compression on Mac somewhat differently than on Windows. For instance, Mac versions tend to apply less aggressive default compression, which can preserve quality but result in larger file sizes. This means you may need to manually compress images if you want smaller files for easier sharing or quicker loading times.
You might want to compress images to reduce the overall file size of your presentation, especially when sending via email or uploading online. However, compression can degrade image quality, which is critical when you want to display detailed graphics or brand visuals. Knowing when to avoid compression is just as important as knowing how to compress images.
PowerPoint’s built-in compression tools allow you to reduce image resolution and remove cropped areas, balancing file size and quality within the app. External tools offer more control and can optimize images before insertion, often achieving smaller sizes without visible quality loss. Combining both methods gives you flexibility in managing your presentation’s size and appearance.
| Image Format | Typical Use | File Size Impact |
|---|---|---|
| JPEG | Photographs | Smaller files with some quality loss |
| PNG | Graphics with transparency | Larger files, better quality |
| TIFF | High-quality images | Large files, less common |
How to compress pictures in PPT on Mac using PowerPoint’s built-in tools
PowerPoint on Mac offers a straightforward way to compress pictures directly within your presentation, helping reduce file size without leaving the app. To start, select any picture in your slide where you want to apply compression. This activates the Picture Format tab in the ribbon.
- Click on the Picture Format tab at the top of the window. When it opens, look for the Compress Pictures button, usually located on the right side.
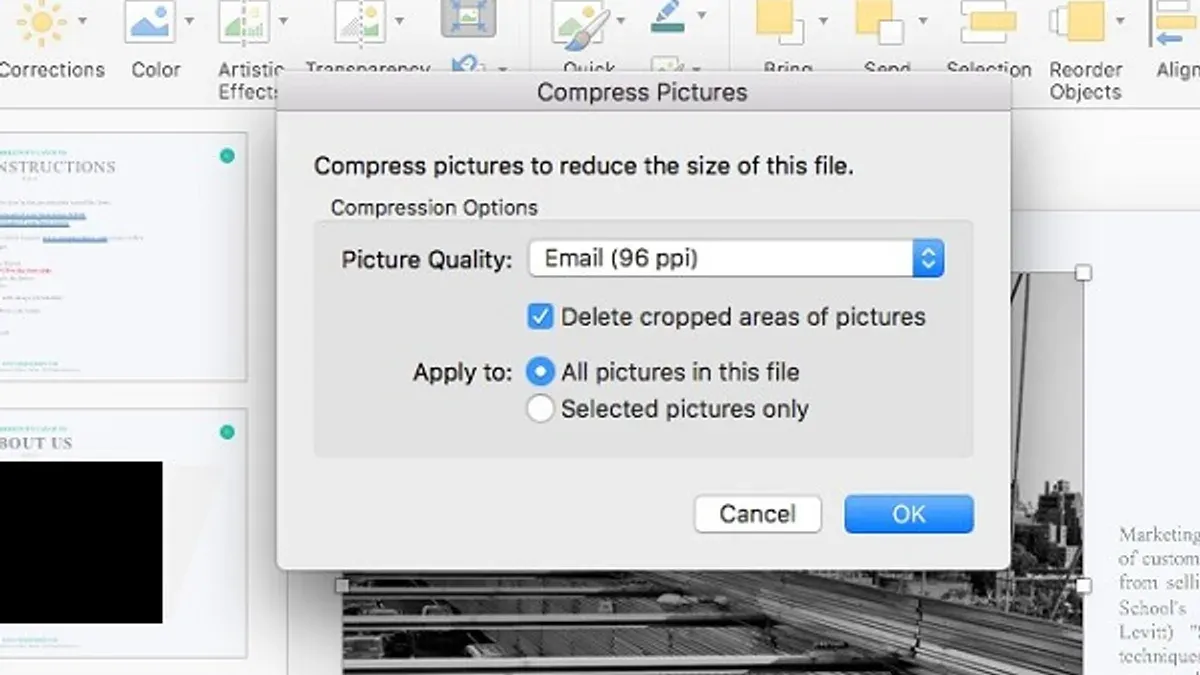
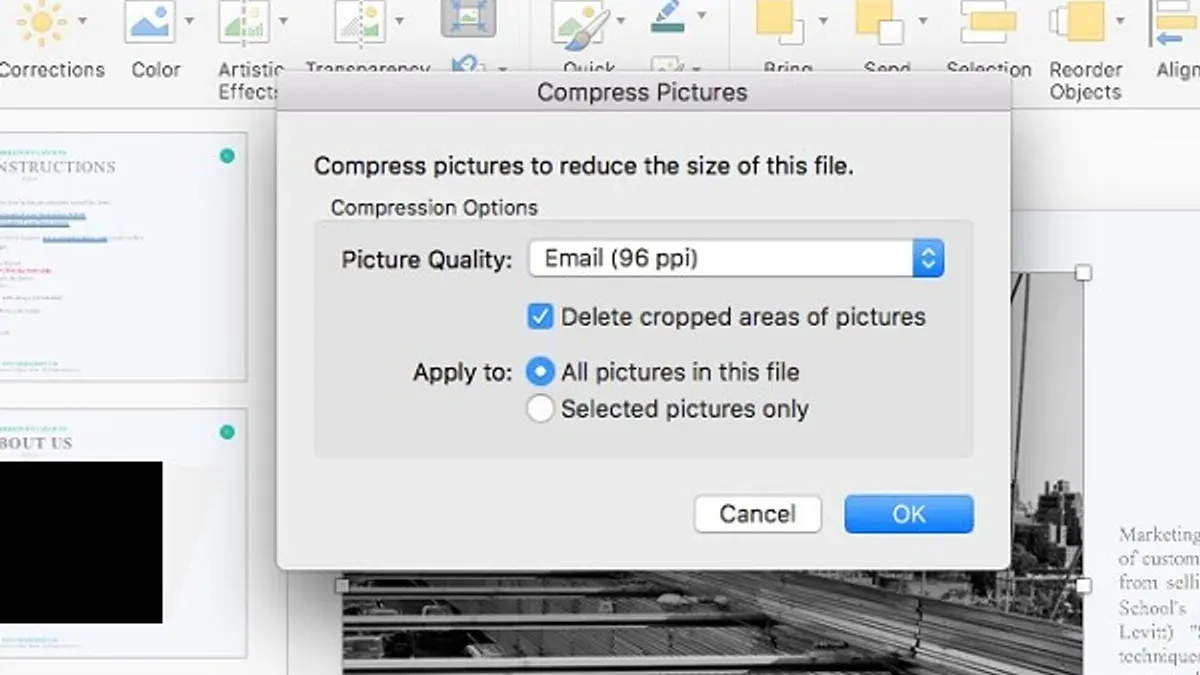
- Click Compress Pictures. A dialog box will appear with multiple compression options.
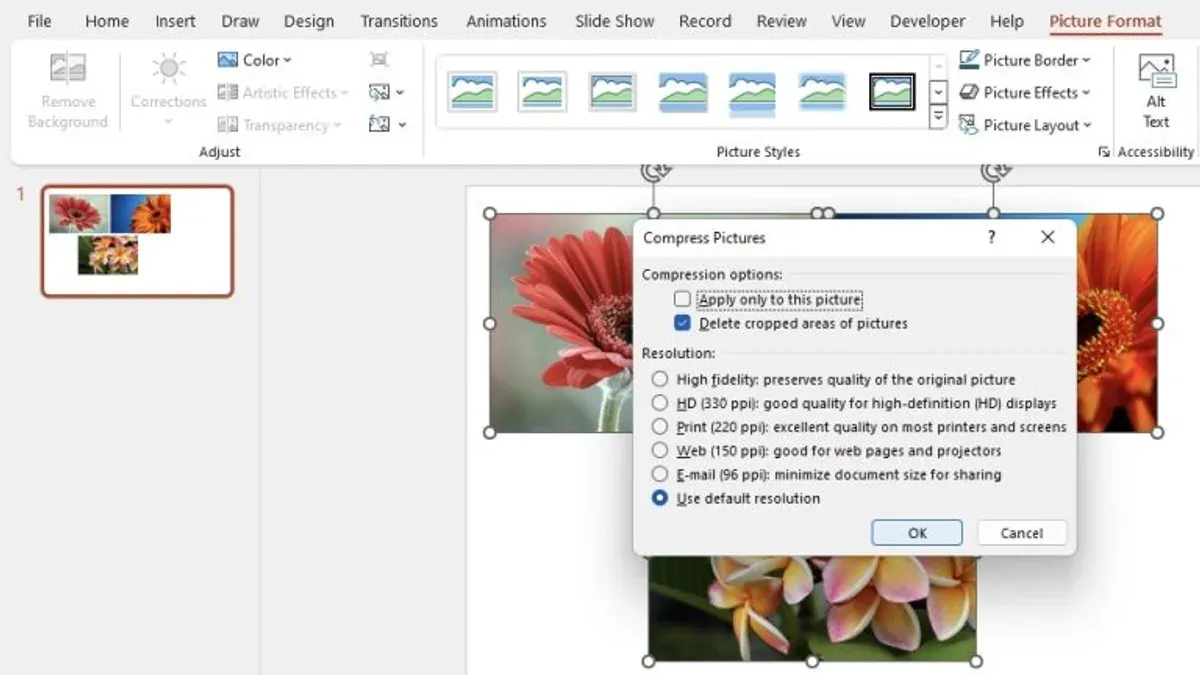
- Choose your desired resolution: High fidelity (keeps original quality), 150 ppi (good balance for onscreen presentations), or 96 ppi (smaller file size but lower clarity). Select the resolution that fits your needs.
- Decide whether to apply compression to only this picture or to all pictures in the presentation. Checking the box labeled Apply only to this picture limits changes to the selected image; unchecking it compresses all images.
- Click OK to apply compression. You will notice a reduction in file size, which can be verified by saving your file and checking its properties.
Lower resolution settings reduce file size significantly but may make images appear less sharp, especially when projected or zoomed. Higher resolutions maintain clarity but result in bigger files. Using the built-in tool lets you quickly balance these factors without extra software.
How to compress pictures in Microsoft PowerPoint on Mac using export options
Exporting your PowerPoint presentation is an effective way to reduce file size while managing image compression outside the built-in tools. You can export your presentation as a PDF or a compressed PPTX file, each with different impacts on image quality and file size. Exporting to PDF often results in smaller files because the format is optimized for document sharing, but it flattens images, which means you lose editing flexibility. Exporting as a compressed PPTX preserves editability but reduces image resolution based on your chosen settings.
- Open your presentation in PowerPoint on your Mac.
- Click File in the menu bar, then select Export.
- In the Export dialog, choose File Format from the dropdown menu. Select PDF to create a PDF version.
- Before exporting, click Options. Under PDF options, choose Minimum size (publishing online) to compress images aggressively. Click OK.
- Choose your export location and click Export. The resulting PDF will have smaller images and a reduced file size compared to the original PPTX.
- Alternatively, to export a compressed PPTX, repeat steps 2 and 3 but select PowerPoint Presentation (.pptx).
- Click Tools beside the Format dropdown, select Compress Pictures, and choose your desired resolution (e.g., Web (150 ppi)).
- Click Export. This creates a new PPTX with compressed images, maintaining editability but reducing file size.
Comparing file sizes, PDFs typically yield smaller files due to aggressive compression and format optimization but are not editable. Compressed PPTX files keep your presentation editable and allow moderate file size reduction. Use export compression when you want to prepare a final version for sharing or printing (PDF) or when you need a smaller editable file (compressed PPTX). This method supplements built-in compression by offering format-specific options that better match your distribution needs.
How to compress media in PowerPoint on Mac for videos and audio
Compressing embedded videos and audio in PowerPoint on Mac is a valuable way to reduce your presentation’s file size, especially when it contains large media files. This option is found under the Media Format tab once you select a video or audio clip in your slide. Using media compression can significantly shrink your file, but it may slightly impact playback quality depending on the settings you choose.
Follow these steps to compress embedded media:
- Select the video or audio file on your slide. When selected, the Media Format tab will appear in the ribbon.
- Click on the Media Format tab, then locate and click the Compress Media button on the right side of the toolbar. A drop-down menu will appear with compression quality options.
- Choose a compression level: Presentation Quality preserves most detail but offers moderate compression; Internet Quality balances file size and playback quality; Low Quality maximizes compression but reduces playback fidelity.
- Wait for PowerPoint to process the compression. Once completed, you'll see a summary of the file size reduction achieved for your media. This reduction can be quite noticeable, often cutting media size by 30% or more depending on the original file.
Keep in mind, compressing media can slightly lower playback clarity or audio fidelity, which might be noticeable on high-resolution displays or quality speakers. If maintaining pristine media quality is critical, avoid compressing those specific files. Instead, consider optimizing other elements or using external tools to compress media before inserting it into your presentation.
How to not compress images in PowerPoint Mac when you want to keep original quality
PowerPoint on Mac automatically compresses images to reduce file size, but you can disable this feature to preserve your images' original quality. This is especially useful when your presentation requires sharp, high-resolution visuals, such as detailed photographs or graphics meant for large displays.
Follow these steps to turn off automatic picture compression:
- Open your presentation in PowerPoint.
- Click PowerPoint in the top menu bar, then select Preferences.
- In the Preferences window, choose Edit.
- Look for the option labeled Automatically compress pictures when saving and uncheck this box.
- Close the Preferences window and save your presentation.
After disabling this, PowerPoint will retain the original resolution of your images when saving, preventing unwanted quality loss. When you insert high-resolution images, they remain intact without PowerPoint resizing or compressing them.
Keep in mind that avoiding compression will increase your presentation file size, which might affect performance, especially with numerous large images. Consider this trade-off when deciding whether to preserve original quality or reduce file size.
To verify the effect, insert a high-resolution image, save your presentation with compression disabled, then compare it with a version where compression is enabled. You will notice crisper details and no visible artifacts in the uncompressed version, confirming the preservation of image quality.
How to compress PowerPoint file on Mac by optimizing images outside PowerPoint
Before inserting images into your PowerPoint slides, compressing them externally can significantly reduce your presentation’s overall file size. Using Mac’s Preview app, Adobe Photoshop, or online tools like TinyPNG or JPEG-Optimizer allows you to reduce image dimensions and file weight without losing too much clarity. For example, resizing a 4000x3000 pixel image down to 1920x1080 pixels often cuts file size by more than half while maintaining good screen resolution.
When choosing image formats, prefer JPEG for photographs and PNG for images needing transparency. Adjust compression levels carefully: high compression decreases size but can cause visible artifacts. Pre-compressed images interact well with PowerPoint’s internal compression, often resulting in a smaller final file than relying solely on PowerPoint’s tools.
Follow these steps to optimize images before adding them to PowerPoint:
- Open your image in Preview. Use the “Tools” menu and select “Adjust Size.” Enter dimensions that suit your slide layout, such as 1920 pixels wide for full-slide images. Press OK. The image file size should drop; check by selecting “Get Info.”
- Export the resized image by clicking “File” > “Export.” Choose JPEG format, then drag the quality slider to around 70-80%. Save the new file. The smaller file size indicates successful compression.
- Insert the compressed image into your PowerPoint slide. The presentation file size will reflect this smaller image, making the overall file lighter.
By optimizing images externally before insertion, you retain control over quality and achieve more consistent file size reduction compared to relying solely on PowerPoint’s compression. This approach is especially effective for presentations with many high-resolution photos.
Troubleshooting common issues when compressing pictures in PowerPoint on Mac
If you find compression options grayed out or unavailable, it is often because the presentation is in a format that does not support compression, such as when the file is opened in read-only mode or if you are working on a PDF export instead of the editable PPTX file. Ensure you have write access and are editing the original presentation file. Also, compression tools require the image to be selected or a picture to be active in the slide.
If image quality is too degraded after compression, you can adjust the compression level by selecting a higher resolution option under the Compress Pictures settings. Remember that choosing options like "Use document resolution" or "High fidelity" preserves more quality but may reduce the compression effect. Always preview images after compression to confirm the balance matches your needs.
To recover original images after accidental compression, PowerPoint on Mac does not provide an automatic undo for compression once the file is saved. Your best option is to revert to a previously saved version using Time Machine or the "Revert To" feature in the File menu if available. Regularly backing up your presentation before compressing images is recommended.
Performance issues or crashes when handling large images may result from limited system memory or oversized image files. Try reducing image dimensions or using external image optimization tools before inserting images. Closing other applications and restarting PowerPoint can also improve stability.
- Check file format and permissions: Open the editable PPTX file with full write access. If compression options are active, you should see the Compress Pictures button enabled under the Picture Format tab.
- Adjust compression settings: Select an image, click Compress Pictures, then choose "Use document resolution" or "High fidelity" and apply. Verify image clarity on the slide.
- Recover original images: If quality is unacceptable, close the file without saving, then reopen from backup or use File > Revert To > Browse All Versions to restore earlier content.
- Resolve performance issues: Before adding images, reduce their size externally using Preview or another image editor. Restart PowerPoint if it becomes unresponsive during compression.
Comparing image compression options: built-in vs external tools and when to use each
Choosing between PowerPoint’s built-in compression and external image optimization depends on your priorities for quality, file size, and workflow efficiency. PowerPoint’s compression is quick and convenient, integrated directly into the app, making it ideal for fast adjustments or when you need a smaller file for casual sharing. However, it can sometimes reduce image quality noticeably, especially at lower resolution settings.
External tools, such as dedicated image compressors or photo editing software, offer more control over compression parameters. These tools typically produce higher-quality results and can significantly reduce file size before images are inserted into your presentation. This approach is better suited for professional presentations where image clarity is critical and you have time to prepare assets carefully.
In collaborative workflows, built-in compression helps maintain consistency across different users’ edits because compression settings are embedded in the PowerPoint file. External compression requires that all collaborators use the same optimized images, which can complicate version control but ensures maximum quality.
| Method | Estimated Quality Retention | Typical File Size Reduction | Time & Effort | Best Use Case |
|---|---|---|---|---|
| PowerPoint Built-in Compression | 70-90% | Moderate (20-50%) | Low (minutes) | Quick fixes, casual sharing, collaborative editing |
| External Image Optimization | 85-100% | High (40-70%) | Moderate to High (10-30 minutes) | Professional presentations, high-quality prints, pre-import optimization |
- Identify your primary goal: speed or image quality. If you need a fast file size reduction, use PowerPoint’s built-in compression.
- If maintaining image clarity is essential, compress your images externally before adding them to PowerPoint.
- For collaborative projects, consider how compression affects all users and decide whether embedded compression or shared optimized images fit your workflow best.
- Use the comparison table as a quick reference to balance quality, size, and effort for your specific presentation needs.
- Test a sample slide with your chosen method to verify the balance between file size and image quality before finalizing your presentation.
Frequently asked questions
How to compress pictures in powerpoint?
To compress pictures in PowerPoint on Mac, select an image, then go to the Picture Format tab. Click on "Compress Pictures" in the ribbon. Choose your desired resolution, such as "Email (96 ppi)" for maximum compression or "HD (150 ppi)" for better quality, and decide whether to apply compression to all images or just the selected one. Finally, confirm by clicking "OK."
How to compress pictures on powerpoint?
You can compress pictures directly within PowerPoint by selecting any image and accessing the Picture Format tab. Use the "Compress Pictures" option to reduce file size by adjusting resolution and removing unnecessary data like cropped areas. This helps shrink the file without manually editing images outside PowerPoint.
How to compress images in a powerpoint?
Compress images in PowerPoint by selecting an image, opening the Picture Format tab, and choosing "Compress Pictures." Pick a resolution that balances quality and size, such as "Web (150 ppi)" for presentations shown onscreen. Make sure to uncheck "Apply only to this picture" if you want to compress all images, then click "OK."
How to compress photos in a powerpoint?
Compress photos by clicking on a photo, then navigating to the Picture Format menu and selecting "Compress Pictures." Select a target resolution appropriate for your presentation purpose, and decide whether to compress all photos or just the selected one. This reduces the PowerPoint file size while retaining acceptable photo quality.
How to compress pics in powerpoint?
To compress pics in PowerPoint on Mac, select any picture and open the Picture Format tab. Click "Compress Pictures," choose a compression resolution such as "Email (96 ppi)" or "Print (220 ppi)," and decide if compression applies to all pictures or only the selected image. Confirm with "OK" to complete the process.
Understanding the limits of this guide
This guide focuses on native PowerPoint tools and widely used external workflows for compressing images and media on Mac. It does not cover advanced scripting, automation, or third-party plug-ins that can provide more granular or batch compression control. Users looking for professional-grade optimization, such as custom compression algorithms or integration with graphic design software, may need to explore specialized software outside of PowerPoint.
For those handling extremely large files or who require precise control over every image's compression level, consider dedicated image editing applications or professional media compression tools that offer greater customization. This guide aims to help most Mac users balance image quality and file size effectively within PowerPoint's built-in capabilities and common external methods.
To get the most out of PowerPoint’s compression options, your next step should be to carefully select compression settings when exporting your presentation. Choose "File" > "Export," then select "PowerPoint Presentation (.pptx)" and adjust the "Image Quality" dropdown to Medium or High, depending on your balance preference. This step often makes the biggest difference in reducing file size without noticeably sacrificing image clarity.
See also: How to Use Presenter View in PowerPoint on Mac: Step-by-Step Guide · How to Record Voiceover in PowerPoint on Mac: Step-by-Step Guide · How to Embed Fonts in PowerPoint on Mac: A Clear Step-by-Step Guide