How to Create and Use Proxies in Premiere Pro on Mac
This guide shows how to create and use proxies in Premiere Pro on Mac to edit high-resolution footage smoothly and efficiently.
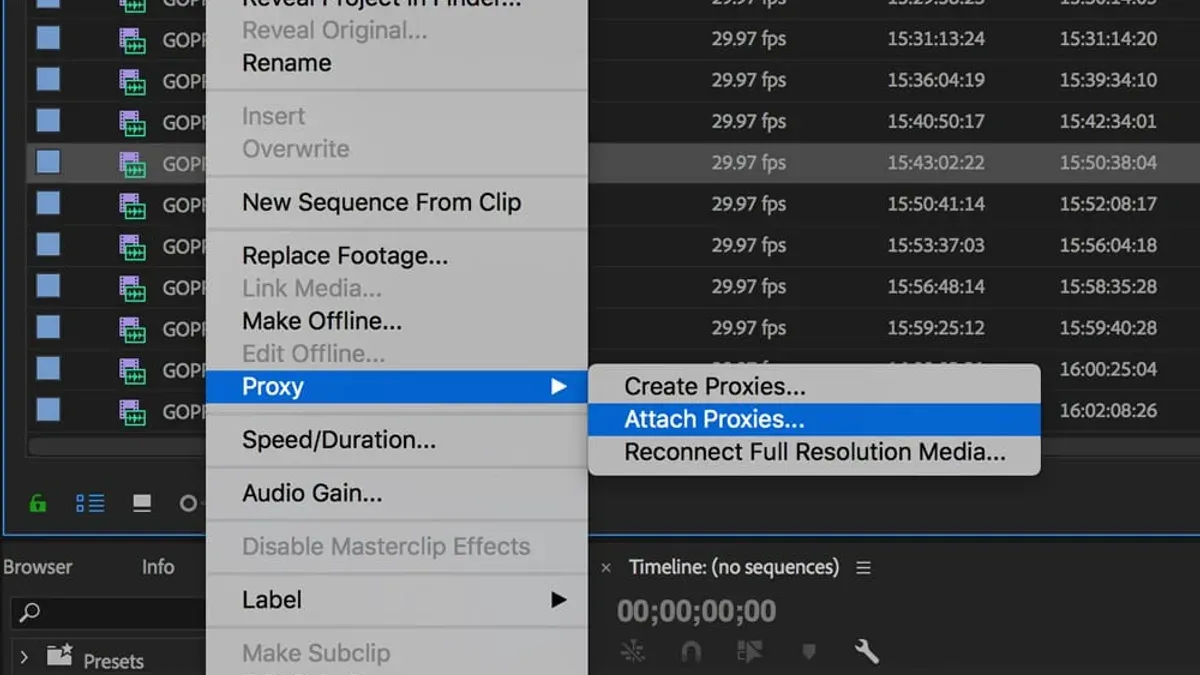
Working with high-resolution footage on a Mac can quickly slow down your editing process in Premiere Pro. You may notice lagging timelines and delayed responses, especially when dealing with 4K or higher resolution files.
This article explains how to create proxies in Premiere Pro on Mac and guides you through the full proxy workflow. You'll learn how to generate proxies, attach them to existing clips, and switch between proxies and full-resolution footage for smoother editing without compromising final quality.
Key takeaways
- Use the Media Encoder preset "QuickTime ProRes Proxy" for efficient proxy creation on Mac.
- Attach proxies to clips via the Project panel by right-clicking and selecting "Proxy > Attach Proxies."
- Toggle proxy usage with the "Toggle Proxies" button in the Program Monitor for seamless switching.
- Maintain original clip quality by editing with proxies enabled but exporting from full-resolution media.
- Check proxy file paths and formats if proxies do not attach or playback lags.
Before you start: what you need to create proxies in Premiere Pro on Mac
Creating proxies in Premiere Pro on Mac requires meeting specific system and software conditions to ensure smooth performance. Your Mac should run macOS Mojave or later, with at least 16GB of RAM recommended for handling proxy workflows efficiently. Storage speed significantly affects proxy creation time; using an SSD with fast read/write speeds will reduce wait times compared to traditional HDDs.
Premiere Pro must be updated to a recent version that supports proxy workflows, typically versions 14.0 and above. Begin your project with a well-organized media folder structure to simplify proxy management. Footage shot in high-resolution formats like 4K or higher benefits most from proxies, as these reduce processing load during editing.
Premiere Pro supports proxy formats such as ProRes Proxy and H.264 on Mac. ProRes Proxy files are larger but offer faster rendering and smoother playback, while H.264 creates smaller files but can be slower to process. Consider your storage capacity and performance needs when selecting a proxy codec.
How to create proxies in Premiere Pro on Mac
- Open your project in Premiere Pro and select the clips you want to create proxies for in the Project panel or Media Browser. Once selected, right-click and choose Proxy > Create Proxies. You will see the Create Proxies dialog.
- In the dialog, choose a proxy preset from the available options such as 1024x540 or Proxy - QuickTime 480x270. To customize encoding settings, click the wrench icon next to the preset to open Adobe Media Encoder, where you can adjust codec, resolution, and bitrate. This flexibility lets you balance quality and file size.
- Specify the destination for the proxy files. By default, Premiere Pro saves proxies alongside the original media in a subfolder named Proxies. You can change this to a different folder on your Mac to better organize your storage.
- Click OK to start proxy creation. Adobe Media Encoder launches in the background and begins encoding. You can continue working while proxies generate; time varies by footage resolution and Mac hardware but generally ranges from a few seconds for low-res clips to several minutes for 4K footage.
- Once encoding finishes, Premiere Pro automatically attaches proxies to the original clips. You’ll see a proxy badge icon on the clip thumbnails in the Project panel indicating successful proxy linkage.
Proxy presets commonly include options like QuickTime ProRes Proxy and H.264 at lower resolutions. Selecting a preset with a lightweight codec speeds up editing but reduces visual fidelity. Adjust these settings based on your workflow needs and available storage.
How to attach proxies to existing clips in Premiere Pro
If you imported clips without proxies initially, you can attach proxies later to improve editing performance. The key step is ensuring proxy files match the original clips in filename and format.
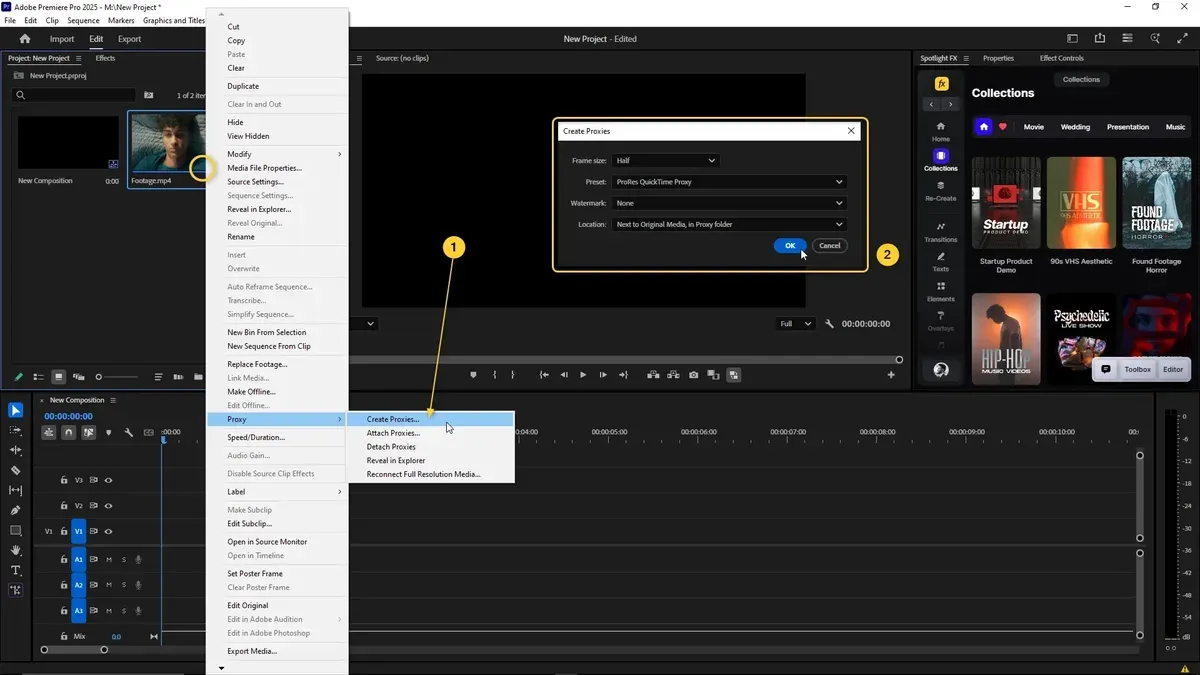
- Select the clips in your Project panel that need proxies attached. You can select multiple clips by holding Shift or Command.
- Right-click the selected clips and choose Proxy > Attach Proxies. This opens a file browser.
- Navigate to the folder containing your proxy files. The proxy filenames must correspond exactly to the original clips' filenames, typically with an added suffix like “_proxy” or similar depending on your naming convention. The file format should also be compatible (e.g., QuickTime MOV or MP4).
- Select the matching proxy files and confirm. Premiere Pro attempts to link the proxies to the original clips.
- Check the Proxy status column in the Project panel. If proxies attach successfully, you will see a proxy icon next to the clip and the status will show as "Attached."
- If the status remains "None" or an error appears, verify the proxy filenames and formats match the originals exactly. Mismatches are the most common cause of failed attachment.
For example, if your original clip is named Scene01_CamA.mov, the proxy should ideally be named Scene01_CamA_proxy.mov or follow the naming pattern you used when creating proxies. Accurate matching ensures smooth linking.
After attachment, toggling proxies on and off during editing confirms they function correctly, allowing you to switch between high-res and proxy footage seamlessly.
How to use proxies in Premiere Pro for smoother editing
Using proxies in Premiere Pro on Mac can significantly improve playback and rendering speed, especially with high-resolution footage. The key control is the Toggle Proxies button, which switches between proxy and full-resolution files seamlessly.
- Open your Premiere Pro project and locate the Toggle Proxies button in the Program Monitor toolbar. If it’s not visible, click the plus (+) icon to customize the button bar and drag the Toggle Proxies icon into place. When enabled, the button appears blue.
- Click the Toggle Proxies button to switch to proxy files. You should notice smoother playback and faster scrubbing, as proxies are lower resolution and less demanding on Mac hardware.
- Click the button again to return to full-resolution files for final color grading or effects work. This toggling allows you to balance speed and quality during editing.
- Customize your workspace by saving a layout with the Toggle Proxies button included for quick access during your editing sessions.
- When collaborating or sharing projects, ensure proxies are included or easily recreated; otherwise, playback benefits may be lost on other Macs without the proxy files.
Performance gains vary by Mac model and footage resolution, but proxies typically reduce playback lag and dropped frames noticeably on Retina MacBooks and Mac desktops. Using proxies does not affect export quality since full-resolution files are used during final rendering.
How to edit with proxies in Premiere Pro without losing quality
When editing with proxies in Premiere Pro on Mac, proxies are used only during the editing process to improve playback performance. The full-resolution footage is automatically used during export, ensuring the final output maintains the highest quality.
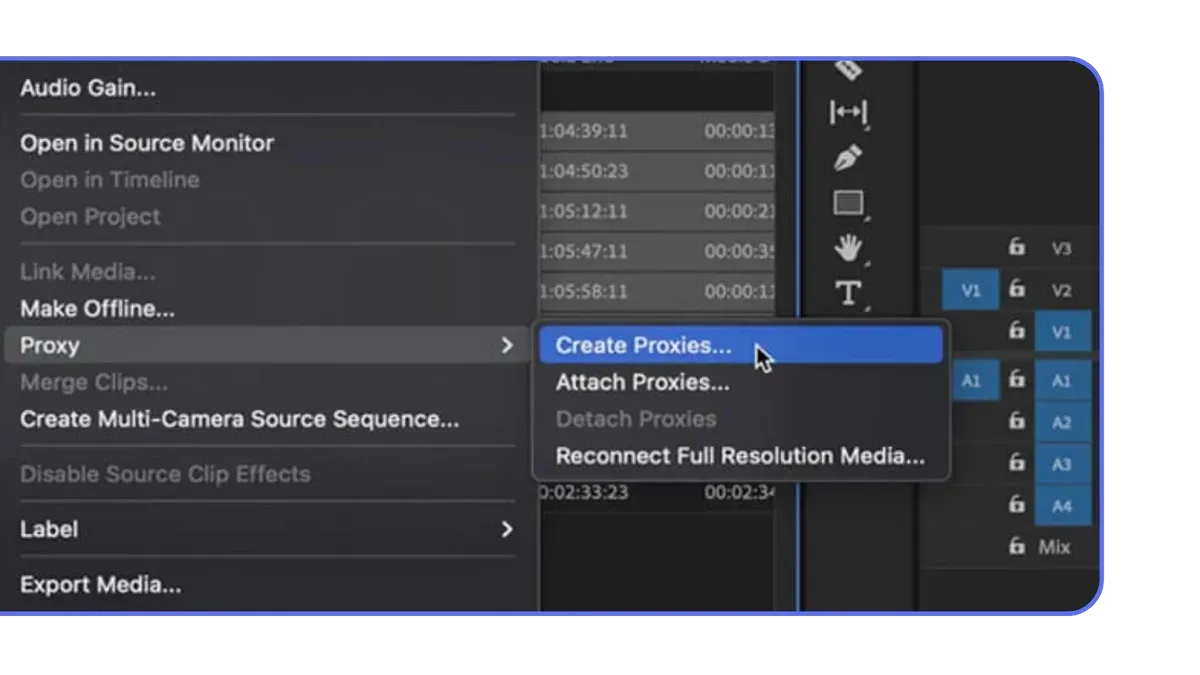
- Confirm that proxies are enabled for your clips by checking the "Toggle Proxies" button in the Program Monitor toolbar. When active, you should see your footage playing smoothly with reduced resolution.
- Complete your editing with proxies enabled to benefit from faster scrubbing and responsiveness. All edits, effects, and transitions apply to the proxy files but are linked to the original media.
- Before exporting, disable "Toggle Proxies" to switch back to full-resolution media. This ensures Premiere Pro uses the original files for rendering the final video.
- Go to File > Export > Media and verify that export settings match your desired output quality. Premiere Pro automatically switches to the full-resolution files during export, so no proxy files are included in the final render.
- Export your project. The final video will retain the original quality without degradation from proxies.
Common pitfalls: Avoid exporting with proxies still enabled, as this will result in low-resolution output. Also, ensure proxies are correctly linked; mismatched filenames or missing proxies can cause Premiere Pro to fallback to original media unexpectedly.
Following this workflow guarantees a smooth editing experience without compromising final video quality.
Troubleshooting common proxy issues on Mac in Premiere Pro
When proxies do not attach or fail to appear in your timeline, verify that proxy filenames and formats exactly match the original clips. An error like “Proxy files not found” indicates a mismatch or relocation of proxy files.
If proxy playback does not improve performance, check that the Toggle Proxies button is enabled in the Program Monitor. Also, ensure your Mac’s hardware acceleration settings are active under Premiere Pro > Preferences > Media.
Missing or accidentally deleted proxy files require you to recreate proxies. To avoid this, keep your proxy files organized in a dedicated folder and avoid moving or deleting them outside Premiere Pro.
To reset proxy preferences and clear related cache, follow these steps:
- Close Premiere Pro.
- Navigate to ~/Library/Application Support/Adobe/Common/Media Cache and delete the contents; this clears cached proxy data.
- Reopen Premiere Pro and go to Preferences > Media.
- Click Clean next to Media Cache Database to reset the cache.
- Restart Premiere Pro; proxy settings will reset and cache will rebuild.
If you encounter the error “Cannot attach proxies: file not found”, double-check that proxies are in the designated folder and that naming conventions are consistent.
- How to Use Hardware Encoding in Premiere Pro on Mac
- How to Fix Premiere Pro Lagging Playback on Mac: Step-by-Step Guide
Frequently asked questions
How to make proxies in premiere?
To make proxies in Premiere Pro, import your high-resolution clips, right-click them in the Project panel, and select Proxy > Create Proxies. Choose a preset like 1024x540 or create a custom one, then set the destination for the proxy files. Adobe Media Encoder will open automatically to generate the proxies.
How to create proxy in premiere pro?
Creating proxies involves selecting clips, right-clicking, and choosing Proxy > Create Proxies. Pick a proxy preset matching your editing needs, such as a low-resolution format like QuickTime with a low bitrate. Confirm the destination folder, and Media Encoder will handle the proxy creation.
How to attach proxies in premiere?
If you have existing proxies, select the original clips in the Project panel, right-click, and choose Proxy > Attach Proxies. Then, browse to the proxy files and link them. This method is useful when proxies were created outside Premiere Pro or need to be reconnected.
How to make proxy in premiere pro?
Making a proxy starts at the Project panel by right-clicking clips and selecting Proxy > Create Proxies. Choose a suitable preset and file location. Adobe Media Encoder will launch to convert the files, producing proxies that Premiere Pro automatically links.
How do I make proxies in Premiere Pro quickly on a Mac?
For quick proxy creation on a Mac, use the Proxy > Create Proxies option with a fast preset like 1024x540 H.264. Ensure Adobe Media Encoder is running to speed up encoding. You can also enable Ingest with proxy creation during import to streamline the process.
What this guide does not cover
This guide does not cover proxy workflows for collaborative cloud editing or third-party proxy creation tools; it focuses on Premiere Pro’s built-in proxy features on Mac. If you work extensively with remote teams or require advanced proxy customization beyond Premiere Pro’s native capabilities, consider exploring specialized proxy management software or cloud-based editing platforms that support proxy syncing and sharing.
The single most useful next step is to familiarize yourself with the Media Encoder’s preset options for proxies under the “Create Proxies” dialog. Choosing the right preset—such as 1024x540 or 480x270 H.264 formats—can significantly impact editing performance and disk space usage. Experiment with these settings to find the balance that suits your project’s resolution and your Mac’s hardware capabilities for smoother playback without compromising final output quality.