Mac Keyboard Shortcut to Zoom In and Out: A Clear How-To Guide
Discover how to quickly zoom in and out on your Mac using keyboard shortcuts for better readability and efficient navigation.
You’re working on a detailed spreadsheet or reading an article, and the small text strains your eyes. Instead of reaching for the trackpad or mouse, you want a quicker, more efficient way to adjust your view.
This guide explains how to use the Mac keyboard shortcut to zoom in and out, streamlining your navigation without interrupting your workflow. You’ll learn practical keyboard shortcuts for both MacBooks and desktops, how to utilize built-in macOS accessibility Zoom features, and ways to customize shortcuts to suit your preferences. Additionally, common pitfalls and troubleshooting tips will help ensure smooth control over your screen magnification.
Key takeaways
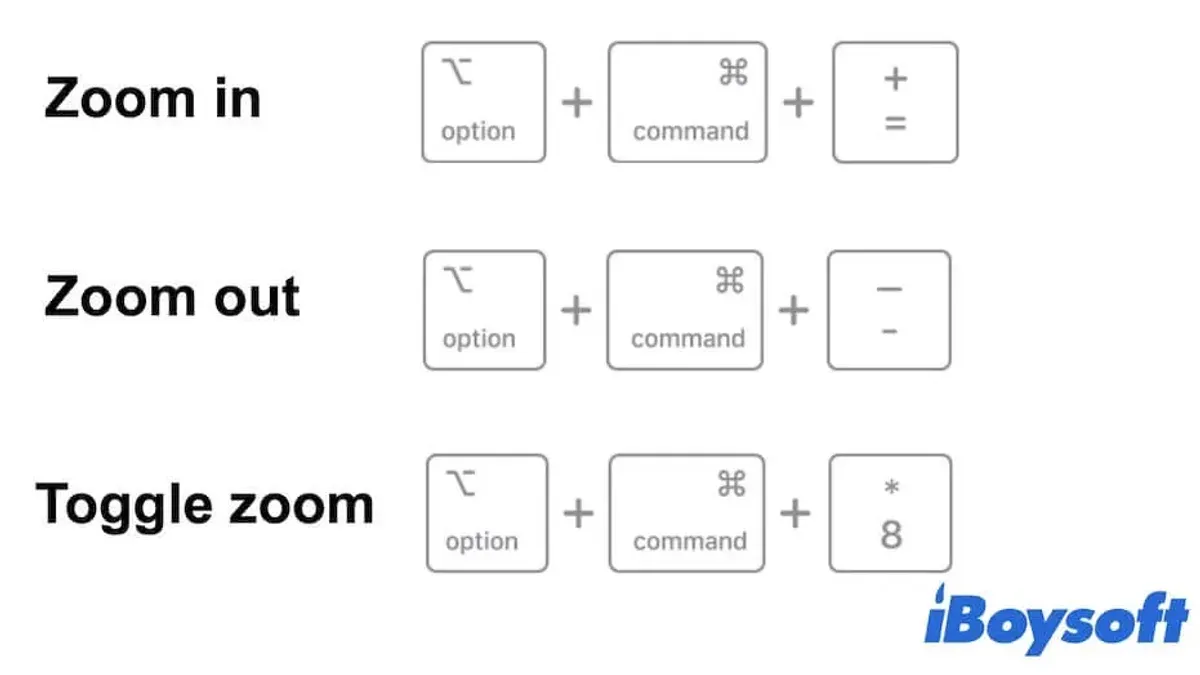
- Use Option + Command + = to zoom in and Option + Command + - to zoom out by default.
- Enable Zoom under System Settings > Accessibility > Zoom for keyboard control over screen magnification.
- Customize zoom shortcuts via System Settings > Keyboard > Shortcuts > Accessibility for personalized use.
- Common mistakes include not enabling Zoom accessibility features before using shortcuts and confusing shortcut keys.
- Zoom shortcuts improve readability, detailed work, and accessibility without needing external tools.
What zooming on Mac means and why it matters
Zooming on a Mac refers to the ability to magnify the content displayed on your screen, allowing you to see details more clearly without changing the physical display size. This feature is crucial not only for users with visual impairments but also for designers, editors, and anyone who needs to focus on small elements during their workflow. For example, a graphic designer might zoom in to edit fine details in an image, while a user with low vision can enlarge text and interface elements to reduce eye strain.
macOS includes built-in Zoom accessibility features accessed through System Settings > Accessibility > Zoom, which provide customizable zoom styles such as full screen, picture-in-picture, or split screen. These zoom options enhance usability by allowing users to tailor magnification to their specific needs.
Zooming serves as both an accessibility tool and a general convenience feature. While it supports users who might otherwise struggle with standard text sizes or interface elements, it also speeds up navigation and precision tasks for all users. Practical testimonials from macOS users often highlight how keyboard shortcuts for zooming improve productivity by minimizing reliance on trackpads or mice for navigation.
How do you zoom in and out on Mac using keyboard shortcuts
On a Mac, the primary keyboard shortcuts for zooming the entire screen are Option + Command + Plus (+) to zoom in and Option + Command + Minus (-) to zoom out. Pressing these combinations will enlarge or reduce the content across all visible apps, providing a full screen zoom effect that helps you focus on details without using a mouse.
It’s important to distinguish this from zooming within individual applications, such as browsers or document editors, where shortcuts like Command + Plus (+) or Command + Minus (-) adjust the zoom level only inside that app window, not the whole screen.
If these system-wide zoom shortcuts aren’t working, you likely need to enable them first. Navigate to System Settings > Accessibility > Zoom. Here, toggle on “Use keyboard shortcuts to zoom.” This panel also offers options to customize the zoom style and behavior.
For example, after enabling the shortcuts, pressing Option + Command + Plus while viewing a webpage will magnify the entire screen, making text and images larger everywhere, which differs from simply enlarging a browser window’s content.
The settings panel includes visual guides and can show you screenshots for clarity on how the shortcuts function, ensuring you can set up and troubleshoot your zooming efficiently.
How to zoom in and out on MacBook and Mac desktop with keyboard
The keyboard shortcuts for zooming in and out on MacBook and desktop Macs are fundamentally the same, typically involving the Option + Command keys combined with Plus (+) or Minus (–). However, hardware differences mean you might need to adjust how you use these shortcuts depending on your device.
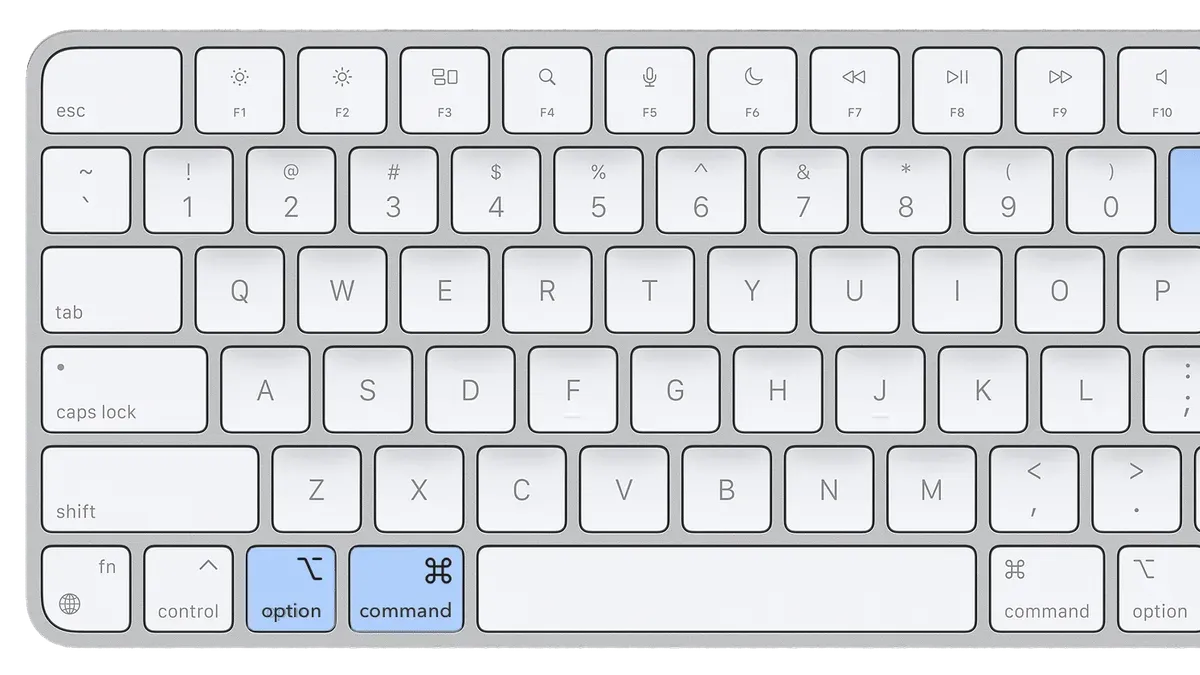
On MacBooks with a Touch Bar, the traditional function keys (F1-F12) are replaced by a dynamic strip, which can sometimes obscure the standard Zoom controls found on desktop keyboards. If you rely on function keys for other shortcuts, you may need to press the fn key to access the function key layer. For example, on a MacBook, pressing fn + Option + Command + + can be necessary if your Touch Bar or keyboard shortcuts require function key activation to register.
External keyboards connected to your Mac can change the shortcut experience as well. If you use a non-Apple keyboard, key labeling and placement might differ, but the modifier keys (Option, Command) remain consistent. You may need to familiarize yourself with the external keyboard’s layout to ensure you press the correct keys. For instance, some Windows keyboards map the Windows key to Command, so pressing Option + Windows key + + might mimic the Mac zoom shortcut.
| Keyboard Type | Zoom In Shortcut | Zoom Out Shortcut | Notes |
|---|---|---|---|
| MacBook (Touch Bar) | Option + Command + Plus (+), or fn + Option + Command + Plus (+) | Option + Command + Minus (–), or fn + Option + Command + Minus (–) | Use fn if function keys are required |
| Mac desktop (Apple Keyboard) | Option + Command + Plus (+) | Option + Command + Minus (–) | Standard function keys available |
| External keyboard | Option + Command + Plus (+) or mapped equivalent | Option + Command + Minus (–) or mapped equivalent | Key labels may vary; check modifier key mapping |
For example, if you have a MacBook Pro with a Touch Bar, you might try pressing Option + Command + + to zoom in, but if this doesn’t work immediately, adding the fn key (fn + Option + Command + +) often resolves the issue. On a desktop Apple keyboard, simply pressing Option + Command + + is usually sufficient.
How to zoom out on Mac keyboard effectively
To zoom out on a Mac using the keyboard, the exact shortcut is Option + Command + Minus (–). Pressing these keys together decreases the zoom level incrementally, allowing you to return the display to its original size or a more comfortable viewing level.
Common errors include pressing the wrong keys, such as using the hyphen key on the numeric keypad instead of the main keyboard’s minus key, or missing the crucial step of enabling the Zoom feature in System Preferences > Accessibility > Zoom. Without enabling Zoom here, the shortcuts will have no effect.
For example, if your screen is zoomed in to 200%, pressing Option + Command + Minus once reduces it to about 150%. Pressing it repeatedly steps down the zoom level until it returns to 100% (normal size). If you accidentally zoom in too far, use this shortcut multiple times to quickly reset the view.
Another tip is to avoid trying to zoom out by simply pressing Command + Minus alone, which often triggers other app-specific shortcuts like reducing font size but won’t adjust the macOS zoom level.
Remember, if the shortcut seems unresponsive, double-check that the Zoom option is enabled and that you are pressing the correct key combination precisely to avoid confusion and wasted time.
Using keyboard shortcuts with macOS Zoom accessibility features
macOS offers several Zoom accessibility options that you can control and customize through keyboard shortcuts, extending beyond simple zoom in and out. First, enable Zoom by going to System Settings > Accessibility > Zoom, where you can choose your preferred zoom style: Full Screen, Split Screen, or Picture-in-Picture.
Full Screen zoom enlarges the entire display, while Split Screen divides your screen into zoomed and normal areas, and Picture-in-Picture creates a resizable zoom window that follows your cursor. For example, if you select Picture-in-Picture, pressing Option + Command + 8 toggles zoom on and off, and you can move the zoom window using the arrow keys combined with Control, making keyboard navigation seamless.
Additional shortcuts include Option + Command + F to toggle full-screen zoom and Option + Command + S to switch to split-screen zoom. You can also enable focus tracking so the zoom follows the keyboard focus, which is especially helpful when navigating menus or dialog boxes without a mouse.
To customize these shortcuts, open Keyboard Shortcuts in System Settings, then Accessibility, and modify the Zoom section to assign keys that fit your workflow. This flexibility allows users who rely heavily on the keyboard to adjust zoom behavior precisely, improving navigation and reducing reliance on external devices or gestures.
Practical applications: when and why to use Mac zoom shortcuts
Zoom shortcuts on Mac prove invaluable in various real-world situations, enhancing both productivity and accessibility. When reading small text in detailed documents or images, quickly zooming in with keyboard shortcuts eliminates eye strain and the need to adjust display settings manually. For example, a graphic designer reviewing intricate details in a high-resolution image can instantly magnify the area without interrupting workflow.
During presentations or screen sharing, zoom shortcuts allow you to focus your audience’s attention on specific content. By zooming in on charts or data points, you make the information clearer without physically moving closer to the screen or using a mouse. This approach keeps your presentation smooth and professional.
Accessibility is a primary reason many users rely on zoom shortcuts. Individuals with low vision or temporary eye strain can benefit from quickly adjusting screen magnification without navigating through menus. For instance, someone recovering from an eye condition can modify zoom levels on the fly to reduce discomfort, improving their overall experience.
These practical uses show how mastering Mac zoom shortcuts saves time and enhances usability across diverse scenarios, making screen navigation more efficient and comfortable.
Common mistakes to avoid when using zoom shortcuts on Mac
One frequent issue is not enabling Zoom in System Settings before trying shortcuts. To activate it, you must go to Apple menu > System Settings > Accessibility > Zoom, and toggle on “Use keyboard shortcuts to zoom.” Without this step, the shortcuts will not respond, causing confusion.
Many users also mistake app-specific zoom functions for system-wide zoom. For example, pressing Command + Plus in Safari only enlarges webpage text, not the entire screen. This often leads to complaints about shortcuts not working, when in fact the system zoom feature is separate and requires the correct key combinations.
Overusing zoom can lead to disorientation. Continually zooming in without resetting can make navigation cumbersome. For instance, zooming in repeatedly on detailed images can trap you in an overly magnified view, making it hard to follow the cursor or locate interface elements.
Finally, ignoring alternative zoom methods like trackpad gestures or the Accessibility Keyboard can limit your options. Some users find a three-finger double-tap or pinch gesture quicker and less disruptive than keyboard shortcuts. Being familiar with multiple zoom approaches helps avoid frustration.
How to customize Mac zoom shortcuts to fit your workflow
To tailor zoom shortcuts to your preferences, open System Settings and navigate to Accessibility > Zoom > Advanced. Here, you can find the option to customize keyboard shortcuts for zooming in, zooming out, and toggling zoom.
Click on a shortcut to edit it, then press your preferred key combination. For example, if Option + Command + Plus conflicts with another app, you might change zoom in to Control + Option + Command + =. Avoid shortcuts already assigned to system functions or popular apps to prevent conflicts.
If you want to revert to the default shortcuts, use the Restore Defaults button within the same menu. This can resolve issues if custom shortcuts do not work as expected.
Consider this concrete example: You prefer using Control + Option + = to zoom in because it’s easier to reach with one hand. After changing the shortcut, test it immediately to confirm it activates zoom correctly. If it doesn’t, try adding an additional modifier key or selecting a different combination.
Below is a sample before and after mapping:
| Function | Default Shortcut | Custom Shortcut |
|---|---|---|
| Zoom In | Option + Command + Plus | Control + Option + = |
| Zoom Out | Option + Command + Minus | Control + Option + - |
| Toggle Zoom | Option + Command + 8 | Control + Option + 8 |
Customizing shortcuts can improve your workflow by matching your hand positioning and avoiding key conflicts, enhancing the ease of zoom control on your Mac.
- Mac Keyboard Shortcut to Open Spotlight: A Clear Guide
- Mac Keyboard Shortcut to Record the Screen: A Complete Guide
- Mac Keyboard Shortcut to Hide an App: How to Use It Efficiently
Frequently asked questions
How to zoom out in mac?
To zoom out on a Mac, press Option + Command + Minus (-). This keyboard shortcut reduces the zoom level incrementally when the Zoom feature is enabled in Accessibility settings. Ensure that Zoom is turned on via System Preferences > Accessibility > Zoom for these shortcuts to work.
How to zoom out on mac desktop?
On a Mac desktop, you can zoom out by using the same shortcut: Option + Command + Minus (-). Alternatively, if you use a trackpad, the pinch-to-zoom gesture can zoom out without keyboard shortcuts. Remember to activate Zoom in Accessibility preferences to enable keyboard zooming.
How to zoom in on mac with keyboard?
Zooming in on a Mac using the keyboard involves pressing Option + Command + Plus (+). This increases the zoom level step-by-step. Confirm that Zoom is enabled in System Preferences > Accessibility > Zoom; otherwise, these shortcuts will not function.
How to zoom out on mac screen?
Zooming out on the Mac screen requires pressing Option + Command + Minus (-) when the Zoom feature is active. You can also use the scroll wheel while holding Control if you have enabled “Use scroll gesture with modifier keys to zoom” in Accessibility settings. This provides a flexible way to zoom out quickly.
How to zoom out on macbook?
On a MacBook, use the keyboard shortcut Option + Command + Minus (-) to zoom out. The trackpad pinch gesture also works if enabled. Make sure Zoom is activated in Accessibility preferences to use these shortcuts effectively.
What this guide does not cover and who should look elsewhere
This guide focuses on macOS built-in zoom features and keyboard shortcuts accessible through System Preferences > Accessibility > Zoom. It does not cover third-party zoom tools like ZoomIt or app-specific zoom functions found in browsers or design software, which often have their own unique shortcuts. If you rely heavily on specialized applications requiring precise zoom controls, consulting the documentation for those specific apps or exploring dedicated tools may be more effective.
To take the most practical next step, open your Mac's System Preferences, navigate to Accessibility, and then Zoom. Here, enable keyboard shortcuts such as “Use keyboard shortcuts to zoom” and customize options like maximum zoom level or smooth images. Adjusting these settings ensures your zoom shortcuts work reliably and match your workflow, improving navigation and accessibility immediately.