How to Mark All Emails as Read in Mail App and Other Email Clients
Clear your inbox fast by learning how to mark all emails as read in Mail app and other popular email clients with simple, effective steps.
Seeing hundreds of unread emails can feel overwhelming, especially when you want to clear your inbox quickly. Whether you use Apple Mail on your Mac or iPhone, Outlook, or Gmail, knowing how to mark all emails as read can save you time and reduce stress.
This article guides you through how to mark all emails as read in Mail app and other popular email clients. You'll find clear, step-by-step instructions for each platform, plus tips on automating the process and troubleshooting common issues. By the end, you'll be confident managing your email overload efficiently.
Key takeaways
- Use the Edit > Select All > Mark as Read option to clear all unread emails in Apple Mail on Mac.
- On iPhone Mail app, use the Edit > Select All > Mark as Read sequence for batch processing.
- Outlook lets you mark multiple emails as read via long press or Shift-click selection.
- Gmail’s Select All feature combined with the "Mark as read" icon handles large inboxes effectively.
- Set up rules or filters to automate marking certain emails as read as they arrive.
Before you start: What you need to mark all emails as read
Before marking all your emails as read, ensure your device’s operating system is updated to the latest version compatible with your hardware. For example, certain Mail app features on macOS require at least macOS Catalina or newer, while iOS Mail enhancements may need iOS 14 or later. Keeping your device updated ensures optimal functionality and access to the most recent email management tools.
Next, verify that your email accounts are properly set up and fully synced within your Mail app or chosen email client. This means your inbox should display all current messages, and the account status should show as connected without sync errors. If your account is not synced, marking emails as read may only apply locally and not reflect on the server, causing confusion across devices.
Understand that marking all emails as read is generally irreversible without manually re-marking individual messages as unread. If you have important unread messages, consider flagging or moving them to a separate folder before proceeding. This helps ensure you don’t lose track of emails that still need your attention.
Finally, be aware of the difference between marking emails as read locally and on the server, especially if you use IMAP or POP protocols. IMAP synchronizes read status across all devices and the server, so changes are reflected everywhere. POP typically downloads emails without syncing read status, so marking emails as read may only affect the local device. Knowing your email protocol helps set correct expectations about how changes propagate.
- Check for system updates: On Mac, go to Apple menu > System Preferences > Software Update; on iPhone, go to Settings > General > Software Update. You should see a message if your system is up to date.
- Open your Mail app and confirm all email accounts are listed and syncing correctly. You should see recent emails loading without error messages.
- Review your inbox for any unread emails you want to keep marked. Flag or move those emails to a separate folder as a precaution.
- Identify your email account type by checking your account settings: IMAP or POP. For IMAP, changes sync server-side; for POP, they usually remain local.
How to mark all emails as read in Apple Mail on Mac
To begin, open the Mail app on your Mac and navigate to the mailbox or folder where you want to mark emails as read. This could be your Inbox, a specific folder, or a smart mailbox containing filtered messages. Ensuring you are in the right location helps you avoid marking unrelated emails as read.
- Click anywhere inside the message list, then press Command + A to select all emails in the current mailbox or folder. You should see all messages highlighted, indicating they are selected.
- Right-click on any of the selected emails to open the context menu, then choose Mark as Read. Alternatively, you can access this option from the menu bar by selecting Message > Mark > as Read. After this action, all selected emails will appear with a read status, usually indicated by the absence of bold text.
- Confirm that the emails are marked as read by scanning the message list for changes in font style or the read icon. If some emails remain unread, repeat the selection and marking steps.
To target specific groups of emails, consider using smart mailboxes or the search bar to filter messages by sender, subject, or date. Once filtered, use the same Command + A shortcut and marking method to mark only those emails as read. This approach helps manage large volumes of emails with precision.
The keyboard shortcut Command + A offers a quicker way to select all messages compared to manually clicking or dragging. Using the context menu or the Message menu both achieve the same result; choosing depends on your comfort with right-clicking or using the menu bar.
How to mark all emails as read in Mail app on iPhone
Managing unread emails on your iPhone using the Mail app requires a slightly different approach than on Mac due to iOS limitations. You start by opening the Mail app and navigating to the inbox or the folder where you want to mark emails as read. You can’t directly select all emails at once in most cases, but there are ways to efficiently mark multiple messages as read.
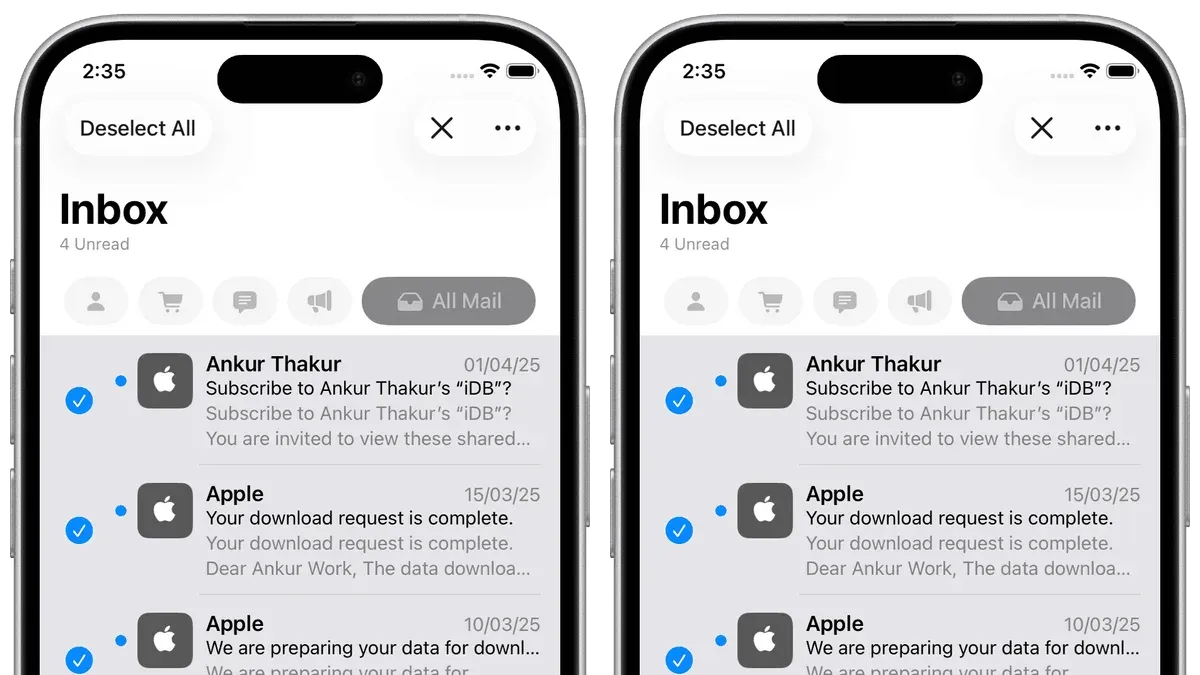
- Open the Mail app and go to the inbox or desired folder. You should see a list of your emails, with unread messages typically shown in bold.
- Tap Edit in the upper right corner. This enables you to select emails individually.
- If you see a Select All option, tap it to highlight all emails in the folder. This option is not always available depending on your iOS version and mailbox type.
- If Select All is not available, manually tap the circle next to each email you want to mark as read. You can select multiple emails by tapping each one in batches.
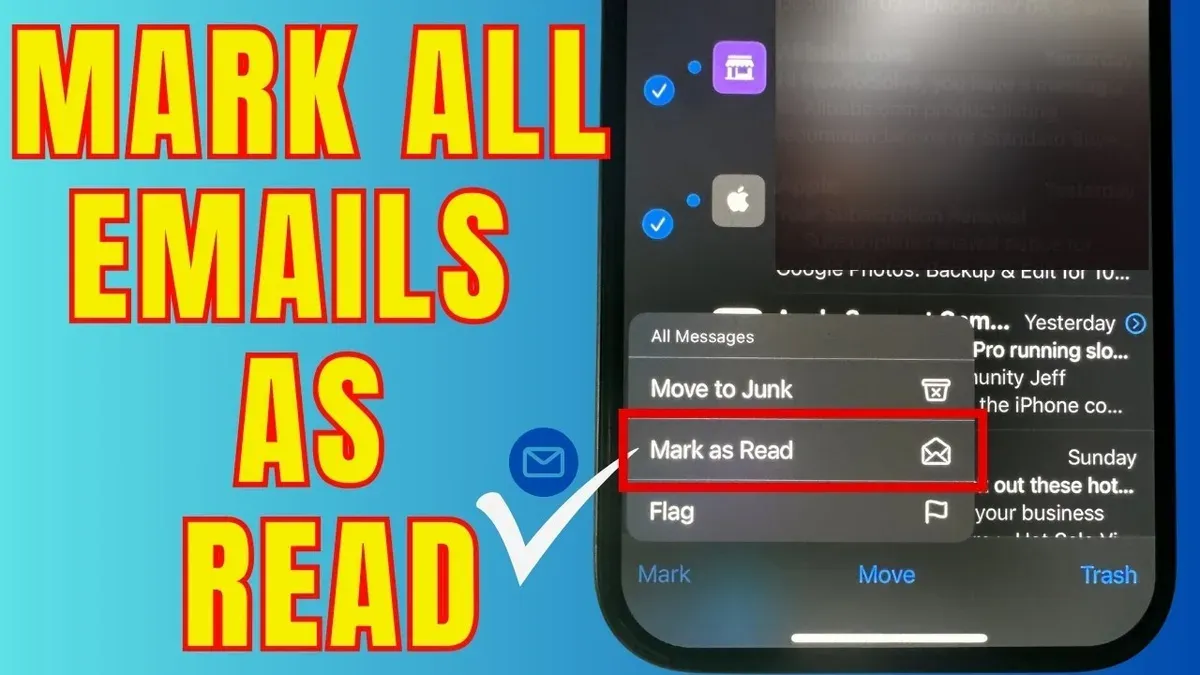
- Once emails are selected, tap Mark in the lower left corner.
- From the menu that appears, choose Mark as Read. The selected emails will lose their bold formatting, indicating they are now marked as read.
- Repeat batch selections if you have many unread emails. This workaround helps when you want to clear a large number of messages without marking them one by one.
Because the Mail app on iPhone lacks a native bulk action like “Select All” in many situations, this manual batch process is your best option for clearing unread messages quickly. Screenshots of the interface show the Edit button top-right, the selection circles appearing next to emails, and the Mark option at the bottom left once emails are selected.
How to mark multiple emails as read in Outlook app
To efficiently manage your unread emails in the Outlook app, you can mark multiple messages as read using built-in multi-select features. Whether you are on a mobile device or desktop, the process is straightforward and helps reduce inbox clutter quickly.
- Open the Outlook app on your device. You can use the iOS, Android, or desktop version. Once open, navigate to the folder containing your unread emails, such as Inbox or a specific subfolder. You should see your list of messages displayed.
- On mobile devices, tap and hold (long-press) on an email to activate multi-select mode. Checkboxes will appear next to each email. On desktop, hold the Ctrl key (Cmd key on Mac) while clicking to select multiple emails individually, or use Shift to select a range. The selected emails will be highlighted.
- After selecting the emails you want to mark as read, tap or click the three-dot menu or the toolbar option, then choose Mark as Read. On mobile, this often appears as an envelope icon or under a menu labeled “More.” On desktop, it is available in the right-click context menu or the Message ribbon.
- Once marked, the emails will no longer appear as unread, indicated by the removal of bold text or an unread count. This immediate visual confirmation helps you track your progress in clearing unread messages.
- For automation, Outlook supports Sweep and Rules to automatically mark emails as read based on sender, subject, or other criteria. Access these features via the desktop app’s Home tab or Outlook on the web under Settings > Mail > Rules. Setting up rules can save time by reducing manual marking.
Keep in mind that the desktop app often offers more robust multi-select and rule-setting options compared to mobile versions. Using rules and sweep can complement manual selection, especially if you receive repetitive emails that you want to auto-mark as read.
How to mark all emails as read in Gmail app
To mark emails as read in the Gmail app, you start by opening the app and navigating to your inbox or a specific label where you want to clear unread messages. The app allows you to select multiple emails, but it has limitations on bulk actions beyond the visible emails on screen.
- Open the Gmail app and go to your Inbox or the label containing the emails you want to mark as read. You should see your list of emails with sender icons or checkboxes.
- Tap on the profile icon or checkbox next to the first email to select it. You will notice the selection mode activates, allowing you to tap others for multi-selection.
- Tap additional emails one by one to select them. If available, look for a “Select all” option at the top of the list, which lets you select all emails currently loaded in the view, but note this usually only covers visible emails, not all unread emails in the folder.
- Once you've selected the emails, tap the three-dot menu icon in the upper right corner. From the dropdown menu, choose “Mark as read.” The selected emails will update to show they are no longer unread.
- If you want to mark all emails as read beyond the visible batch, the Gmail app does not support a direct bulk action for all emails in a folder. In this case, using the desktop Gmail interface where you can select all conversations in a label and mark them as read is recommended.
This method helps you clear batches of unread emails efficiently on mobile, but for managing very large volumes, desktop Gmail provides more powerful options.
How to automatically mark emails as read using rules or filters
Rules or filters in email clients let you automate actions like marking emails as read when they meet certain conditions. This reduces manual work, especially for newsletters or notifications you want to archive quietly. Each app—Apple Mail, Outlook, and Gmail—offers ways to create these rules, though their interfaces and options differ.
Creating a rule in Apple Mail
- Open Apple Mail and go to Mail > Preferences > Rules. You should see a list of existing rules or an empty window.
- Click Add Rule. Enter a descriptive name like "Mark Newsletters as Read."
- Set the conditions, for example: If any of the following conditions are met, then choose From Contains and type the newsletter's sender address or domain.
- In the Perform the following actions section, select Mark as Read.
- Click OK to save. Apple Mail will ask if you want to apply this rule to existing messages; decide accordingly.
Once active, incoming emails matching these criteria will automatically be marked as read.
Creating a rule in Outlook
- In Outlook desktop, go to the Home tab and click Rules > Manage Rules & Alerts.
- Click New Rule and start from a blank rule with "Apply rule on messages I receive." Click Next.
- Choose conditions such as "from people or public group" or "with specific words in the subject." Enter the relevant details and click Next.
- Under actions, check mark it as read. Click Finish and then OK.
Outlook rules run automatically on new messages, keeping your inbox cleaner without manual intervention.
Creating a filter in Gmail
- Open Gmail in a browser and click the gear icon, then select See all settings.
- Go to the Filters and Blocked Addresses tab and click Create a new filter.
- Enter filter criteria, such as the sender's email or keywords in the subject line, then click Create filter.
- Check the box for Mark as read among the options and click Create filter again.
Gmail applies this filter to new incoming messages, automatically marking them read based on your rules.
Enabling, disabling, and considerations
You can enable or disable rules at any time in these apps through their rules management panels. Use this to pause automation if you expect important messages that might get overlooked. Keep in mind that auto-marking some emails as read may cause you to miss timely or critical information, so choose criteria carefully. For example, automatically marking newsletters or social media notifications can reduce clutter, but avoid applying rules to emails from colleagues or clients.
Troubleshooting common issues when marking emails as read
If emails remain marked as unread after you try to mark them as read, the first step is to check your sync status. Make sure your device is connected to the internet and that your email account is set up using the IMAP protocol, which syncs read status across devices. For example, POP accounts may not update the server, causing inconsistent read status.
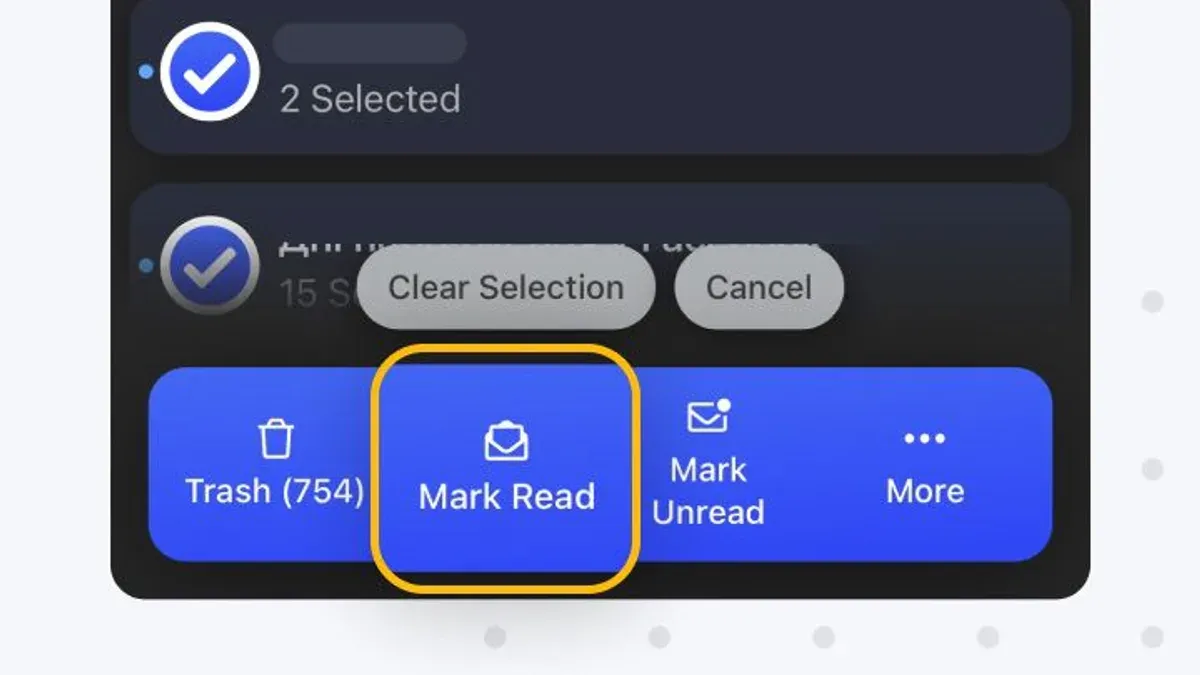
On the iPhone Mail app, if you don't see a 'Select All' option, use batch selection by tapping Edit, selecting a manageable group of emails, then tapping Mark as Read. Alternatively, use the desktop Mail app or webmail to mark all emails at once.
If rules or filters aren't applying as expected, review the exact conditions set in your email client’s settings. Ensure your account is configured to allow rule execution and that there are no conflicting rules. For instance, a filter missing a key keyword may fail silently.
When marking emails as read locally but the status doesn't update on the server, this often indicates IMAP syncing issues. To fix this, refresh your mailbox by pulling down to refresh on mobile or using the 'Get Mail' button on desktop. Restarting the mail app or your device can also help re-establish syncing.
Marking thousands of emails as read at once can slow down performance or cause app freezes. To avoid this, mark emails in smaller batches of a few hundred. This incremental approach reduces server load and prevents timeouts.
- Check your internet connection and confirm your email account uses IMAP. You should see your device syncing mail without errors.
- On iPhone Mail, tap Edit, select a group of emails, then tap Mark as Read. You should see the unread count decrease accordingly.
- Review your rules or filters in settings, ensuring conditions match your emails exactly. Apply or refresh rules and verify emails are processed automatically.
- Refresh your mailbox to force sync. Unread emails marked as read locally should update on the server and across devices.
- Break large batches of emails into smaller groups when marking as read. The app should respond smoothly without freezing.
Frequently asked questions
How to mark all mail as read?
To mark all mail as read, you typically select all emails in your inbox or a specific folder and then choose the option to mark them as read. In most email clients, this is done by clicking a checkbox or using a 'Select All' command, followed by right-clicking or using a toolbar button labeled "Mark as Read." This process clears the unread status for all selected messages at once.
How to mark emails as read automatically?
Emails can be marked as read automatically by setting up rules or filters in your email client. For example, in Outlook, you can create a rule that marks incoming messages from certain senders as read. In Gmail, filters can be configured to apply the "Mark as read" action based on criteria like sender, subject, or keywords. This automation helps reduce manual email management.
How to mark read emails in outlook?
In Outlook, you can mark emails as read by selecting one or more messages, right-clicking, and choosing "Mark as Read." Alternatively, pressing Ctrl+Q (Windows) or Command+T (Mac) marks selected emails as read. You can also adjust settings to mark messages as read when viewed in the reading pane.
How to mark all emails read outlook?
To mark all emails as read in Outlook, navigate to the folder containing the unread emails, click on any email, then press Ctrl+A (Windows) or Command+A (Mac) to select all messages. Next, right-click the selection and choose "Mark as Read," or use the toolbar button. This marks every email in that folder as read at once.
How to mark all emails as read in Apple Mail
In Apple Mail on Mac, open the mailbox containing unread emails, click on one message, then press Command+A to select all. Right-click the selection and choose "Mark as Read," or use the Message menu and select "Mark as Read." This changes the status of all selected emails without opening them individually.
What This Advice Does Not Cover and When to Consider Other Options
Marking all emails as read does not delete them or organize them into folders. If your inbox feels cluttered, you should explore additional management strategies such as archiving, creating folders, or unsubscribing from unwanted newsletters. Automatic rules or filters that mark emails as read may cause you to miss important messages if they are not set up carefully with clear criteria.
Some email clients and devices limit bulk actions, which means you might need to manually select emails in smaller batches to mark them as read. If you regularly handle very large volumes of email, consider using desktop clients or email management tools designed for more advanced sorting and automation.
To take the next step in managing your inbox, try setting up simple filters or rules in your email client to automatically mark less important emails as read. This can reduce the daily buildup of unread messages and help you focus on what really matters without losing track of important emails.
See also: How to Change Your Default Email App in Mail App: Step-by-Step · How to Rebuild Your Mailbox in Mail App: Step-by-Step Guide · How to Block a Sender in the Mail App: Clear Steps for Apple Users