How to Install Command Line Tools in Xcode: A Step-by-Step Guide
This guide shows how to install command line tools in Xcode to set up your Mac development environment efficiently.
You open Terminal on your Mac, ready to start a new coding project, only to find that commands like git or gcc aren’t recognized. This usually means the Xcode Command Line Tools are not installed or properly configured. Knowing how to install command line tools in Xcode is essential for enabling many development workflows without needing the full Xcode app.
This guide walks you through the process step-by-step, covering both installing the tools via Terminal and how to get them without downloading the entire Xcode application. You’ll also find tips to avoid common pitfalls and verify that the tools are set up correctly, ensuring your development environment is ready to go.
Key takeaways
- Check for existing installation using
xcode-select --versionorgit --version. - Install Command Line Tools via Terminal with
xcode-select --install. - You can install Command Line Tools without the full Xcode app, saving disk space.
- Git is included with the Command Line Tools package.
- Verify installation with
xcode-select -pand configure if necessary.
Understand what Xcode Command Line Tools are
Xcode Command Line Tools are a set of essential utilities and compilers designed to support software development directly from the macOS Terminal. These tools include a compiler (clang), debugger (lldb), version control system (git), make utility, and other development-related command-line utilities. They provide the core components needed to compile code, manage projects, and interact with source control without requiring the full Xcode Integrated Development Environment (IDE).
Developers and advanced Mac users rely on these tools to build and manage software projects efficiently. They are especially useful for scripting, automation, and using package managers like Homebrew, which depend on the compiler and git to fetch and build software. Without these tools, many development workflows on macOS would be limited or impossible to perform via the terminal.
The full Xcode app, available on the Mac App Store, includes these command line tools plus a rich graphical interface, Interface Builder, simulators, and extensive SDKs. However, Xcode's full installation is large, often exceeding 10 gigabytes, while the Command Line Tools package is much smaller—typically around 200-300 megabytes. This makes the command line tools a lightweight alternative when you do not need the full IDE but still require the necessary development utilities.
Check if Xcode Command Line Tools are already installed
Before proceeding with installation, you should verify whether the Xcode Command Line Tools are already present on your Mac. This prevents unnecessary downloads and setup steps. The Terminal app offers straightforward commands to check their status quickly.
- Open the Terminal app, which you can find in Applications > Utilities or by searching with Spotlight.
- Type the command
xcode-select -pand press Enter. If the tools are installed, you will see a path like/Library/Developer/CommandLineToolsor/Applications/Xcode.app/Contents/Developer. This output confirms the system knows where the Command Line Tools are located. - If you see an error message such as
error: unable to get active developer directoryor if the output is empty, it indicates the Command Line Tools are not installed or not configured properly. - If instead you receive a message like
command not found: gccor a prompt suggesting installation of developer tools, the Command Line Tools are missing.
Next, type gcc --version and press Enter. A successful installation will display the version of the GNU Compiler Collection, for example:
gcc (Apple clang version 14.0.0) Target: x86_64-apple-darwin20.6.0 Thread model: posix
This confirms the compiler is available for use.
By running these commands, you can reliably determine if the Command Line Tools are ready on your Mac or if you need to install them before continuing with development tasks.
Install Xcode Command Line Tools using Terminal
The quickest and simplest way to install Xcode Command Line Tools is directly through the Terminal application on your Mac. This method triggers a system prompt that guides you through the installation without needing to download the full Xcode app.
- Open Terminal from your Applications > Utilities folder or launch it via Spotlight search.
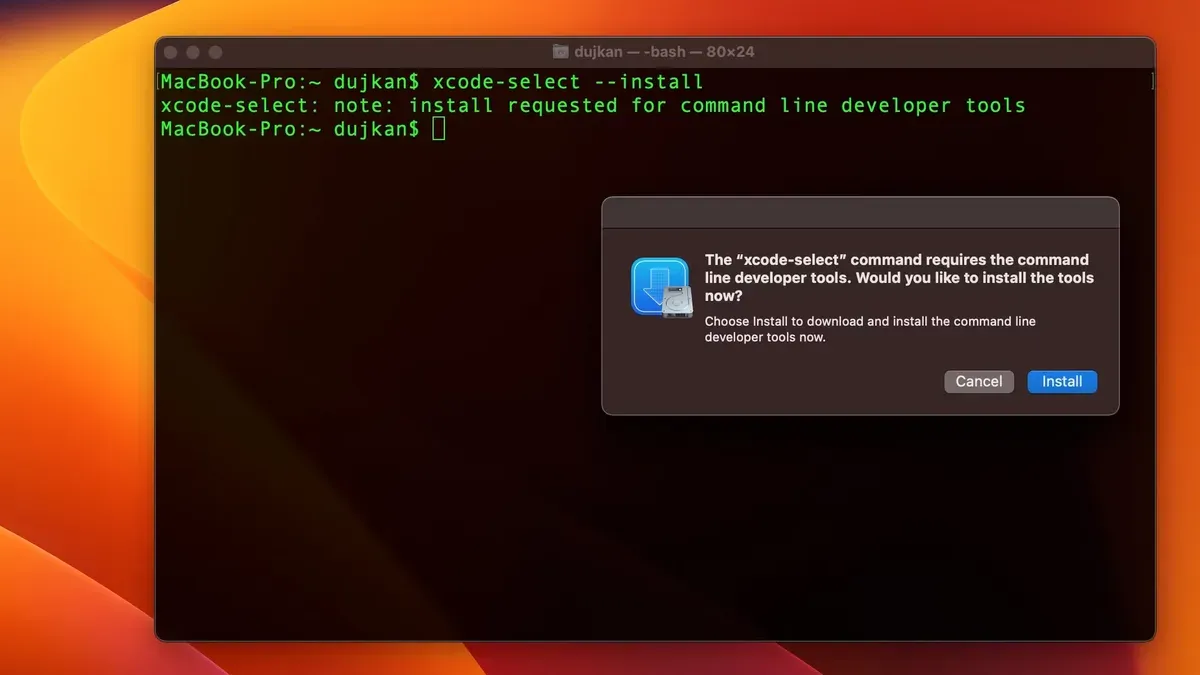
- Enter the command xcode-select --install and press Enter.
- A software update pop-up window will appear, asking if you want to install the Command Line Tools. Click Install to proceed.
- Read and accept the license agreement when prompted to continue.
- The installation will begin automatically, downloading the necessary files from Apple's servers.
- Once completed, a confirmation dialog will appear stating that the installation was successful. You can then close the installer and return to Terminal.
During installation, typical download and setup times vary depending on your internet speed and system performance, but most users report it takes between 2 to 10 minutes. The pop-up window does not provide detailed progress, so patience is key. If the installation stalls or the pop-up does not appear, ensure your macOS software updates are current.
After installation, you can verify success by running xcode-select -p to confirm the path to the developer tools, or by checking the version of gcc or git available in Terminal.
Example output after successful installation when running xcode-select -p might look like:
/Library/Developer/CommandLineTools
This confirms the tools are ready for use in your development workflows.
Install Xcode Command Line Tools without installing Xcode app
If you want to install Xcode Command Line Tools but prefer not to download the full Xcode app, you can get the standalone package directly from Apple's Developer website. This method is particularly useful if you have limited disk space or want to control when and how the installation happens without triggering the full Xcode installation.
Here is how you can manually download and install the Command Line Tools package:
- Visit the Apple Developer Downloads page. You need to sign in with your Apple ID.
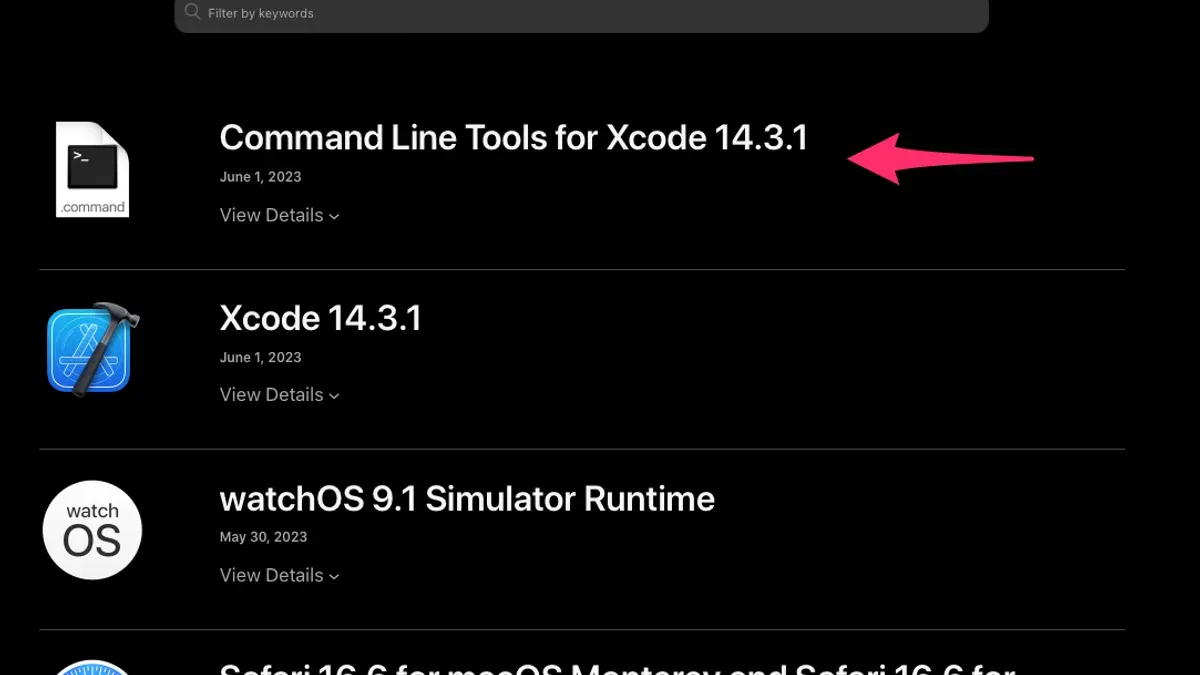
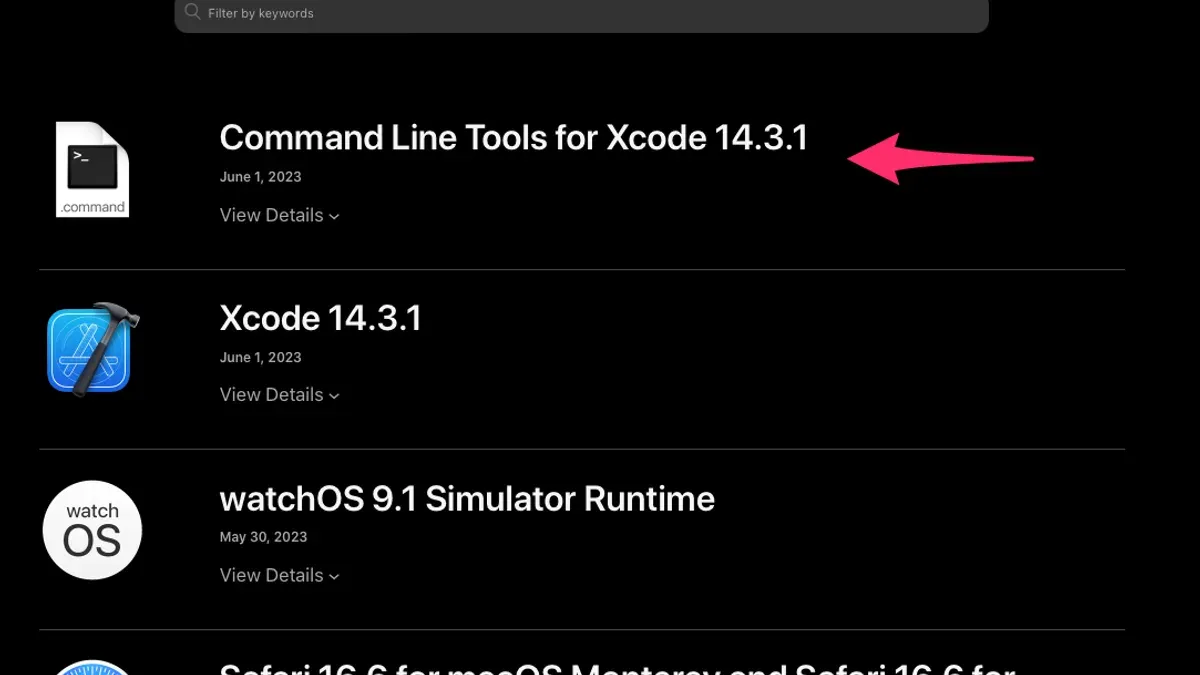
- Search for "Command Line Tools" in the search bar to filter available packages. Look for the latest version compatible with your macOS version, such as "Command Line Tools for Xcode [version]".
- Download the
.dmginstaller file. The size is typically around 130-150 MB, significantly smaller than the full Xcode app which can exceed 10 GB. - Open the downloaded
.dmgfile and double-click the.pkginstaller inside to start the installation process. - Follow the on-screen prompts to complete the installation. Once finished, the Command Line Tools will be installed in
/Library/Developer/CommandLineTools. - Verify the installation by opening Terminal and running
gcc --versionorgit --version. You should see version information returned without errors.
This manual installation method avoids the large download and disk usage of the full Xcode IDE. It also gives you control to install the tools offline or on multiple machines without repeated downloads. Keep in mind that updating the Command Line Tools this way requires downloading and installing new packages manually from the Developer website.
Install Git with Xcode Command Line Tools
Git is included as part of the Xcode Command Line Tools package because it is an essential version control system widely used in software development. When you install these tools, Git is installed automatically, enabling you to manage your source code repositories directly from the Terminal without needing additional installations.
To confirm Git is installed and check its version, open Terminal and enter the command:
- If you receive a message like command not found or Git is missing, it indicates that the Xcode Command Line Tools may not be installed or configured properly. In that case, install or reinstall the tools using
xcode-select --installin Terminal. - To update Git, you can update the entire Xcode Command Line Tools package to get the latest version provided by Apple. Alternatively, you can install a newer Git version via package managers like Homebrew, but this is outside the scope of the Command Line Tools.
git --version
When Git is installed correctly, you will see output similar to:
git version 2.39.1
Verifying Git's presence ensures your development workflow can proceed smoothly, whether you clone repositories, commit changes, or push updates. This integration of Git within the Command Line Tools makes it convenient and efficient for developers working on macOS.
Troubleshoot common installation issues
Sometimes, installing Xcode Command Line Tools can encounter hiccups like errors, stalled downloads, or misconfigurations. If after installation you encounter a ‘command not found’ error when running commands like gcc or git, it often means the system path isn't set correctly. Running xcode-select --reset can fix this by resetting the command line tools path to the default location.
If the installation process seems stuck or fails during download, first check your internet connection and ensure Apple's servers are reachable. Network restrictions or firewalls can block the download. You can also try restarting the Terminal and running xcode-select --install again.
- Open Terminal and run
xcode-select --reset. You should see no output, indicating the path has been reset. - If installation is stuck, quit the installer dialog, then verify your network by pinging Apple's developer site:
ping developer.apple.com
You should receive responses without timeouts. - After confirming network access, re-run
xcode-select --installto trigger the installer dialog again. - If issues persist, check your macOS version compatibility with the installed tools, as mismatches can cause failures.
Try running a command like gcc --version or git --version. A successful output shows the command line tools are active, for example:
gcc (Apple LLVM version 14.0.0) 14.0.0
Copyright (C) 2023 Free Software Foundation, Inc.
By following these steps, you can resolve common issues like missing commands, stalled downloads, and path misconfigurations to get your Xcode Command Line Tools working smoothly.
Verify and configure Xcode Command Line Tools after installation
After installing Xcode Command Line Tools, it is essential to ensure they are properly configured so your development environment works smoothly. Setting the active developer directory correctly makes sure your terminal uses the right tools, especially if you have multiple Xcode versions or tools installed. You can manage this with the xcode-select command.
- Open Terminal and run
sudo xcode-select --switch /Library/Developer/CommandLineTools. This sets the active developer directory to the Command Line Tools installation path. If successful, the command will complete without errors. - Verify the tools are accessible by running
gcc --version. You should see output showing the compiler version, for example: Apple clang version 14.0.0 (clang-1400.0.29.202). This confirms the compiler is ready for use. - Check the installed Xcode Command Line Tools version by running
xcodebuild -version. The output typically includes lines like Xcode 14.0 and Build version 14A309. This confirms the tools are recognized by the system and their version. - If you see an error or a message prompting to install additional components, follow the prompts to complete setup and then repeat the steps above.
Setting the active developer directory ensures your terminal commands use the correct version of the tools, preventing conflicts with any full Xcode installations. Confirming the compiler and build tool versions verifies that your environment is fully prepared for development tasks.
Frequently asked questions
How to install command line tools without xcode?
You can install the Command Line Tools without the full Xcode app by opening Terminal and running xcode-select --install. This triggers a software update prompt to download and install the necessary tools independently. This method avoids the large Xcode download and provides just the essential compilers and utilities.
How to install command line tools for xcode on mac?
To install Command Line Tools for Xcode on your Mac, open Terminal and enter xcode-select --install. A pop-up window will appear asking to install the tools; confirm to start the download and installation. Alternatively, installing the full Xcode app from the App Store includes these tools automatically.
How long to install command line tools for xcode?
The installation duration depends on your internet speed and Mac's performance but usually completes within a few minutes. The download size is relatively small compared to the full Xcode app, so expect a faster installation when using the command line method. If your connection is slow, it may take longer.
How to install xcode command line tools terminal?
Simply open Terminal and type xcode-select --install, then press Enter. A software update window will appear allowing you to download and install the Command Line Tools package. Follow the on-screen prompts to complete the process.
How to install command line tools on mac without xcode?
Installing Command Line Tools without Xcode is straightforward through Terminal by running xcode-select --install. This method downloads only the necessary tools like compilers and Git without the full Xcode environment. It’s the preferred way if you want a lightweight installation focused on development utilities.
What This Guide Does Not Cover
This article focuses specifically on installing and configuring Xcode Command Line Tools for macOS users. It does not cover installing or updating the full Xcode application available through the Mac App Store, which includes a much larger suite of development tools and IDE features. If you require the full Xcode development environment with GUI features, debugging tools, or interface builders, you should install Xcode itself. Additionally, this guide does not address software development or command line tool installation on non-macOS platforms such as Windows or Linux, as Xcode tools are macOS-specific.
If you encounter complex errors during installation or require advanced configuration beyond the scope of basic terminal commands, consider consulting Apple's official developer documentation or support forums for more detailed troubleshooting and setup.
Next Step: Verify Your Installation
After installing the Command Line Tools, open Terminal and run gcc --version or git --version to confirm the tools are accessible. This simple verification ensures your system recognizes the installed tools and they are ready for use in your development workflows. If these commands return version information, you’re all set to proceed with compiling, scripting, or managing version control on your Mac without the full Xcode app.
See also: How to Run an iOS Simulator in Xcode: Step-by-Step Guide · How to Clear DerivedData in Xcode: Step-by-Step Guide