How to Share Internet from Mac to Mac: A Clear Step-by-Step Guide
Discover simple methods to share internet from one Mac to another using Wi-Fi, Ethernet, or Thunderbolt for seamless connectivity.
You have two Mac computers side by side, but only one has a wired internet connection or a stable Wi-Fi network. You want to connect the other Mac to the internet without buying extra hardware or complicated setups. Knowing how to share internet from Mac on Mac can save you time and keep your devices connected seamlessly.
This guide covers practical methods to share your internet connection via Wi-Fi hotspot, Ethernet, or Thunderbolt cable. You'll also learn how to manage file sharing between Macs and Windows PCs, plus tips to troubleshoot common network and sharing issues effectively.
Key takeaways
- Use the Sharing pane in System Preferences to enable Internet Sharing on your Mac.
- You can share internet via Wi-Fi by creating a hotspot or through direct Ethernet/Thunderbolt connections.
- File sharing works across Mac and Windows using SMB protocol and proper folder permissions.
- When only one Wi-Fi adapter is available, use Ethernet or Thunderbolt for internet sharing.
- Check firewall and network settings to resolve common sharing and connectivity problems.
Before you start: What you need to share internet and files between Macs
To share internet and files between Macs, ensure you have at least two Mac computers running compatible versions of macOS that support internet sharing features. macOS versions from macOS Sierra onward generally include these capabilities, but verifying your specific version’s support is recommended.
The Mac that will share its internet connection must have a working internet source, such as Wi-Fi or Ethernet. Both Macs need functional network adapters—Wi-Fi and/or Ethernet—to establish a reliable connection. For direct wired sharing, having an Ethernet or Thunderbolt cable can simplify the setup and improve speed.
You should be familiar with navigating System Preferences and specifically the Network and Sharing panes, where you configure connection and sharing settings. Permissions and firewall settings must allow internet and file sharing; check these under System Preferences > Security & Privacy > Firewall. Ensure that File Sharing and Internet Sharing services are enabled and permitted through the firewall.
- Confirm both Macs are powered on and running compatible macOS versions. You should see the macOS version number under Apple menu > About This Mac.
- Verify the Mac sharing internet has a stable active internet connection, visible in the menu bar or under System Preferences > Network.
- Check that Wi-Fi or Ethernet adapters are active on both Macs by viewing the Network settings; connected adapters show a green dot and status.
- If using a direct cable connection, connect the Macs with an Ethernet or Thunderbolt cable; the connection should appear in the Network pane as active.
- Open System Preferences > Sharing and ensure Internet Sharing and File Sharing are enabled and allowed in firewall settings. When active, these services have a green indicator.
How to share internet from Mac to Mac using Wi-Fi hotspot
- Open System Preferences and click on Sharing. You should see a list of services on the left side.
- Select Internet Sharing but do not check the box yet. In the right pane, use the menu Share your connection from: to select the current internet source, such as Ethernet or Cellular. This designates the incoming connection to share.
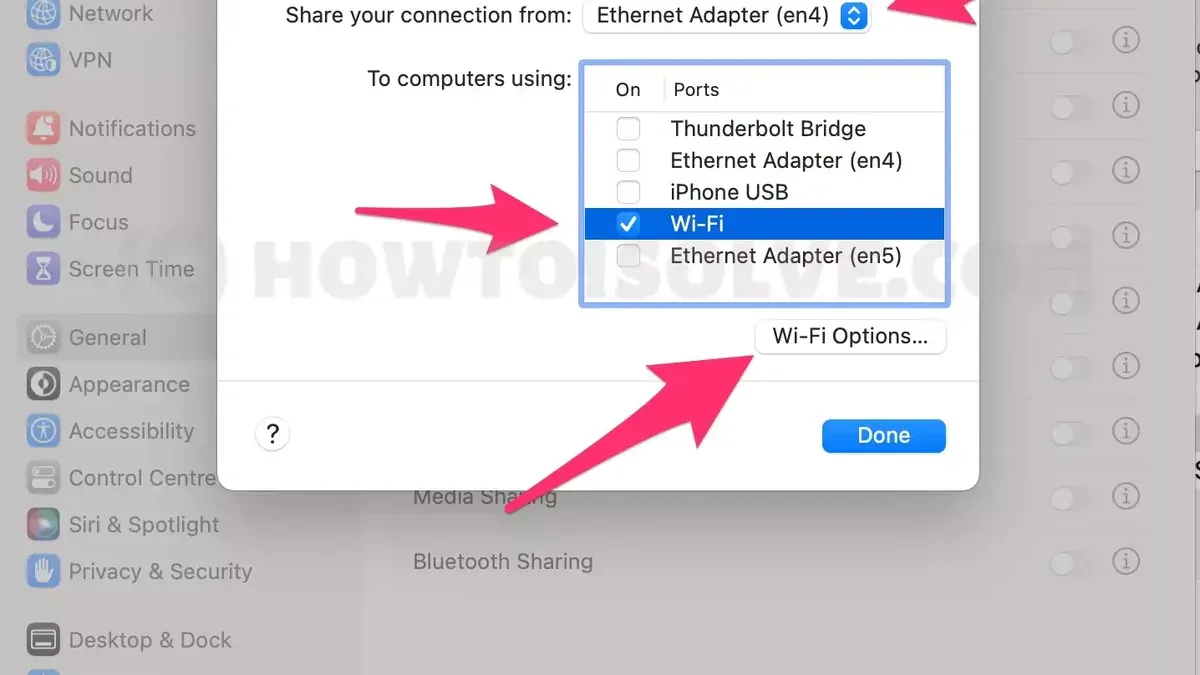
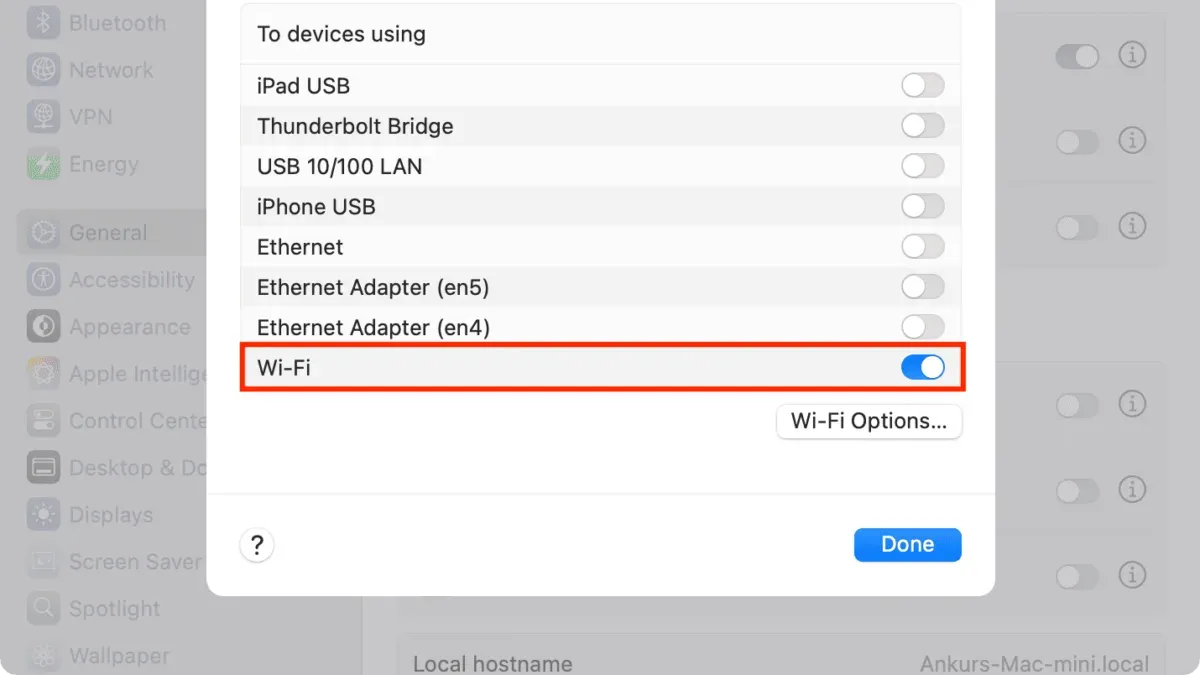
- Below, in To computers using:, check the box for Wi-Fi. This sets Wi-Fi as the method to broadcast the shared connection.
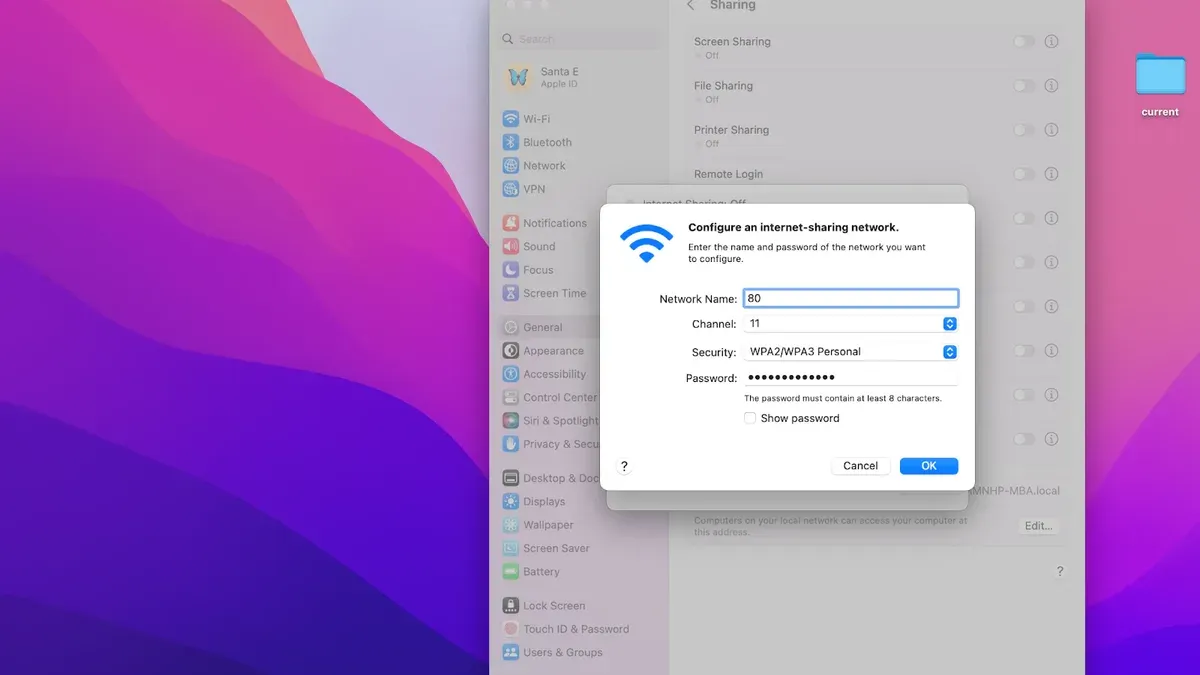
- Click the Wi-Fi Options… button to configure your hotspot. Enter a Network Name that the other Mac will recognize. Choose WPA2 Personal for security and set a strong Password. Confirm by clicking OK.
- Back in the Sharing pane, now check the box next to Internet Sharing. A prompt will appear asking you to confirm starting the service; click Start. The status icon should turn green, and the text will say "Internet Sharing: On".
- On the second Mac, open the Wi-Fi menu and look for the network name you just created. Connect using the password you set. Successful connection means the second Mac now accesses the internet through the first Mac’s shared connection.
Common issues include forgetting to configure Wi-Fi Options, which results in an unsecured or hidden network, or not confirming the Internet Sharing prompt, leaving the hotspot inactive. Also, ensure no conflicting network services are active, as macOS allows only one active internet sharing method at a time.
How to share internet from Mac to Mac using Ethernet or Thunderbolt cable
Sharing internet via a wired connection offers faster and more stable speeds compared to wireless sharing. You can connect two Macs directly without a router using an Ethernet or Thunderbolt cable.
- Connect both Macs using a compatible Ethernet or Thunderbolt cable. You should see a network link light on Ethernet ports or a connection indicator on Thunderbolt ports.
- On the Mac with internet access, open System Preferences and go to Sharing.
- Select Internet Sharing from the list but do not enable it yet.
- From the Share your connection from dropdown, select the source of your internet (e.g., Wi-Fi or another interface that has internet).
- In the To computers using list, check the box for Ethernet or Thunderbolt Ethernet, depending on your cable type.
- Enable Internet Sharing by checking its checkbox. A green indicator should appear confirming it is active.
- If automatic IP configuration fails, open System Preferences > Network on both Macs. For the Mac sharing internet, assign a manual IP like 192.168.2.1 with subnet mask 255.255.255.0.
- On the receiving Mac, set the Ethernet or Thunderbolt interface to use DHCP to obtain an IP address automatically. If DHCP does not work, assign a manual IP such as 192.168.2.2 with the same subnet mask, and set the router to the IP of the sharing Mac (192.168.2.1).
- Test the internet connection on the receiving Mac by opening a website or pinging an external IP. Also check local network visibility by opening Finder and selecting the network sidebar.
Wired connections generally provide lower latency and higher throughput than Wi-Fi, making them ideal for large file transfers or streaming between Macs. However, they require physical cables and may limit mobility.
How to share Wi-Fi from Mac to Mac when only one Wi-Fi adapter is available
Macs with a single Wi-Fi adapter cannot share their Wi-Fi internet connection over Wi-Fi simultaneously due to a hardware limitation documented by Apple support. The wireless adapter cannot connect to a Wi-Fi network and create a hotspot at the same time.
Instead, you can use alternative methods to share internet between Macs in this situation.
Using Ethernet or Thunderbolt cable
Connect the two Macs directly with an Ethernet or Thunderbolt cable. Then enable Internet Sharing on the Mac with the internet connection, selecting the appropriate interface to share over. This method offers a fast and stable connection without relying on the single Wi-Fi adapter.
Using a second USB Wi-Fi adapter
If you want to share Wi-Fi over Wi-Fi, consider adding a second USB Wi-Fi adapter to the Mac providing internet. Configure the built-in Wi-Fi adapter to connect to the internet and the USB adapter to create the Wi-Fi hotspot. This setup circumvents the single-adapter limitation but requires compatible hardware and may reduce portability.
Using Bluetooth PAN for limited sharing
Bluetooth Personal Area Network (PAN) can share internet between Macs but offers slower speeds and limited range. Enable Bluetooth on both Macs, pair them, and share the internet via Bluetooth PAN in System Preferences > Sharing. This is a viable fallback for low-bandwidth tasks or when cables and extra adapters are unavailable.
How to share files between Macs and between Mac and Windows PCs
To share files between Macs and with Windows PCs, you need to enable File Sharing and configure proper permissions while ensuring compatibility via the SMB protocol.
- Open System Preferences and go to Sharing.
- Check the box next to File Sharing. This activates the file sharing service on your Mac.
- Under the Shared Folders section, click the + button to add folders you want to share. For example, add your Documents folder.
- Select a folder and then adjust user permissions in the Users section. You can assign Read & Write, Read Only, or No Access to specific users or groups. For example, set "Everyone" to Read Only to allow general access without editing rights.
- Click Options… and ensure Share files and folders using SMB is checked. This enables Windows compatibility.
- Also check the box next to the user account(s) you want to allow access and enter the password if prompted.
- From another Mac, open Finder, click Go in the menu bar, then Connect to Server….
- Enter the address in the format smb://[IP address or hostname] (e.g., smb://192.168.1.10) and click Connect. You should see the shared folders appear.
- On a Windows PC, open File Explorer, enter \\[IP address or hostname] (e.g., \\192.168.1.10) in the address bar, and press Enter.
- Enter the Mac user credentials when prompted to view and access the shared folders.
Following these steps ensures smooth file sharing across Mac and Windows devices with proper access controls. Remember to verify folder permissions if access issues arise.
How to connect to internet on Mac and troubleshoot common network issues
Ensuring your Mac is properly connected to the internet involves checking both hardware and software settings. Start by opening System Preferences > Network to view the status of your Wi-Fi or Ethernet connection. A green dot next to the active interface indicates a successful connection. If you see a yellow or red dot, proceed with the following troubleshooting steps.
- Renew the DHCP lease: In Network preferences, select your active network interface, click Advanced, then the TCP/IP tab, and click "Renew DHCP Lease." This action refreshes your IP address assignment. A valid IP address (for example, 192.168.x.x) should appear if successful.
- Check DNS settings: Still in the Advanced settings, go to the DNS tab. Ensure you have valid DNS server addresses, such as those provided by your ISP or public DNS servers like 8.8.8.8. Incorrect DNS settings can cause browsing issues even when connected.
- Flush the DNS cache: Open Terminal and enter "sudo dscacheutil -flushcache; sudo killall -HUP mDNSResponder". This clears outdated DNS information that might cause resolution errors.
- Temporarily disable firewall or security software: Go to System Preferences > Security & Privacy > Firewall and turn it off temporarily to check if it is blocking network access. Some third-party security apps may also interfere with sharing.
- Verify router and modem operation: Restart your router and modem by unplugging them for 30 seconds, then plugging them back in. Confirm other devices can access the internet to rule out service outages.
- Use Network Diagnostics: From the Wi-Fi status menu or Network preferences, click "Assist me" and select "Diagnostics." Follow the prompts to identify and resolve network issues. This tool often pinpoints common problems such as incorrect settings or hardware faults.
Common connectivity problems are frequently resolved by renewing the DHCP lease or resetting DNS settings. Disabling security software and restarting networking hardware address less frequent but critical blocks. Network Diagnostics provides guided troubleshooting when manual steps do not fix the issue.
Troubleshooting common issues when sharing internet and files from Mac
Users frequently encounter connection drops, permission errors, and conflicts when sharing internet or files from a Mac. Addressing these issues involves checking settings systematically.
- Internet Sharing toggle won’t stay enabled: Open System Preferences > Sharing, then disable other services like Screen Sharing or File Sharing temporarily. Re-enable Internet Sharing. When successful, the checkbox remains checked and the green status indicator appears.
- Wi-Fi hotspot not visible on client devices: Go to System Preferences > Network > Wi-Fi > Advanced, check the Security settings of your hotspot (WPA2 Personal recommended). Also, ensure the Wi-Fi channel is not congested by selecting a less crowded channel in Internet Sharing > Wi-Fi Options. The hotspot should then appear in available networks.
- Cannot connect to Windows shares: Verify SMB is enabled via System Preferences > Sharing > File Sharing > Options by checking "Share files and folders using SMB." Confirm you use the correct username and password for the Windows machine. Successful connection shows the shared folders accessible in Finder.
- Slow network speeds during sharing: Test connecting with an Ethernet or Thunderbolt cable instead of Wi-Fi to compare speeds. If wired is faster, reduce wireless interference by relocating devices or changing channels. A clear speed increase indicates Wi-Fi issues.
- Firewall blocking sharing services: Navigate to System Preferences > Security & Privacy > Firewall > Firewall Options. Add exceptions for Internet Sharing, File Sharing, and SMB services by clicking the plus button and selecting the relevant apps or services. When done correctly, connections will no longer be blocked.
Troubleshooting requires patience and methodical checks. Keep in mind that overlapping sharing services and incorrect credentials are the most common failure points.
- How to Set Custom DNS on Mac: Step-by-Step Guide
- How to Share a Printer on Mac: Step-by-Step Network Setup
- How to Turn On AirDrop for Everyone on Your Mac: A Complete Guide
- How to Change Your AirDrop Name on Mac: A Clear Step-by-Step Guide
Frequently asked questions
How to share from mac to windows?
To share files from Mac to Windows, enable File Sharing on your Mac via System Preferences > Sharing > File Sharing. Add the folders you want to share, then click Options and enable "Share files and folders using SMB." On the Windows PC, open File Explorer, type \\ followed by your Mac's IP address (e.g., \\192.168.1.5), and enter your Mac user credentials when prompted.
How to access network share on mac?
On your Mac, open Finder and select Go > Connect to Server (or press Command + K). Enter the network share address in the format smb://servername/sharename or afp://servername/sharename, then click Connect. Provide login details if required, and the shared folder will appear as a mounted drive in Finder.
How to share wifi on mac?
Go to System Preferences > Sharing and select Internet Sharing. Choose the source connection (e.g., Ethernet) from the "Share your connection from" dropdown. Then, check Wi-Fi in the "To computers using" list. Click Wi-Fi Options to set your network name, channel, and security. Finally, enable Internet Sharing by checking its box.
How to share mac files with windows?
Enable File Sharing in System Preferences > Sharing. Click Options, and ensure "Share files and folders using SMB" is checked along with your user account. On Windows, open File Explorer and connect to your Mac's IP address using the format \\IPaddress. Enter your Mac username and password to access shared files.
How to connect apple mac to internet?
To connect your Mac to the internet, click the Wi-Fi icon in the menu bar and select your Wi-Fi network. Enter the password if required. For wired connections, connect an Ethernet or Thunderbolt cable to your Mac and router or modem; the connection should establish automatically. If issues occur, check Network settings in System Preferences for configuration and diagnostics.
What this guide does not cover
This guide does not cover sharing internet from Mac to non-Apple mobile devices in detail, which may require additional apps or settings. Internet sharing over Wi-Fi is limited by hardware capabilities; Macs with a single Wi-Fi adapter cannot share Wi-Fi internet over Wi-Fi without additional hardware such as a USB Wi-Fi adapter or a second network interface. Some network sharing features depend on macOS versions and may vary slightly between updates, so menu names or options could differ on your system.
The most practical next step is to verify your Mac's network interfaces and ensure you have the necessary connections or adapters before starting the sharing process. Open System Settings > Network to check available services and confirm your active internet connection. This helps avoid common pitfalls like attempting to share a connection that isn’t active or lacking the required hardware to create a hotspot or share via cable.