How to Show Hidden Files Using Mac Terminal: A Clear Step-by-Step Guide
Discover how to reveal hidden files on your Mac using Terminal with clear, step-by-step instructions for safe and easy access.
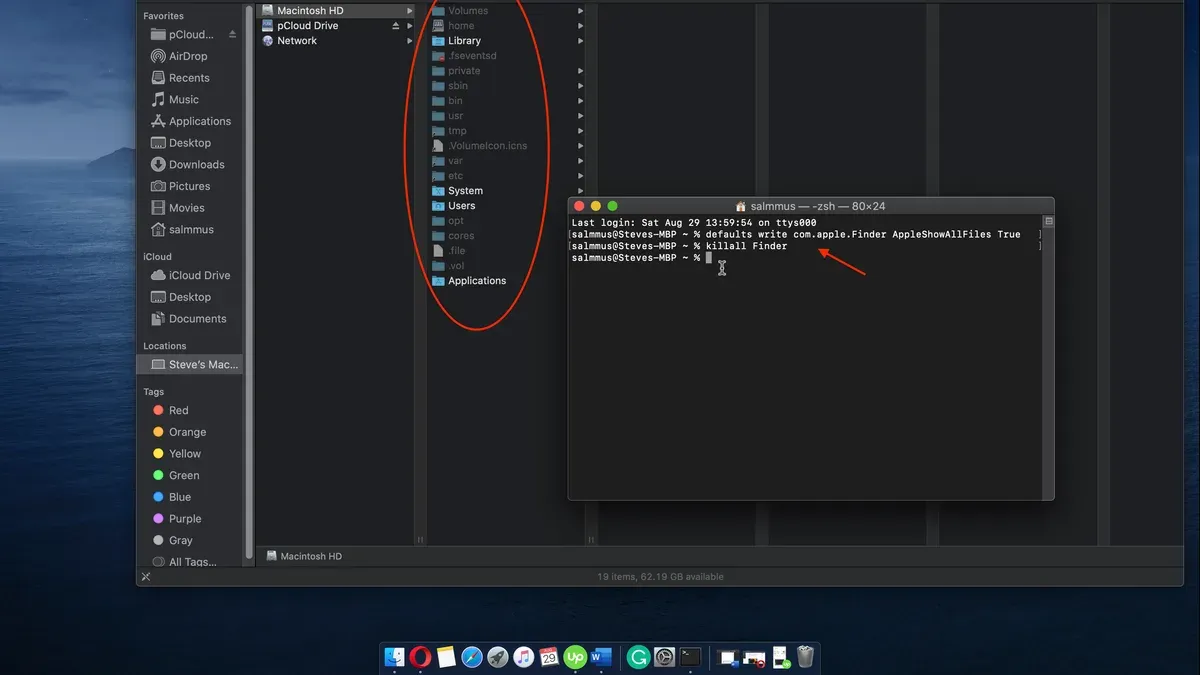
You need to access hidden files on your Mac for troubleshooting or customization, but Finder doesn’t show them by default. Using Terminal commands is a reliable way to reveal these files, especially when graphical options fall short.
This guide explains how to show hidden files with Terminal in Mac Terminal through clear step-by-step instructions. You’ll learn how to enter the correct commands, restart Finder to apply changes, hide files again, and troubleshoot common issues. Alongside practical steps, the article covers the risks and limitations so you can decide when revealing hidden files makes sense.
Key takeaways
- Use the command defaults write com.apple.finder AppleShowAllFiles YES to show hidden files.
- Restart Finder with killall Finder to apply changes immediately.
- Hide files again by changing YES to NO in the command.
- Be cautious as modifying hidden files can affect system stability.
- Troubleshoot by checking command syntax and user permissions if changes don’t appear.
Before you start: What you need to know and prepare
Using Terminal to reveal hidden files requires a basic understanding of the command line interface on your Mac. Hidden files are typically concealed because they are system-related or contain configuration data, and modifying them without caution can affect system stability.
Before proceeding, back up any important data to avoid unintended consequences. This precaution helps protect your files if you accidentally alter or delete critical system components.
To open Terminal, navigate to Applications > Utilities > Terminal, or press Command + Space and type Terminal, then hit Enter. This launches the command line interface where you will enter commands.
Common hidden files you might want to view include dotfiles such as .bash_profile, .gitconfig, and system files like .DS_Store. These files are not visible in Finder by default to prevent accidental changes.
- Open Terminal via Applications > Utilities > Terminal or Spotlight search.
You should see a window with a prompt ending in $ or %. - Ensure you have a recent backup of your important data.
This step helps protect your system if changes cause issues.
Step 1: Entering the command to show hidden files
- Open Terminal from your Applications > Utilities folder or by searching with Spotlight.
- Type the following command exactly: defaults write com.apple.finder AppleShowAllFiles TRUE. This command instructs macOS to change Finder’s settings to display all files, including those normally hidden.
- Press Enter to execute the command. The Terminal will not return any message; a silent success means the command was accepted without errors.
- Ensure you use uppercase TRUE as it is case sensitive; mistyping it (for example, using lowercase) will not work.
- Double-check for spaces and punctuation exactly as shown, since any deviation can cause the command to fail silently.
The defaults write command modifies user preferences stored in macOS, allowing you to change Finder’s behavior without navigating graphical settings. After running this, you will proceed to restart Finder to apply the changes.
Step 2: Restart Finder to apply changes
After entering the command to show hidden files, you must restart Finder for the change to take effect. Finder caches file visibility settings, so without a restart, hidden files will remain invisible despite the updated preference.
- Open Terminal and type killall Finder, then press Enter. This command terminates the Finder process, forcing it to close and relaunch automatically.
- Observe your screen: Finder windows will disappear briefly and then reappear. This visual reboot confirms Finder has restarted successfully.
- Check a Finder window to see if hidden files are now visible. Hidden files will appear slightly translucent or grayed out compared to regular files.
If you prefer not to use Terminal to restart Finder, you can also do so via the graphical interface. Open Activity Monitor from Applications > Utilities, locate “Finder” in the list, select it, and click the stop (X) button to quit it. Finder will relaunch automatically.
Alternatively, use the Force Quit option from the Apple menu, choose Finder, and click Relaunch. The visual result is the same: Finder windows close and reopen, applying your new settings.
Before restarting Finder, hidden files remain invisible; afterwards, you will see them alongside regular files, confirming the command's success.
How to hide files again using Terminal
To reverse the process and hide hidden files again, you need to change the Terminal setting back and restart Finder. This restores the default behavior, keeping system and hidden files out of view to prevent accidental changes.
- Open Terminal and type the command defaults write com.apple.finder AppleShowAllFiles FALSE. This command tells macOS to hide hidden files again.
- Restart Finder by typing killall Finder in Terminal and pressing Enter. Finder will relaunch, and hidden files will no longer be visible.
- Confirm that hidden files are hidden by checking your Finder windows. Files that previously appeared with a dot prefix should no longer be visible.
Hiding these files again is important because many are system files critical to macOS operations. Leaving them visible increases the risk of accidental deletion or modification.
Alternatively, you can use the keyboard shortcut Command + Shift + Period (.) to toggle hidden files on and off without Terminal commands. This quick method suits occasional use but does not persist through Finder restarts.
Troubleshooting common issues when showing hidden files
If hidden files do not appear after running the command, first verify the syntax. A common error is typing TRUE in lowercase or misspelling AppleShowAllFiles. The command must be exactly defaults write com.apple.finder AppleShowAllFiles TRUE (case-sensitive).
Permission errors usually indicate insufficient privileges. Prepend sudo if needed and enter your password when prompted. For example, sudo defaults write com.apple.finder AppleShowAllFiles TRUE.
If Finder refuses to restart or crashes, try manually relaunching it. Open Activity Monitor, select Finder, and click Force Quit. Finder will automatically restart.
When the command runs without error but files remain hidden, refresh Finder by holding Option, right-clicking the Finder icon in the Dock, and selecting Relaunch.
Sometimes a full system restart is necessary to apply settings, especially after multiple command attempts.
- Open Terminal and carefully retype:
defaults write com.apple.finder AppleShowAllFiles TRUE. Press Enter. You should see no output, indicating success. - Run
killall Finderto restart Finder. Finder should close and reopen without errors. - If an error appears, check the message. For example, "Operation not permitted" means you need
sudo. Trysudo defaults write com.apple.finder AppleShowAllFiles TRUEand enter your password. - If Finder does not restart, open Activity Monitor from Applications > Utilities, find Finder, select it, and click Force Quit. Finder should relaunch.
- If files are still hidden, hold Option, right-click the Finder icon in the Dock, and choose Relaunch. This forces a refresh.
- As a last step, restart your Mac. After reboot, hidden files should be visible if commands were entered correctly.
Understanding the risks and limitations of showing hidden files
Showing hidden files in Finder reveals items that macOS normally keeps out of sight, including critical system files like .DS_Store, .bash_profile, and configuration folders such as /etc. These files are hidden to prevent accidental modification or deletion, which can cause system instability or data loss.
Displaying hidden files does not change your access permissions or grant you the ability to modify protected files. macOS enforces file permissions independently of visibility, so even if you see a file, you may still lack write access. For example, system-owned files typically require administrator privileges to edit.
Not all hidden files are useful or safe to interact with. Many are configuration or cache files that should be left untouched unless you have specific knowledge. Deleting or altering unknown hidden files can disrupt applications or macOS processes.
Lastly, this method only affects file visibility within Finder. Terminal and other applications will not change how they display or access hidden files based on this setting. Be cautious and deliberate when working with hidden files to avoid unintended consequences.
- How to Optimize Mac Storage for Better Performance and Space
- How to Manage iCloud Storage on Mac: A Step-by-Step Guide
- How to Turn Off iCloud Drive Desktop and Documents Sync on Mac
- How to Remove Background Items and Images on Your Mac
Frequently asked questions
Can I show hidden files without using Terminal?
Yes, you can show hidden files without Terminal by using Finder shortcuts. Press Command + Shift + Period (.) while in any Finder window to toggle the visibility of hidden files. This method is quick and reversible but applies only to Finder, not other applications or system-wide settings.
Will showing hidden files harm my Mac?
Showing hidden files itself does not harm your Mac; it only changes what you see in Finder. However, modifying or deleting hidden files without understanding their purpose can cause system or app issues. Exercise caution when handling these files, especially those related to system configurations.
How do I know which hidden files are safe to delete or modify?
Determining which hidden files are safe to delete or modify requires knowledge of their function. Generally, files in your user Library folder like caches may be safe to clear, but system files in /System or /Library folders should be left alone unless you have specific instructions. Always back up important data before making changes.
Can I make hidden files visible only temporarily?
Yes, you can make hidden files visible temporarily by toggling visibility with the Finder shortcut Command + Shift + Period (.). If you use Terminal commands to show hidden files, you can hide them again by running the corresponding hide command or restarting Finder. This lets you control visibility without permanent changes.
What this advice does not cover and who should look elsewhere
This method only changes Finder’s visibility of hidden files and does not affect how other applications handle these files. If you are unfamiliar with Terminal commands or the significance of system files, proceed cautiously. Accidentally modifying or deleting hidden files can cause system instability or data loss. Always consider backing up important data before altering visibility settings.
For users seeking to manage hidden files within specific applications or those needing more comprehensive system management, graphical tools or specialized software may be more appropriate. This guide does not cover modifying file permissions or deeper system configurations that could require advanced expertise.
The most useful next step is to familiarize yourself with the Finder’s View options and keyboard shortcuts, such as pressing Command + Shift + Period (⌘ + ⇧ +.), which offers a quick toggle for showing or hiding hidden files without using Terminal. This can help you efficiently verify changes or switch visibility without repeated command-line input.