How to Use Aliases in zsh on Mac Terminal: A Practical Guide
Streamline your Mac Terminal workflow by learning how to create and manage aliases in zsh for faster, error-free command execution.
You open your Mac Terminal and find yourself typing the same long commands repeatedly. Streamlining this process can save you time and reduce errors. Learning how to use aliases in zsh in Mac Terminal helps you customize your shell environment to fit your workflow efficiently.
This guide covers everything from creating simple aliases to handling aliases with arguments and integrating Oh My Zsh aliases. You'll also understand common differences between zsh and bash aliases, ensuring you avoid typical pitfalls on macOS.
Key takeaways
- Aliases in zsh simplify repeated commands by letting you assign shortcuts.
- Create aliases by editing your ~/.zshrc file and applying changes with source ~/.zshrc.
- Aliases with arguments require functions or other workarounds because standard aliases don't accept parameters.
- Oh My Zsh comes with useful predefined aliases that you can customize or extend.
- Be aware of differences between bash and zsh alias behavior to troubleshoot issues effectively.
Before you start: understanding zsh and your Mac Terminal setup
zsh, or Z Shell, is a powerful Unix shell that macOS uses as its default shell. Since macOS Catalina, Apple switched from bash to zsh due to licensing and feature improvements. zsh offers enhanced scripting capabilities, improved tab completion, and more customizable options compared to bash.
To confirm your current shell is zsh, open the Terminal app and run:
- Type echo $SHELL and press Enter.
- You should see an output like /bin/zsh. This confirms you are using zsh.
Below is a comparison of key features relevant for aliases between zsh and bash on macOS:
| Feature | zsh | bash |
|---|---|---|
| Default on macOS | Yes (since macOS Catalina) | No (default prior to Catalina) |
| Alias support | Yes, with extended customization | Yes |
| Alias with arguments | Requires functions or special syntax | Same limitation |
| Configuration files | ~/.zshrc | ~/.bash_profile or ~/.bashrc |
Before creating aliases, ensure you have access to the Terminal app and a text editor like nano, vim, or a GUI editor to modify your ~/.zshrc configuration file. This file is where your alias definitions will be stored and loaded automatically when you start a new terminal session.
How to create an alias in macOS zsh
Creating aliases in zsh lets you shorten long commands or customize your workflow. You can define aliases temporarily for the current Terminal session or make them permanent by adding them to your configuration file.
- Open Terminal on your Mac.
- To create a temporary alias, type alias name='command'. For example,
alias ll='ls -la'creates an alias ll for detailed directory listing. Press Enter and then runllto see it in action. This alias lasts only until you close the Terminal window. - To make an alias permanent, open your
~/.zshrcfile in a text editor, likenano ~/.zshrc. - Add your alias line at the bottom, e.g.,
alias gs='git status'. You can add multiple aliases this way. - Save and exit the editor (in nano: press Control+O, Enter, then Control+X).
- Reload your shell configuration by running
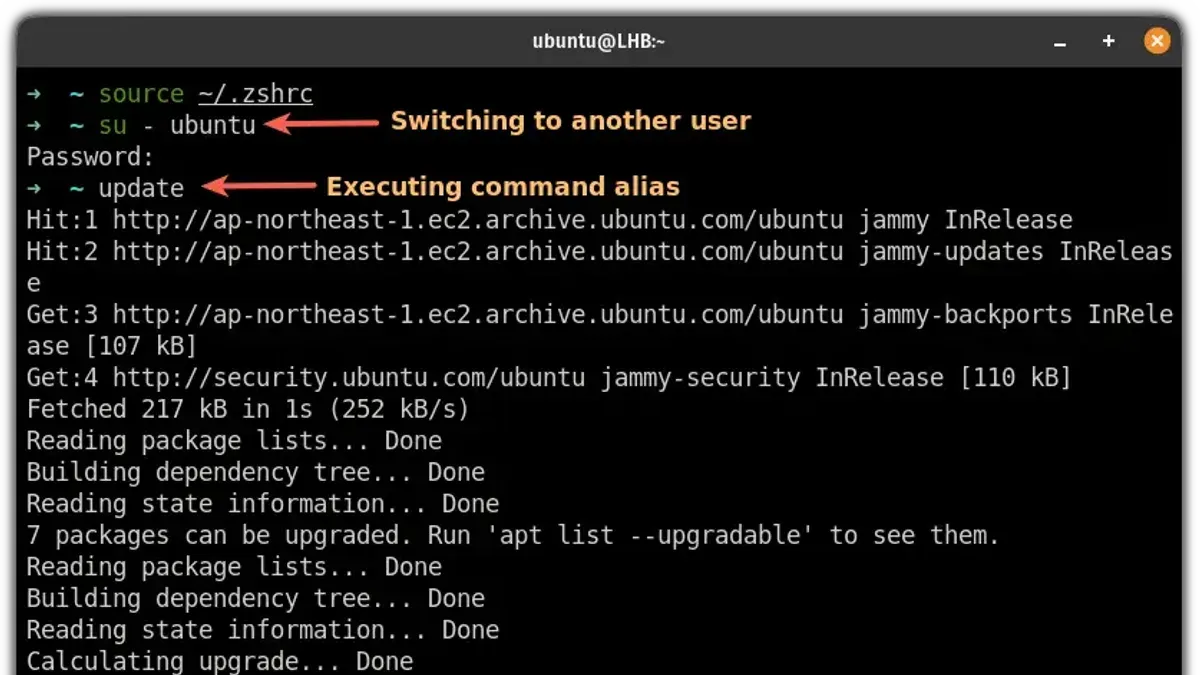
source ~/.zshrc. Your alias is now available in every Terminal session.
Alias names should be simple and avoid conflicts with existing commands. Use only letters, numbers, underscores, and dashes. Avoid spaces and special characters.
How to use alias command in Linux and Unix shells: similarities with macOS zsh
The alias command syntax is largely consistent across Unix-like shells, including bash on Linux and zsh on macOS. Typically, you define an alias using alias name='command'. For example, alias ll='ls -l' works both in bash and zsh.
However, some differences arise from the shell environment and startup files. Bash commonly uses ~/.bashrc or ~/.bash_profile for persistent aliases, while zsh uses ~/.zshrc. On macOS, zsh is the default shell, so aliases are placed in ~/.zshrc, aligning with zsh conventions rather than bash.
When you run alias without arguments, both shells list active aliases similarly. Yet, zsh supports more complex alias expansions and can handle options differently, which may affect alias behavior when porting scripts or commands from bash.
To use aliases across shells, you can replicate the alias definitions in the appropriate startup files for each shell. On macOS, zsh’s behavior and alias syntax closely match Linux bash, easing cross-platform workflows.
How to create and use aliases with arguments in zsh
The standard alias command in zsh cannot directly accept arguments. This means you cannot pass parameters to an alias like you would with a function. To work around this limitation, define a function in your ~/.zshrc file that acts like a parameterized alias.
Here is an example showing why a basic alias fails with arguments:
alias greet='echo Hello'
greet World
This will output only "Hello" ignoring the "World" argument.
Instead, create a function to handle parameters:
greet() {
echo "Hello $1"
}
Steps to create and test such functions:
- Open your
~/.zshrcfile in a text editor. - Add the function definition, for example:
greet() { echo "Hello $1"; } - Save the file and reload the shell with
source ~/.zshrc. - Run the function with an argument:
greet World - You should see the output:
Hello World
You can extend functions with more arguments, for example:
copyfile() {
cp "$1" "$2"
}
Calling copyfile source.txt destination.txt copies the file accordingly.
Using functions instead of aliases allows flexible, parameterized commands that fit naturally into your zsh environment.
How to integrate Oh My Zsh aliases and customize your zsh experience
Oh My Zsh is a popular framework that bundles hundreds of aliases designed to speed up your Mac Terminal workflow. These aliases cover common tasks like git commands, directory navigation, and system utilities.
You can find Oh My Zsh’s built-in aliases in the ~/.oh-my-zsh/plugins/ directory, under each plugin’s folder. For example, the git plugin includes aliases like gst for git status and gco for git checkout.
To add or override aliases safely, edit your ~/.zshrc file after the line that sources Oh My Zsh. Place your custom alias definitions there to ensure they take precedence. For instance:
- Open
~/.zshrcin a text editor. - Scroll to the bottom, after
source $ZSH/oh-my-zsh.sh. - Add
alias ll='ls -alF'or overridegstby redefining it. - Save the file and run
source ~/.zshrcto apply changes.
Be cautious about potential conflicts: some plugins define aliases that may clash with your custom ones. If you notice unexpected behavior, check if a plugin alias is overriding yours. Adjust plugin loading order or rename your aliases to avoid collisions.
Troubleshooting common alias issues in zsh on Mac Terminal
If your aliases are not working after adding them to ~/.zshrc, first ensure the file is properly sourced. Run source ~/.zshrc or restart your Terminal to apply changes. Syntax errors in alias definitions, such as missing quotes or the wrong assignment format, can prevent aliases from loading.
Conflicts with existing commands or functions may cause aliases to be ignored. Use which alias_name and type alias_name to check what the shell resolves your alias to. For example, which ll might output ll: aliased to ls -l confirming the alias is active.
To debug, follow these steps:
- Edit
~/.zshrcand add your alias, e.g.,alias gs='git status'. - Run
source ~/.zshrc. You should see no error messages. - Check the alias with
alias gs. It should outputgs='git status'. - Run
type gs. It should indicate it is an alias. - Execute
gsand observe the expectedgit statusoutput.
If aliases still fail, verify no function or script with the same name exists by inspecting type alias_name. Also, clear any command caching by restarting the Terminal session.
Frequently asked questions
How to create alias in macos?
To create an alias in macOS, open your Terminal and edit the ~/.zshrc file by adding a line like alias ll='ls -la'. Save the file and run source ~/.zshrc to apply the changes immediately. This sets a shortcut command that you can use in your current shell sessions.
How to set alias in unix?
In Unix systems, you set an alias by adding a line such as alias gs='git status' to your shell configuration file (e.g., ~/.bashrc or ~/.zshrc). After saving, you can either restart your terminal or source the file to activate the alias. The process is similar across most Unix-like shells.
How to set alias in linux?
Setting an alias in Linux works by modifying your shell’s config file, usually ~/.bashrc or ~/.zshrc, with a line like alias update='sudo apt update && sudo apt upgrade'. Then run source ~/.bashrc or source ~/.zshrc to load the alias into your current session. This creates a shortcut for commonly used commands.
What is zsh in mac?
zsh, or Z shell, is the default command-line shell on macOS, replacing bash since macOS Catalina. It offers enhanced features like improved scripting, better autocompletion, and theme support. zsh makes customizing your Terminal environment easier and more powerful compared to older shells.
How to set alias linux?
To set an alias in Linux, add a line such as alias cls='clear' to your shell’s configuration file, typically ~/.bashrc or ~/.zshrc. After saving, apply it by sourcing the file with source ~/.bashrc or opening a new terminal window. This method works consistently across most Linux distributions.
Limits of this guide and who should look elsewhere
This article focuses on simple alias creation and usage in zsh on macOS and does not cover advanced shell scripting or environment management tools like direnv or complex shell frameworks beyond Oh My Zsh. If you require detailed shell function scripting, complex environment variable management, or use specialized frameworks like Prezto or Fish shell, this guide will not address those needs. For deep customization beyond aliasing, consider dedicated shell scripting resources or tool-specific documentation.
To make the most out of aliases, start by editing your ~/.zshrc file with a text editor such as nano or vim, then reload your shell session using source ~/.zshrc. This straightforward step ensures your aliases are active and ready to improve your Terminal workflow immediately.