How to Use Mission Control on Mac: A Practical Step-by-Step Guide
Discover practical steps to use Mission Control on Mac for managing windows, spaces, and apps to enhance your productivity.
You often have multiple apps and windows open on your Mac, making it hard to keep track of everything. Mission Control helps by giving you an overview of all your open spaces, apps, and windows, so you can switch between tasks smoothly.
This article explains how to use Mission Control on Mac with a focus on adapting to your specific Mac model and input devices. Whether you prefer keyboard shortcuts, a mouse, or a trackpad, you’ll find clear, practical steps and tips to integrate Mission Control into your workflow effectively.
Key takeaways
- Activate Mission Control using Control + Up Arrow or the dedicated F3 key on compatible keyboards.
- Use trackpad gestures like a three- or four-finger swipe up to open Mission Control quickly.
- Customize Mission Control settings in System Preferences > Mission Control for tailored behavior.
- Different Mac models have unique input options—MacBook trackpads support more gestures than Mac mini setups.
- Assign hot corners to launch Mission Control instantly with a mouse movement.
Before you start: What you need to use Mission Control effectively
Mission Control is available on Macs running OS X Lion (10.7) and later versions of macOS. Ensure your Mac is updated to at least this version to access Mission Control features. You can check your macOS version by clicking the Apple menu and selecting "About This Mac."
Next, identify which input devices you will use to interact with Mission Control. This can include a built-in or external keyboard, a mouse, and/or a trackpad. Each device offers different ways to invoke and navigate Mission Control.
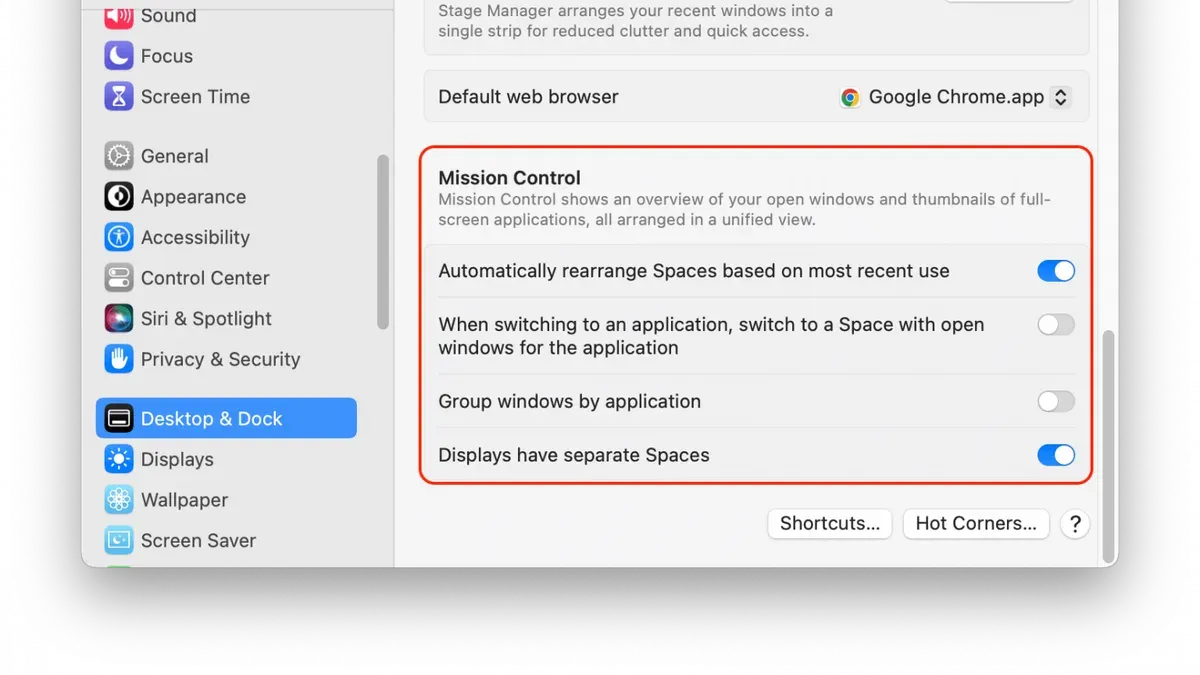
Before using Mission Control, review its settings in System Preferences to tailor the experience to your needs. Navigate to System Preferences > Mission Control to find options and assign keyboard or mouse shortcuts. This panel also allows you to enable features like "Displays have separate Spaces" and "Group windows by application," which affect how Mission Control organizes your workspace.
Understanding the core concepts of Mission Control will help you use it effectively. These include:
- Spaces: Virtual desktops that help organize open windows and apps.
- Full-screen apps: Applications occupying an entire Space for focused work.
- Window management: Viewing and selecting open windows across your Spaces.
Familiarity with these elements prepares you to customize and navigate Mission Control efficiently.
- Click the Apple menu and select "About This Mac." You should see your macOS version, which must be OS X Lion (10.7) or later.
- Open System Preferences and choose "Mission Control." The Mission Control pane will display options and shortcut configurations.
- Identify your input devices: look for your keyboard layout, mouse model, or trackpad availability to understand what controls you can use.
- Review the settings such as "Show Dashboard as a Space," "Automatically rearrange Spaces based on most recent use," and shortcut keys. Adjust them if needed and verify changes by testing the shortcuts.
By completing these steps, you ensure your Mac and input devices are ready for using Mission Control, and you have the foundational knowledge to navigate its features.
What is Mission Control on Mac and why use it
Mission Control is a built-in window and desktop management tool on Mac that helps you organize and navigate your workspace efficiently. It combines open windows, desktop Spaces, full-screen apps, and historically the Dashboard, into a single, accessible overview. This integration allows you to see all your active tasks at a glance and switch between them quickly.
With Mission Control, you can manage multiple apps and windows without clutter, which improves multitasking by reducing the time spent searching for a specific window or app. For example, if you’re working on a report, designing graphics, and communicating via chat, Mission Control lets you easily switch between these different windows or place them in separate desktops to keep your workflow organized.
Compared to Windows Task View, which also displays open windows and virtual desktops, Mission Control offers a streamlined visual overview that emphasizes smooth navigation between full-screen apps and Spaces. While Task View focuses on showing timeline history and app windows, Mission Control integrates desktops and full-screen apps more fluidly, making it easier to separate workspaces for different projects.
| Feature | Mission Control (Mac) | Task View (Windows) |
|---|---|---|
| View all open windows | Yes, with grouped windows by app | Yes, all windows shown individually |
| Manage virtual desktops | Yes, called Spaces | Yes |
| Full-screen app integration | Seamless switching between full-screen and desktops | Supported but less integrated |
| Timeline/history view | No | Yes, shows recent activities |
Using Mission Control effectively helps you stay organized and reduces distractions, especially when handling multiple tasks or projects. It keeps your Mac workspace clear and your focus sharp by giving you immediate visual access to everything running on your Mac.
How to open Mission Control on Mac using keyboard shortcuts
Using keyboard shortcuts is a fast way to open Mission Control and access your open windows and desktops. The default shortcut is Control + Up Arrow, which immediately displays an overview of all your active windows.
Another common method is pressing the F3 key, often marked with three rectangles, dedicated to Mission Control on most Mac keyboards. On MacBook models with a Touch Bar, you can customize the Control Strip to include a Mission Control button for quick access.
To customize these shortcuts, follow these steps:
- Open System Preferences from the Apple menu.
- Click on Keyboard, then select the Shortcuts tab.
- Choose Mission Control from the sidebar.
- Here, you can enable or change shortcuts such as Mission Control, Application Windows, and Show Desktop.
- Click the existing shortcut and press the new key combination you prefer to assign it.
Function keys may require pressing the Fn key depending on your keyboard settings. To avoid confusion, check System Preferences > Keyboard > Keyboard and adjust “Use F1, F2, etc. keys as standard function keys” if needed.
Remembering these shortcuts can improve your workflow by reducing reliance on the mouse or trackpad. Start by using Control + Up Arrow regularly, and customize shortcuts that suit your typing habits for faster window management.
In summary, multiple keyboard shortcuts exist for Mission Control, and tailoring them in System Preferences can help you open it more efficiently according to your device and preferences.
How to use Mission Control on Mac with mouse and trackpad
Using pointing devices like your mouse or trackpad provides intuitive ways to access Mission Control beyond keyboard shortcuts. You can set up Hot Corners to trigger Mission Control by moving the pointer to a screen corner.
- Open System Preferences and go to Desktop & Screen Saver.
- Click the Hot Corners button at the bottom right.
- Choose a corner and select "Mission Control" from the dropdown menu.
- Click OK and move your cursor to that corner; Mission Control should activate.
For Mac trackpads, gestures offer a smooth method to open Mission Control. The default gesture is a three or four-finger swipe up, depending on your trackpad settings.
- Open System Preferences and select Trackpad.
- Click the "More Gestures" tab.
- Ensure "Swipe up with three fingers" or "Swipe up with four fingers" is checked under Mission Control.
- Swipe up on your trackpad with the chosen number of fingers; Mission Control will display.
If you use a Magic Mouse, you can assign Mission Control to a specific button or gesture.
- Open System Preferences and select Mouse.
- Click the "More Gestures" tab.
- Assign Mission Control to "Smart Zoom" or a secondary click if preferred.
- Use the assigned gesture or button to open Mission Control.
Comparing input styles, trackpad gestures are often faster and more natural for many users, especially on MacBooks, while mouse setups may offer more precision and easier access on desktop Macs. Personal preference and device type typically guide the best choice.
How to use Mission Control on different Mac models: MacBook Air, MacBook, and Mac mini
Each Mac model offers unique input devices and screen sizes that influence how Mission Control functions best. Understanding these differences helps you tailor your workflow effectively.
Using Mission Control on MacBook Air
The MacBook Air features a smaller screen and a large, responsive Force Touch trackpad. To optimize Mission Control here, rely heavily on trackpad gestures like a three- or four-finger swipe up, which provides quick access without needing keyboard shortcuts. The compact display means managing multiple desktops or full-screen apps is essential to avoid clutter.
- Swipe up with three or four fingers on the trackpad. You should see all open windows and desktops displayed.
- Create additional desktops by moving the cursor to the top-right corner and clicking the plus (+) button. This helps organize workspaces on the smaller screen.
- Use Mission Control to drag and drop windows between desktops to maintain an uncluttered view.
Using Mission Control on MacBook
The MacBook, similar to the Air but with a slightly different keyboard layout, often includes a dedicated Mission Control key (F3) by default. Keyboard shortcuts remain effective, but trackpad gestures are equally supported. Users can adjust shortcut keys under System Preferences > Keyboard > Shortcuts if needed.
- Press the F3 key to open Mission Control. You should see your open windows and desktops.
- Swipe up with three or four fingers on the trackpad for an alternative access method.
- Organize windows by dragging them across desktops to streamline multitasking.
Using Mission Control on Mac mini
Unlike MacBooks, the Mac mini relies on external peripherals. The experience depends on the connected keyboard and mouse, which may vary widely. Commonly, users pair a Magic Keyboard and Magic Mouse or a third-party mouse with programmable buttons.
- Press Control + Up Arrow on the external keyboard to open Mission Control. You should see all open windows and Spaces.
- If your mouse supports gestures, configure a gesture to trigger Mission Control in System Preferences > Mouse > More Gestures.
- Use Hot Corners (System Preferences > Desktop & Screen Saver > Hot Corners) to assign Mission Control activation to a screen corner for quick access.
Each device requires adapting to its input methods: MacBook Air benefits from trackpad gestures due to its portable design, MacBook offers a balance of keys and gestures, and Mac mini relies on external device configurations. Adjusting Mission Control settings and input methods improves workflow tailored to each Mac’s hardware and your usage style.
Managing and customizing Mission Control settings for better workflow
To tailor Mission Control to your workflow, visit System Settings and select Desktop & Dock, then click Mission Control. Here, you'll find options to adjust how Mission Control behaves and organizes your windows.
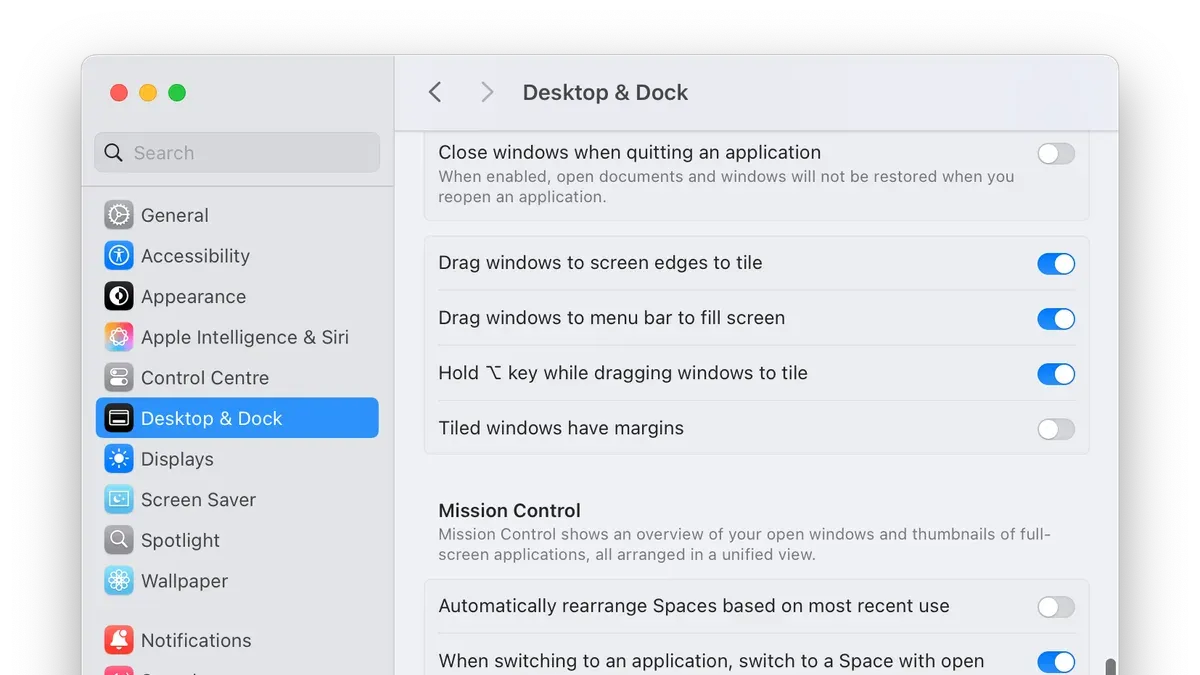
- Open System Settings from the Apple menu and select Desktop & Dock.
- Click on Mission Control to access its preferences.
- Toggle Dashboard on or off depending on whether you want quick access to widgets; note that disabling it frees up screen space.
- Enable or disable Group windows by application to control whether Mission Control clusters windows from the same app together or displays them individually, which affects how you scan open tasks.
- To create multiple desktops (Spaces), enter Mission Control (using your preferred method), then click the + icon in the top-right corner. This lets you separate tasks or projects across different desktops.
- Assign apps to specific desktops by right-clicking an app’s icon in the Dock, selecting Options, and choosing This Desktop. This locks the app to the current Space, helping keep your workflow organized.
Before customizing, Mission Control may show all windows mixed together, making it harder to focus. After enabling grouping and assigning apps to Spaces, you can quickly switch between organized desktops, reducing clutter and improving focus.
These settings adapt Mission Control from a generic window overview to a personalized workspace manager suited to your multitasking style.
Troubleshooting common Mission Control issues
If Mission Control fails to open or keyboard shortcuts do not respond, first verify that the shortcuts are correctly assigned in System Preferences under Keyboard > Shortcuts > Mission Control. Sometimes, conflicting shortcuts or disabled keys cause issues.
When gestures or Hot Corners do not activate Mission Control, check System Preferences > Mission Control > Hot Corners to ensure corners are enabled and correctly mapped. For trackpad gestures, review System Preferences > Trackpad > More Gestures to confirm Mission Control gestures are enabled.
If windows are not displaying correctly or desktops seem missing, restarting the Dock process can help. Open Terminal and enter killall Dock. This resets Mission Control's window management without affecting your open apps.
Performance issues like lag or freezing often result from too many active desktops or resource-heavy apps running simultaneously. Closing unnecessary windows and quitting demanding applications can improve responsiveness.
- Open System Preferences and navigate to Keyboard > Shortcuts > Mission Control. Confirm shortcuts like Control + Up Arrow are enabled. When correct, pressing the shortcut should reveal the Mission Control view.
- Go to System Preferences > Mission Control > Hot Corners. Set a corner to Mission Control, then move your cursor to that corner. You should see Mission Control activate.
- In System Preferences > Trackpad > More Gestures, ensure "Mission Control" is checked. Swipe up with three or four fingers on the trackpad; Mission Control should open.
- Open Terminal and type killall Dock, then press Enter. The Dock will restart; afterward, check if Mission Control windows display correctly.
- Close unneeded applications or desktops if Mission Control is slow. You should notice smoother transitions and quicker response times.
- How to Use Window Tiling on Mac: A Practical Step-by-Step Guide
- How to Tile Windows on Mac Using Your Keyboard Efficiently
Frequently asked questions
How to open mission control mac?
You can open Mission Control on a Mac by pressing the F3 key, which often has three rectangles icon, or by swiping up with three or four fingers on the trackpad. Alternatively, you can press Control + Up Arrow. Some Macs also allow configuring a hot corner to activate Mission Control when you move your cursor to a screen corner via System Settings > Desktop & Dock > Hot Corners.
What is apple mission control?
Apple Mission Control is a macOS feature that provides an overview of all your open windows, desktops, and full-screen apps. It helps you organize and switch between tasks efficiently by showing everything in a single view. Mission Control combines Exposé, Spaces, and Dashboard functionalities into one interface.
What is mac mission control?
Mac Mission Control is the built-in window management tool on macOS designed to simplify navigation across multiple apps and desktops. It visually arranges your open windows, spaces, and full-screen apps to help you find and switch between them quickly. This feature enhances multitasking by reducing clutter and improving workspace organization.
How to access mission control on mac with mouse?
To access Mission Control using a mouse, you can set up a hot corner through System Settings > Desktop & Dock > Hot Corners, assigning Mission Control to a chosen screen corner. Moving your cursor to that corner will trigger Mission Control. Some Apple mice support gestures like swiping up with three fingers on the Magic Mouse, but enabling hot corners is the most reliable method.
how to open mission control mac
Opening Mission Control on a Mac can be done by pressing the Mission Control key (F3) on your keyboard, using the Control + Up Arrow combination, or swiping up with three or four fingers on a compatible trackpad. You can also activate it by assigning a hot corner in System Settings, allowing quick access with your mouse or trackpad.
What this guide does not cover
This guide focuses on using Mission Control as it is built into macOS and does not cover alternative window management tools like Stage Manager or third-party applications such as Magnet or BetterSnapTool. These alternatives may offer different features or workflows that better suit some users' preferences. If you require advanced window tiling, snapping, or multi-monitor setups beyond Mission Control's capabilities, exploring those options could be beneficial.
To make the most of Mission Control, the single most useful next step is to customize your Mission Control settings in System Preferences under Mission Control. Enable options like "Displays have separate Spaces" if you use multiple monitors, and assign hot corners or keyboard shortcuts that fit your workflow. This tailoring ensures Mission Control works seamlessly with your input devices and Mac model, improving your productivity consistently.