How to Use Scenes in Freeform: A Step-by-Step Guide
This guide shows you how to create, navigate, and manage scenes in Freeform to organize your visual projects effectively.
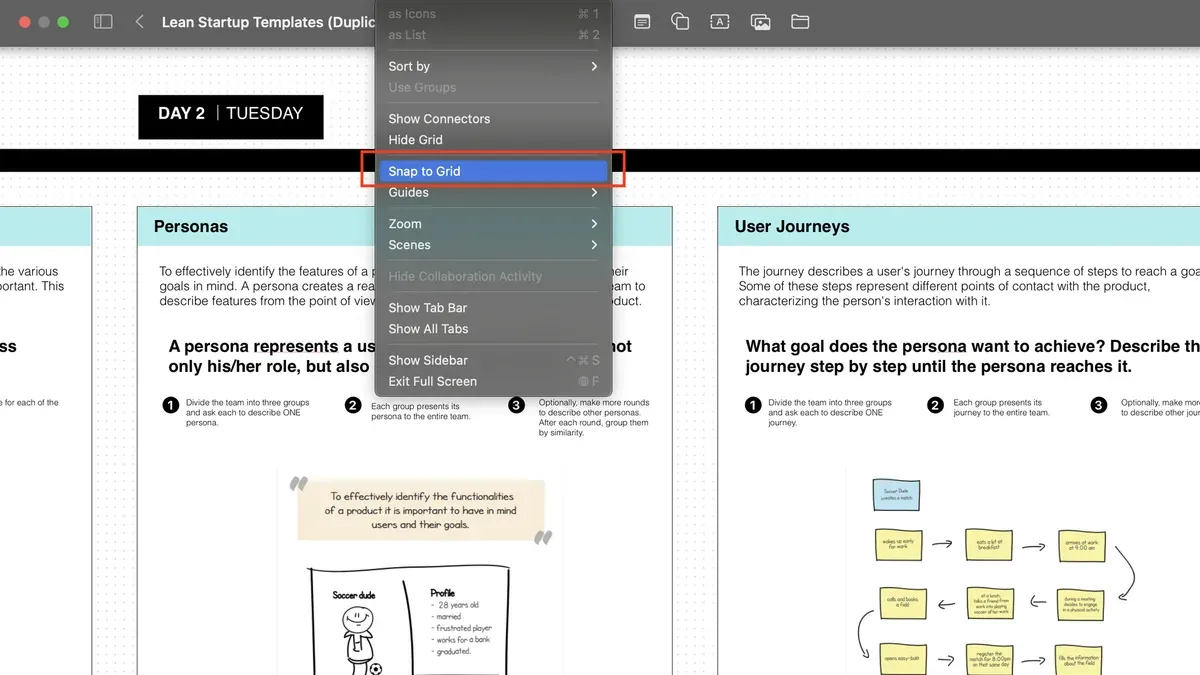
You're trying to organize multiple visual ideas within Apple’s Freeform app but find yourself unsure how to keep everything clear and accessible. Perhaps you're confused by the term "Freeform" itself, which can refer to different tools and concepts, making it harder to focus on the app’s scene functionality.
This article walks you through how to use scenes in Freeform in Freeform, showing you step-by-step how to create, navigate, and manage scenes effectively. Along the way, it clarifies common confusions around the term "Freeform" and compares the app’s scenes with similar features in other platforms. By the end, you'll know exactly how to organize your projects visually using scenes within the Freeform app.
Key takeaways
- Scenes in Freeform allow you to group boards and content for easier navigation and presentation.
- You can create a new scene by tapping the Scenes button and selecting the + icon.
- Switch between scenes smoothly using the sidebar or gesture controls.
- Edit scenes by renaming, deleting, or rearranging them through the Scenes menu.
- Understanding Freeform’s scenes helps avoid confusion with other "free form" tools and maximizes your workflow.
Before you start: What you need to use scenes in Freeform
Before you begin working with scenes in Freeform, make sure you have the right setup to take full advantage of its features. Freeform is an Apple-designed app intended for visual collaboration and organization, so it is important to distinguish it from other tools or platforms that share the name "Freeform" but serve unrelated purposes. This ensures you are working within the correct environment.
To use scenes in Freeform, you need an Apple device that supports the app. Freeform runs on macOS Ventura or later for Mac, iPadOS 16 or later for iPad, and iOS 16 or later for iPhone. Confirm your device and operating system meet these requirements to avoid compatibility issues. Once installed, the Freeform app icon typically shows a white board with colorful shapes and lines, helping you identify it among other apps.
Because Freeform is designed to sync your work across devices, ensure you are signed in with your Apple ID on your device. This allows seamless collaboration and access to your projects wherever you are. Finally, have a basic familiarity with the Freeform interface, including how to create boards, add elements, and use menus. This foundational knowledge will help you follow the step-by-step instructions for using scenes more easily.
- Check your device’s operating system version: On Mac, go to Apple Menu > About This Mac; on iPad or iPhone, go to Settings > General > About. Confirm it meets or exceeds macOS Ventura, iPadOS 16, or iOS 16 respectively.
- Locate and open the Freeform app on your device. The icon is a white board with colorful shapes. When opened, you should see an interface with boards and a toolbar.
- Verify you are signed in with your Apple ID by going to Settings > Apple ID on iPhone or iPad, or System Settings > Apple ID on Mac. If not signed in, follow prompts to log in.
- Familiarize yourself with Freeform’s basic interface: try creating a new board, adding a few shapes or text boxes, and navigating menus. This practice ensures you will be comfortable working with scenes.
Open Freeform and locate the scenes feature
- Launch the Freeform app on your Apple device by tapping its icon on your Home screen or in the App Library. Once opened, either select an existing board from your list or tap the + button to create a new board. You should see a blank or populated canvas depending on your choice.
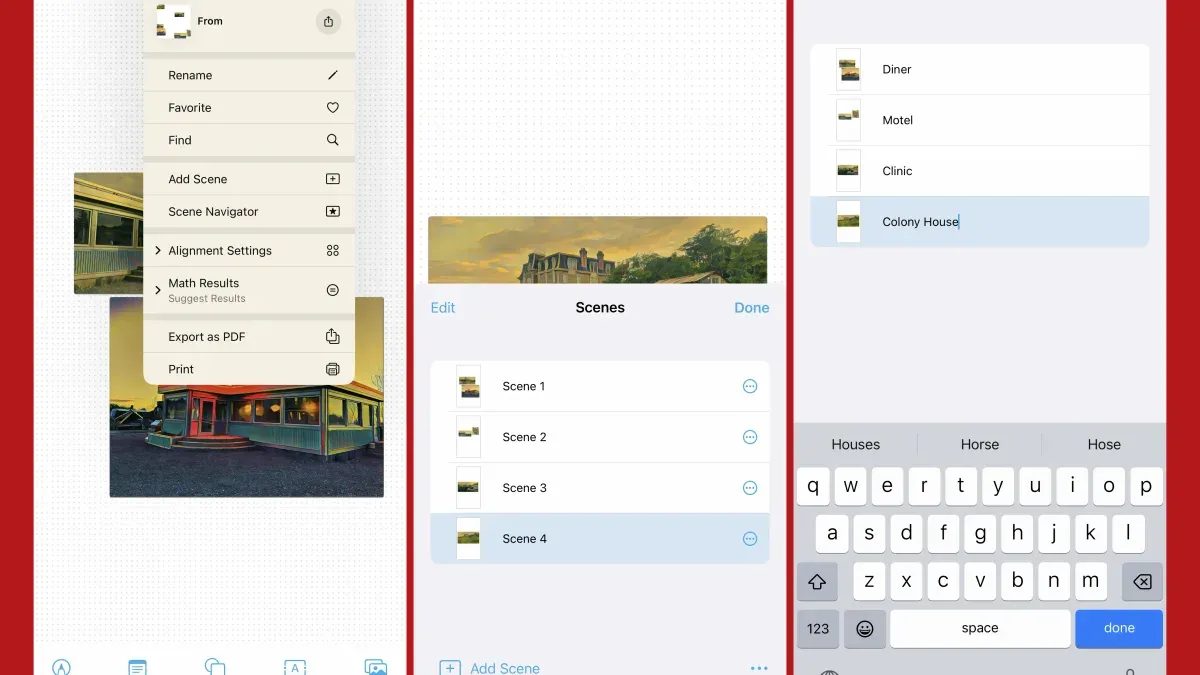
- Look toward the top or side of the board interface for the Scenes panel. On iPad and Mac, this panel often appears as a sidebar on the left with thumbnail previews of your scenes; on iPhone, it may be accessed via a button labeled Scenes or an icon resembling stacked rectangles.
- Tap or click the Scenes panel or its icon to open it fully. Here, you will see existing scenes represented as snapshots or groupings of your board content. Each scene acts like a mini-viewport highlighting a particular arrangement of your notes, images, or drawings.
- Understanding scenes: these are organized groupings or snapshots within your board that help you navigate complex visual ideas efficiently or prepare focused sections for presentation. Scenes let you jump quickly to relevant sections without manually scrolling or zooming.
- Explore the Scenes panel to see how thumbnails update as you add or modify content in your board. This visual overview helps you recognize what each scene contains at a glance, making your workflow more intuitive.
Example: On a sample board with multiple brainstorming clusters, you might have one scene showing only your mood board images, another focusing on text notes, and a third highlighting sketches. Switching between these scenes helps you present or organize your ideas clearly.
Create your first scene in Freeform
Creating a scene in Freeform helps you focus on specific parts of your board by capturing a snapshot of selected content. To start, decide which area or objects you want to include in your scene. This could be a cluster of images, text notes, sketches, or a combination relevant to your project.
- Select the content: Click and drag to create a selection box around the objects or area you want to capture. When selected, these items will be highlighted with a blue outline.
- Create the scene: With your selection active, tap the "Add Scene" button located in the Scenes panel or use the context menu by right-clicking (or control-clicking) and choosing "Create Scene." A new scene thumbnail will appear, representing your selection.
- Name your scene: Click on the scene's title placeholder to enter a clear, descriptive name that reflects its purpose, such as "Project Overview" or "Concept Sketches." This helps you identify scenes quickly later.
- Adjust the scene boundaries: If you want to refine what the scene includes, click the scene thumbnail, then drag its edges to resize or reposition the captured area. You can also add or remove objects by editing your selection and updating the scene accordingly.
For example, if you have a board with multiple ideas scattered around, you might select just the cluster of sketches related to one concept and create a scene named "Character Designs." Before creating the scene, your board shows all content at once; after, navigating to this scene zooms directly to just those sketches, making your workspace more organized and presentation-ready.
Navigate and switch between scenes smoothly
To move quickly across different parts of your Freeform board, use the scenes feature to streamline navigation. Start by accessing the scene list or the thumbnail view, which displays all your saved scenes in one place. This visual preview helps you identify and select the exact section of your board you want to work on or present.
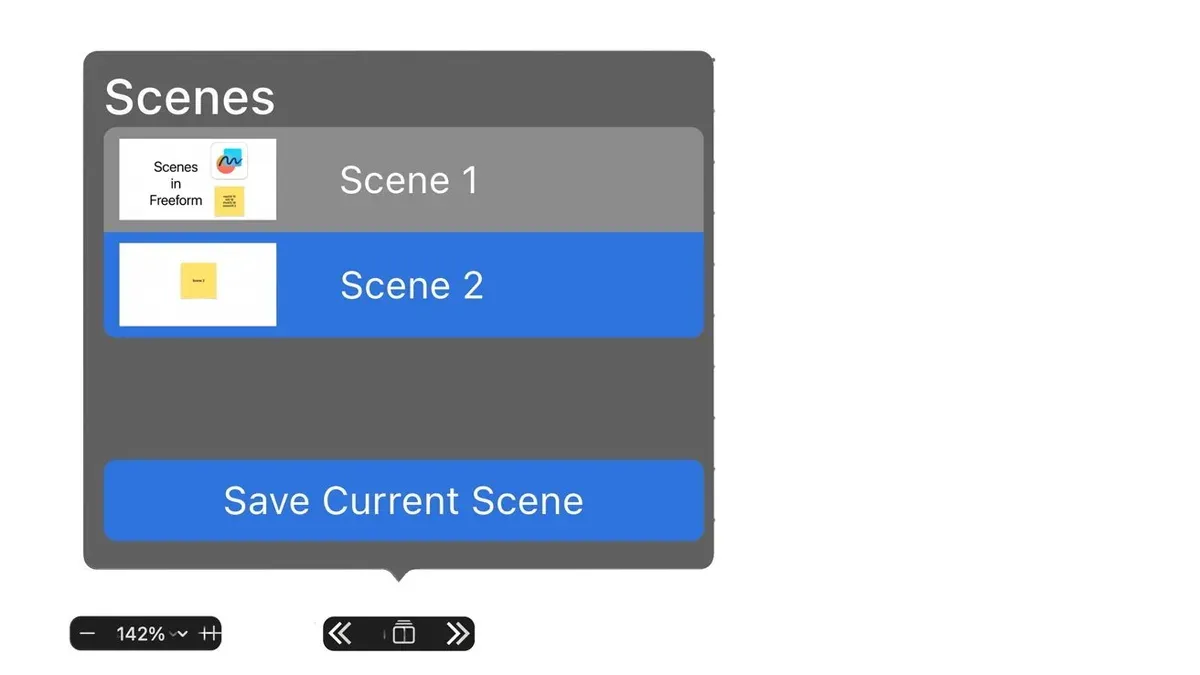
- Tap the Scenes icon in the toolbar to open the scene panel. You should see thumbnails representing each scene you created.
- Click or tap on a scene thumbnail to jump directly to that scene’s content. The board view will immediately update to show only the elements within the selected scene.
- If your device supports it, use keyboard shortcuts like Command + ] and Command + [ (on Mac) or swipe gestures to cycle forward and backward through scenes. This lets you move without returning to the scene panel.
Using scenes to navigate your board saves time compared to manually scrolling or zooming through a large canvas. It keeps your workspace organized and focused, especially when collaborating, since you can quickly show collaborators specific parts of your project without distractions. Without scenes, finding particular content can be slower and more cumbersome, disrupting your creative flow.
Edit and manage scenes effectively
As your project develops, keeping your scenes updated ensures your Freeform board stays organized and relevant. You can modify existing scenes by resizing the frame to include new elements or exclude outdated ones. Adding or removing content within a scene adjusts its focus, helping you highlight the most important parts of your board.
Renaming scenes is key to maintaining clarity. Use clear, descriptive names that reflect the scene’s content or its purpose, such as "Client Feedback" or "Final Design Concepts." This helps you and collaborators quickly identify each scene’s role without opening it.
Deleting scenes that are no longer needed reduces clutter and keeps your workspace streamlined. Before deleting, confirm that the scene isn’t linked to ongoing tasks or references elsewhere in your project.
Organizing the order of scenes improves the logical flow of your presentation or review. You can drag scenes within the Scenes panel to reorder them, placing related scenes next to each other for easier navigation.
- Open the Scenes panel and select the scene you want to edit. You should see the scene’s content framed on your board.
- Resize the scene frame by dragging its edges to add or remove content. When done, the thumbnail preview updates to reflect the new selection.
- To rename, tap the scene’s name at the top of the Scenes panel, type a new descriptive title, and press Enter. The updated name appears immediately.
- To delete a scene, right-click (or Control-click) the scene’s thumbnail and choose "Delete Scene." Confirm the deletion when prompted, and the scene disappears from the panel.
- Reorder scenes by clicking and dragging a scene thumbnail to a new position in the list. The scenes rearrange, allowing you to establish a logical sequence.
Maintaining clear, purposeful scene names and an organized order helps you navigate your project with ease and present your ideas more effectively.
Use scenes for presentations and sharing in Freeform
Scenes in Freeform offer a structured way to present your ideas step by step. When presenting, you can move through scenes sequentially, allowing viewers to focus on specific parts of your board without distraction. This approach helps keep your narrative clear and guides your audience through complex visual information smoothly.
To share your board with collaborators, you can invite them via the Share button. Collaborators can then explore the scenes themselves, which provides a clear understanding of your project’s layout and progress. This shared navigation enhances communication and ensures everyone is on the same page.
Keep in mind some limitations: real-time updates depend on stable internet connections, so collaborators might experience slight delays in seeing changes. Also, offline access to scenes is limited; collaborators need to be online to view the most recent version of your board and its scenes.
- Open your Freeform board and click the Share button in the toolbar. You should see options to invite people via email or link.
- Send the invitation to your collaborators. Once they join, confirm that they can see the Scenes panel on their side.
- Start your presentation by selecting the first scene in the Scenes panel. Your collaborators will see the same view if following your presentation.
- Navigate through the scenes using the panel or arrow keys. Your collaborators can either follow along or explore scenes independently.
- After the presentation, ask collaborators for feedback on scene clarity and navigation to improve future boards.
For example, a student presenting a design project used scenes to break down each design element. Collaborators noted the stepwise approach made it easier to understand changes and provide targeted feedback. This demonstrates how scenes can improve collaborative discussions and presentations within Freeform.
Understand common issues when using scenes and how to fix them
When working with scenes in Freeform, you may encounter some common issues that can interrupt your workflow. One frequent problem is scenes not saving correctly or disappearing after restarting the app. This often happens if the app closes unexpectedly or if there is a syncing error. Another issue is that scenes may not sync properly across multiple devices, causing inconsistencies in your project view.
Additionally, selecting objects for scenes on smaller screens can be challenging due to limited space and touch precision. Lastly, confusion arises between the Freeform app’s scenes feature and other tools or apps named 'Freeform,' which have entirely different functions.
Scenes not saving or disappearing
- Ensure Freeform is updated to the latest version in the App Store; an update often fixes bugs.
- Before closing the app, verify that your scene shows a checkmark or confirmation that it is saved.
- If a scene disappears after restart, try force-quitting the app and reopening it to refresh data.
- Restart your device to clear temporary system glitches that might affect saving.
- Check your device storage and iCloud status; insufficient storage or iCloud syncing issues can prevent saving.
Scenes not syncing across devices
- Verify that all devices are signed in with the same Apple ID and have iCloud Drive enabled for Freeform in Settings > Apple ID > iCloud.
- Confirm that each device has a stable internet connection to allow syncing.
- Open Freeform on each device and pull down to refresh the board list, forcing data sync.
- If syncing fails, toggle iCloud Drive off and on again for Freeform and restart the app.
- Be aware that large boards or complex scenes may take longer to sync; allow some time before checking.
Difficulty selecting objects on smaller screens
- Zoom in closely on the area where objects are clustered to improve selection accuracy.
- Use the lasso tool or selection gestures to group-select objects instead of tapping individually.
- Consider temporarily hiding layers or objects that obstruct your target items for easier access.
- Use a stylus if available to enhance precision on touchscreens.
Confusion between Freeform scenes and other 'Freeform' tools
Remember that Freeform scenes refer specifically to snapshots within the Freeform app designed for organizing visual boards. Other apps or tools named 'Freeform' may offer different features unrelated to scenes or boards. To avoid confusion, always check the app icon, developer name, and feature descriptions before following tutorials or advice.
If you encounter error messages like “Scene could not be saved,” “Sync failed,” or “Unable to select object,” follow the corresponding steps above. Being proactive about updates, device settings, and selection techniques will help you troubleshoot most issues independently.
Explore how Freeform scenes compare with 'free form' concepts in other apps
Freeform scenes in the Freeform app are designed to organize and present visual ideas on a flexible board, focusing on 2D content arrangement and collaboration. This differs significantly from the "free form" terminology used in other software. For example, SolidWorks uses "freeform" to describe a 3D modeling technique that allows users to sculpt complex shapes in CAD environments, which involves manipulating geometry in three dimensions rather than organizing visual boards.
Similarly, many drawing or design apps use "freeform" to refer to freehand drawing tools or unrestricted sketching modes, emphasizing artistic expression rather than structured presentation. These tools focus on creating shapes and lines without constraints, unlike Freeform’s scenes which capture specific board views to streamline navigation and communication.
Freeform’s unique advantage lies in its collaborative and presentation features. Scenes act as snapshots that can be shared and navigated collaboratively, helping teams or individuals present step-by-step ideas clearly. Other freeform tools usually lack this integrated scene-based organization and presentation approach, focusing instead on creation or modeling.
| Feature | Freeform Scenes (Apple Freeform) | Freeform in SolidWorks | Freeform Drawing Apps |
|---|---|---|---|
| Primary Purpose | Visual board organization and presentation | 3D shape modeling and sculpting | Freehand drawing and sketching |
| Content Type | 2D images, notes, files on boards | 3D geometry and surfaces | Lines, strokes, artistic shapes |
| Collaboration | Real-time sharing and scene navigation | Limited or none | Varies, often none |
| Presentation | Scene-based step-by-step walkthroughs | Not focused on presentation | Not focused on presentation |
| Platform | Apple devices with Freeform app | CAD software on desktop | Various platforms, often mobile/desktop |
Frequently asked questions
How to use freeform?
To use Freeform, start by opening the app on your Apple device where it is available. You can create boards to organize ideas visually by adding notes, images, sketches, and links. Use the scene feature within Freeform to break your board into focused sections, making it easier to present or collaborate. Experiment with adding and arranging elements to suit your creative workflow.
How to use freeform on windows?
The Freeform app is currently exclusive to Apple devices and does not have a native Windows version. However, you can access Freeform boards shared via iCloud links through a web browser on Windows, allowing you to view and comment. For full editing capabilities, using an iPhone, iPad, or Mac is necessary.
How to stream freeform?
If you mean streaming content from the Freeform TV channel, you can use official streaming platforms like Hulu Live, YouTube TV, or the Freeform app on supported devices. Ensure you have a subscription to one of these services to access live or on-demand Freeform programming. For streaming your own Freeform app boards, use screen sharing through apps like Zoom or AirPlay.
How to watch freeform free?
Watching Freeform content for free is limited as it generally requires a cable or streaming service subscription. Occasionally, Freeform offers free episodes on its official website or app without login, but availability varies. Check promotional offers from streaming platforms or network apps that might provide limited free access.
How to use freeform in solidworks?
In SolidWorks, 'Freeform' refers to a modeling tool that allows you to sculpt and shape surfaces intuitively. Access it via the 'Freeform' feature in the Surface or Direct Editing toolbar, where you can push, pull, and manipulate mesh control points. This tool is distinct from the Freeform app and is used for complex 3D surface design within SolidWorks.
Know the Limits of This Guide and Freeform Scenes
This guide focuses specifically on the Apple Freeform app and how to use its scenes feature effectively. It does not cover unrelated platforms or other uses of the term 'Freeform' in different industries or software. Additionally, the availability and functionality of scenes in Freeform may vary depending on the device you use and the version of your operating system.
Users who rely on Windows should be aware that Freeform is either limited or unsupported on that platform. If you work primarily on Windows, consider alternative apps designed for visual brainstorming and scene management to meet your needs.
To deepen your understanding and practical skills, the most useful next step is to explore Freeform’s built-in templates and pre-made scenes. Experimenting with these can reveal new ways to organize your ideas and streamline your presentations, helping you gain confidence in customizing scenes to fit your unique projects.
See also: How to Insert PDFs into Freeform: A Clear Step-by-Step Guide · How to Collaborate Effectively in Freeform: A Step-by-Step Guide