How to Change the Default Font in Microsoft Word on Mac: Step-by-Step
Discover how to set your preferred default font in Microsoft Word on Mac with easy steps to ensure consistent, time-saving document creation.
When you open a new document in Microsoft Word on your Mac, the default font might not be the one you prefer. Every time you start typing, you find yourself manually changing the font, which can slow down your workflow and lead to inconsistent documents. If you want to save time and keep your documents looking consistent, learning how to change default font in Microsoft Word on Mac is essential.
This article guides you step-by-step through setting your preferred default font in Word, explaining where the changes apply and how to make them stick. You will also learn how to use Styles and save custom templates to maintain your font choices across all your documents. Troubleshooting tips are included to help if your default font settings don’t seem to take effect.
Key takeaways
- Set your default font via the Font dialog box and save it to the Normal template.
- Use the Styles pane to modify the Normal style for consistent font across paragraphs.
- Create and save custom templates to reuse your preferred font in new documents.
- Restart Word after changing defaults to ensure settings apply properly.
- Check for document-specific overrides if your default font doesn’t stick.
Before you start: What you need to know
To change the default font in Microsoft Word on your Mac, ensure you have Microsoft Word installed and updated to a recent version. Newer versions improve compatibility and offer a smoother experience when adjusting preferences. Keep in mind that altering the default font only affects new documents created from the Normal template; it does not change fonts in existing files you have already saved.
Custom templates you or others have created behave differently. These templates preserve their own font settings, so changing the default font in Word won’t impact documents based on those templates. If you use templates regularly, you will need to update font settings inside each template separately.
You should be familiar with Word’s Preferences pane and the Styles pane to follow this guide effectively. While Word’s default font is typically Calibri or sometimes Cambria, Mac’s system fonts like Helvetica or San Francisco differ, which can cause confusion if you switch between apps. Many users experience inconsistent fonts because templates or styles override the default, so understanding how Word manages these settings is key.
- Open Microsoft Word on your Mac. You should see the main Word window with a blank document or recent files displayed.
- Click on the “Word” menu in the top-left corner of the screen and choose “Preferences.” This opens the Preferences pane where you will find options for fonts and styles.
- Locate and click on “Fonts” or “Styles” within Preferences to prepare for modifying default font settings. You should see font name lists and size options.
How to set default font in Microsoft Word on Mac
- Open Microsoft Word and create a new blank document. When the blank document appears, you are ready to adjust the default font settings.
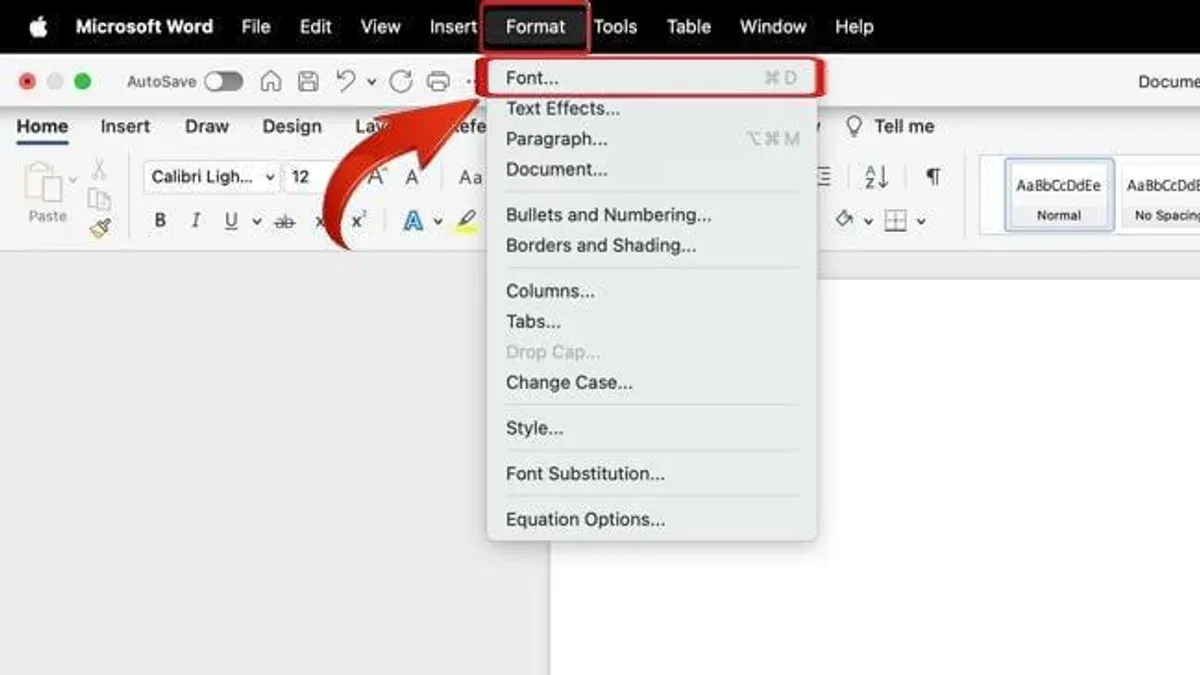
- Go to the Home ribbon at the top of the window. Locate the Font group, then click the small diagonal arrow in the bottom-right corner of this group to open the Font dialog box.
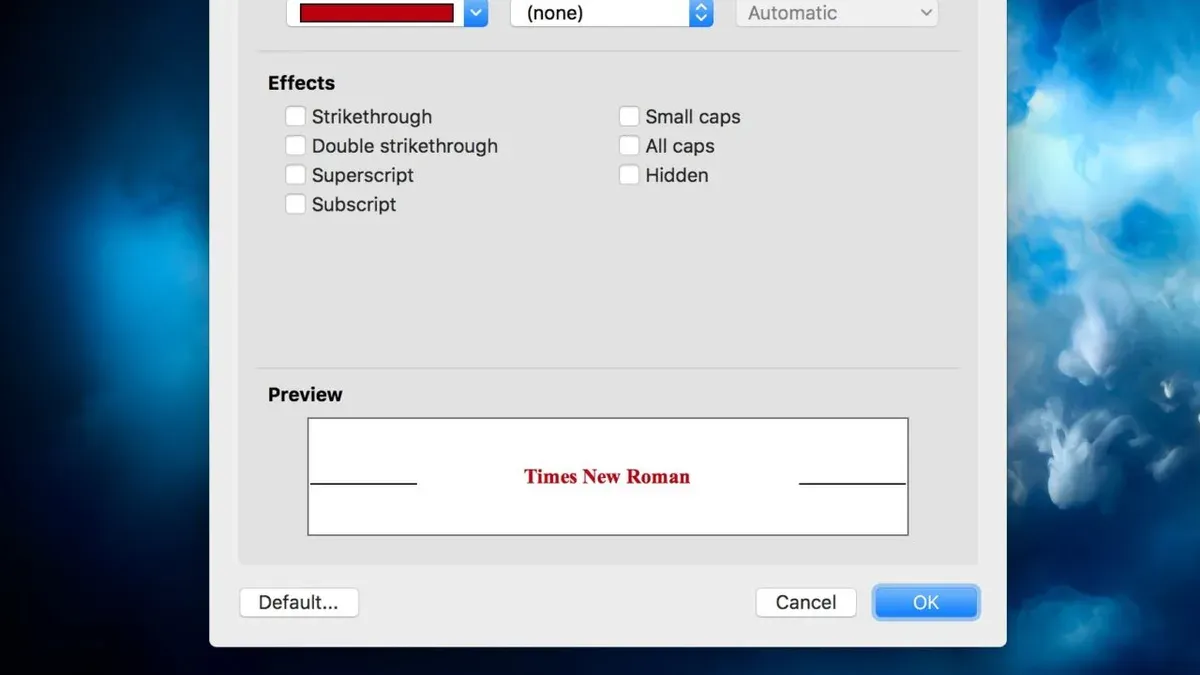
- In the Font dialog, select your preferred font settings. For example, change the font from Calibri to Times New Roman, set the font size from 11 to 12, and adjust any other attributes like style (regular, bold) or color if needed.
- Click the Default button at the bottom left of the dialog. A prompt will appear asking if you want to set the default font for all documents based on the Normal template.
- Confirm this choice by clicking Yes. This action updates the default font across all new documents that use the Normal template.
- Close Microsoft Word completely and then reopen it. When you create a new document now, you should see Times New Roman 12 as the default font instead of Calibri 11.
This step-by-step method ensures your preferred font settings apply consistently to all new documents based on the Normal template, saving you the effort of manually changing fonts each time.
How to change default font in Word Mac using Styles
Changing the default font by modifying the Normal style allows you to control most text formatting consistently across new documents. Unlike setting the default font through the Font dialog, adjusting the Normal style affects paragraph and character formatting more comprehensively, including line spacing and alignment when you choose.
- Open Microsoft Word and go to the Home ribbon. You should see the Styles pane on the right side or at the bottom of the ribbon; if not, click the small arrow at the bottom-right corner of the Styles group to open it.
- In the Styles pane, locate Normal, then right-click it and select Modify.... A dialog box named Modify Style will appear.
- In the Modify Style dialog, set your preferred font, size, and any other formatting options such as color or spacing. This is where you tailor the style to your needs.
- Make sure to select the checkbox labeled New documents based on this template. This ensures your changes apply permanently to all new documents based on the Normal template.
- Click OK to save and close the dialog.
- Restart Word to ensure your changes take effect. When you create a new document, the Normal style will use your customized font settings.
Modifying the Normal style differs from changing the font via the Font dialog because it controls more than just the font face—it governs the default paragraph style, affecting new documents and how existing text styled as Normal behaves. However, existing documents created before this change retain their formatting unless you update the style within those files manually.
How to save your custom default font in a template for repeated use
When you want to use your preferred font settings consistently for specific projects without altering the Normal template, creating a custom Word template is the best approach. This lets you keep your custom fonts and styles intact whenever you start a new document from that template.
- Create a new blank document and customize the font and styles exactly as you want them. For example, set your preferred font type, size, and any other formatting adjustments.
- Go to File > Save As Template. In the save dialog, enter a clear name such as MyDefaultFont.dotx. Choose the default location for Word templates so you can find it easily later.
- Click Save. The file is now saved as a Word Template (.dotx), preserving your font settings and styles without affecting the Normal template.
- To use this template, open Word and select File > New from Template, then find and select MyDefaultFont.dotx. A new document based on this template will open with your custom default fonts already applied.
Using templates this way prevents your custom fonts from being overwritten by changes to the Normal template or Word updates. It also helps keep different projects organized, especially if you need unique styles for each. Templates act as reusable blueprints, ensuring your preferred font settings are always ready when you start a new document from them.
Troubleshooting: Why doesn’t my default font change stick?
When you change the default font in Word on Mac but don’t see the update, this often happens because existing documents keep their original fonts and won’t update automatically. For example, opening an old file will still show its saved font, not the new default. Another common cause is that add-ins or corporate policies sometimes override your font settings, preventing changes from applying. If you suspect this, check if any add-ins are active by going to Tools > Templates and Add-ins and temporarily disable them to see if the font change sticks.
If your default font still won’t update, the Normal.dotm template might be corrupted or locked. This template controls default styles and fonts for new documents. To reset it safely, follow these steps:
- Close Microsoft Word completely.
- Open Finder, press Cmd+Shift+G, and enter
~/Library/Group Containers/UBF8T346G9.Office/User Content/Templates. - Locate Normal.dotm and move it to the Desktop as a backup.
- Restart Word; a new Normal.dotm will be created automatically with default settings.
- Set your preferred default font again and click Default in the Font dialog.
- Close and restart Word once more to confirm changes persist.
After these steps, if the font changes apply successfully, it confirms the old Normal.dotm was the issue. If problems continue, verify no corporate restrictions block template modifications. Restarting Word after any change is essential to see new defaults in effect.
Frequently asked questions
How do I set default font in Microsoft Word on Mac?
To set the default font, open a blank document and go to the Home tab. Click the Font dialog box launcher (the small arrow in the bottom-right corner of the Font group). Choose your preferred font, style, and size, then click the "Set As Default" button at the bottom. Select "All documents based on the Normal template" and click OK to confirm.
How to change default font in Word Mac permanently?
Changing the default font permanently requires modifying the Normal template. After setting your font preferences, make sure to save the changes by clicking "Set As Default" and confirming for all documents based on the Normal template. If you want to reuse the font in specific templates, save a custom template with those settings for repeated use.
Why does Microsoft Word on Mac keep resetting my default font?
Word may reset your default font if the Normal template is corrupted, or if a document uses a different template. Also, opening documents created on other devices or versions can override your settings. To fix this, ensure you set the font in the Normal template and consider creating custom templates for consistent use.
Can I have different default fonts for different document types in Word on Mac?
Yes, you can. By creating and saving different templates with unique default fonts, you can choose the template you want when starting a new document. Each template controls the default font and styles independently, so switching templates changes the defaults accordingly.
What This Guide Does Not Cover
This advice applies specifically to Microsoft Word for Mac installed from official sources and may vary slightly depending on your version. If you are using a very old version of Word, consider upgrading to ensure full compatibility with these steps. Changing the default font only affects new documents that are based on the Normal template; it does not retroactively update fonts in existing documents. Additionally, if you work within a managed corporate environment, your font settings might be overridden by group policies outside the scope of this guide.
To maintain consistent font settings going forward, the most practical next step is to create and save a custom template with your preferred default font. This way, every new document you start can inherit your style choices without repeated manual changes, saving you time and keeping your documents uniform.
See also: How to Use Dictation in Microsoft Word on Mac: A Step-by-Step Guide