How to Exclude Folders from Backup in Time Machine: Step-by-Step Guide
This guide explains how to exclude folders from backup in Time Machine to save storage space and improve backup efficiency.
You might have noticed that your Time Machine backups are taking up more space than expected or backing up folders you rarely use. Managing what gets backed up can save storage space and speed up the backup process. This article explains how to exclude folders from backup in Time Machine, enabling you to keep your backups efficient and focused on the files you truly need.
We will walk you through the exact steps to exclude folders, how to remove them from existing backups, and offer practical advice on which folders to consider excluding. Additionally, you’ll learn about the effects of exclusions on your backup size and restore options, ensuring you make informed backup decisions.
Key takeaways
- Exclude folders via System Settings > General > Time Machine > Options to save backup space.
- Removing folders from existing backups requires manual deletion in Finder’s Time Machine interface.
- Exclude large, temporary, or easily replaceable files like caches and downloads for optimal backup performance.
- Excluding folders means they won’t be restorable from Time Machine, so choose exclusions carefully.
- If exclusions don’t apply, check folder permissions and Time Machine status to troubleshoot.
Before you start: What you need to know and prepare
Time Machine automatically backs up your entire system, including system files, applications, user data, and settings. This comprehensive backup ensures you can fully restore your Mac if needed. However, backing up everything can consume significant storage space and lengthen backup durations. Excluding specific folders can help save space and speed up backups, but it also means those excluded files won’t be recoverable from Time Machine.
Before you modify backup exclusions, verify that your Mac is running macOS 10.5 or later, as older versions lack exclusion features in Time Machine. You also need administrator permissions to change these settings and access to System Preferences. Preparing by backing up your current Time Machine configuration or creating a manual backup of important data safeguards you against accidental data loss.
Generally, excluding large, nonessential folders such as downloads, caches, or media libraries can reduce backup size noticeably. Keep in mind that excluding folders means you won’t be able to restore their contents from Time Machine, so choose exclusions carefully based on what you can afford to lose or store elsewhere.
- Open System Preferences from the Apple menu; you should see various system settings categories.
- Click on "Time Machine"; the Time Machine settings panel will appear.
- Review your backup disk and current options to confirm your backup status before making changes.
- Optionally, create a manual backup by clicking "Back Up Now" to ensure your data is current.
How to exclude folders from Time Machine backup
Excluding specific folders from your Time Machine backup helps save disk space and speeds up backup times. To begin, open System Preferences from the Apple menu, then select Time Machine. This will bring up the Time Machine settings window where you manage your backup preferences.
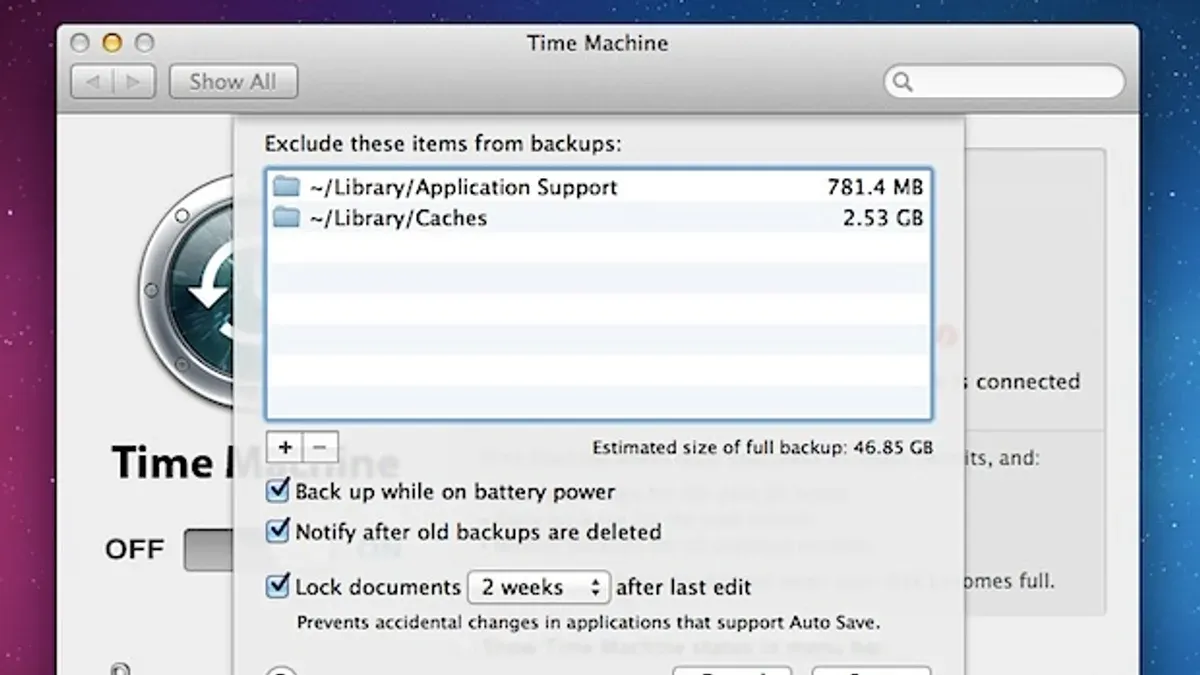
- Click the Options button in the Time Machine preferences window. This opens the exclusion list where you can specify folders or files not to back up.
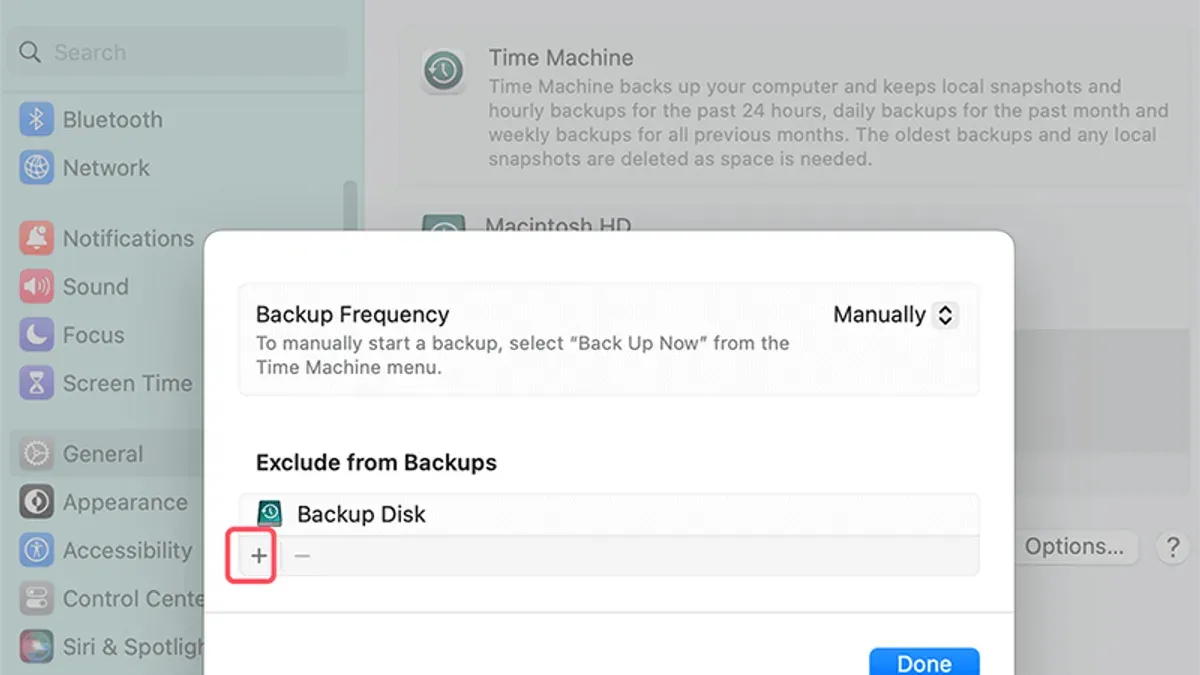
- In the Options pane, click the + button below the list of excluded items. A Finder window will appear, allowing you to browse your Mac’s folders.
- Select the folder or directory you want to exclude from backups, such as Downloads or Movies, which often contain large, non-essential files. After selecting, click Exclude.
- You will see the chosen folder added to the exclusion list. Repeat this step to add more folders if needed.
- Once you finish adding folders, click Save to apply your changes. The excluded folders will no longer be backed up during subsequent Time Machine operations.
- To verify, revisit the Options pane to confirm your folders appear in the exclusion list. You can remove any folder later by selecting it and clicking the - button.
Remember that excluding folders means their contents won’t be recoverable from Time Machine backups. Common exclusions include temporary files, caches, or large media folders that you can store elsewhere.
How to delete folders from Time Machine backup
Removing folders that have already been backed up by Time Machine requires careful navigation through your backup snapshots. This process helps you free up space by deleting large, unnecessary folders, but it must be done cautiously to avoid corrupting your backup history.
- Open a Finder window and select your Time Machine backup drive from the sidebar. You should see a folder named "Backups.backupdb"; open it to access your backup snapshots. If you prefer, you can also enter Time Machine by clicking its icon in the menu bar and choosing "Enter Time Machine." When inside Time Machine, you will see a timeline on the right side showing your backup dates.
- Navigate to the snapshot containing the folder you want to delete. In Finder, open the folder for the date of the backup. In Time Machine interface, browse through the timeline and locate the backup with the folder. You should be able to see the folder structure as it was at that time.
- Select the folder you want to delete. Right-click (or Control-click) on it and choose "Delete All Backups of [Folder Name]" if using Time Machine interface, or move it to Trash if using Finder. When deleting through Finder, make sure you have appropriate permissions and that the Trash is emptied afterward.
- Confirm the deletion when prompted. Time Machine will warn you that this action removes the folder from all backups. Confirming will permanently delete the folder from your backup history, reducing the overall backup size.
- After deletion, verify that the folder no longer appears in your backups by browsing through other snapshots. Keep in mind that deleting backup data cannot be undone, so ensure you do not remove critical files.
For example, if you have a large folder of old video files that you no longer need backed up, deleting it from Time Machine backups can reclaim significant disk space. However, deleting folders risks losing restore points for those files, so confirm you have other copies if needed.
Deleting folders directly from backups is a powerful way to manage disk space but should be done thoughtfully to maintain backup integrity and restore options.
What to exclude from Time Machine backup for optimal performance
To optimize your Time Machine backups, excluding certain folders can significantly reduce backup size and speed up the process. Commonly excluded folders include system caches (such as /Library/Caches), temporary files, the Downloads folder, and large media files like movies or raw photo libraries that you may already store elsewhere. These folders often contain transient or easily replaceable data, so excluding them saves space without risking important information.
However, be cautious not to exclude folders that contain documents, application data, or system settings. For example, excluding your Documents folder or Library files related to apps can prevent you from restoring critical data if needed. Balancing backup size and data security is key: exclude non-essential, bulky data but keep folders that hold unique or irreplaceable files.
When exclusions are applied, your backups will be smaller and faster, but restore options become narrower. For instance, if you exclude a large photo library, you won’t be able to recover those files from Time Machine after deletion. Considering your personal recovery priorities will help you decide which folders to exclude without compromising your ability to restore vital data.
Troubleshooting common issues when excluding folders
If you notice that folders you intended to exclude are still being backed up, the exclusion may not be properly saved. First, double-check that the folder path is correctly listed in Time Machine’s Options under System Preferences. Sometimes, symbolic links or aliases cause confusion; ensure you exclude the actual folder location, not a shortcut. After adding exclusions, always click “Save” to apply changes.
Permission errors can occur if you try to exclude or delete folders without sufficient access rights. If you see messages like “You don’t have permission to make changes,” try unlocking the padlock icon in the Time Machine preferences pane by entering your administrator password. For stubborn permissions issues, adjust folder permissions in Finder by selecting the folder, choosing “Get Info,” and modifying sharing settings to grant your user account Read & Write access.
Backup failures after changing exclusions might display error codes such as “Backup failed” or “Time Machine couldn’t complete the backup.” This can happen if excluded folders contain system files or if there’s a conflict in the backup disk. Restart your Mac and backup drive, then run Disk Utility’s First Aid on the backup disk to check for errors. Exclude only non-essential user data to minimize conflicts.
If you need to reset exclusion settings, remove all folders from the exclusion list in Time Machine preferences and save. Restart your Mac to ensure settings refresh, then re-add exclusions carefully. This can resolve persistent issues caused by corrupted preference files.
Frequently asked questions
how to exclude folders from time machine backup
To exclude folders, open System Preferences and select Time Machine. Click on Options, then press the plus (+) button to browse and add the folders you want to exclude. Confirm by clicking Exclude, then save your changes. This prevents those folders from being backed up in future Time Machine snapshots.
how to delete folders from time machine backup
To delete folders from existing Time Machine backups, enter Time Machine by clicking its icon in the menu bar. Navigate to the folder you want to remove, right-click it, and select Delete All Backups of [folder name]. This permanently removes the folder from all backups, freeing up space but making recovery of that data impossible.
what to exclude from time machine backup
Exclude folders that contain large files you don't need to restore, such as caches, temporary files, or media libraries stored elsewhere. Avoid excluding system files or documents you want to keep safe. Excluding unnecessary data reduces backup size and speeds up the backup process without compromising essential recovery options.
how to remove folders from time machine backup
Removing folders from your backup involves two steps: excluding them from future backups via Time Machine Options, and deleting their data from existing backups through the Time Machine interface. Excluding stops new data from being saved, while deleting clears previous backups of that folder to reclaim space.
What This Guide Does Not Cover
This guide does not cover advanced backup management via Terminal commands or third-party backup tools, which may be necessary if you have complex backup needs or want to automate exclusions beyond what Time Machine’s interface allows. Additionally, excluding folders from your Time Machine backup means that the files within those folders will not be recoverable if you need to restore them later. Before excluding any data, carefully evaluate which files are critical for your backup to avoid accidental data loss.
To move forward effectively, the most useful next step is to review your current backup exclusions by opening System Preferences, selecting Time Machine, and clicking the "Options" button. From there, you can verify or adjust the folders excluded from your backups to ensure you are saving space without compromising essential data recovery options.
See also: How to Fix Library Not Opening in Photos App: Step-by-Step Guide · How to Fix Mail Not Syncing in Mail App: Step-by-Step Solutions · How to Search Emails by Date in Mail App: Step-by-Step Guide · How to Pin a Tab in Safari: Step-by-Step Guide for Mac, iPhone, and iPad