Restore Files from Trash in Finder: Essential Guide for Mac Users
Discover how to put back a file from Trash in Finder to restore deleted Mac files quickly and safely.
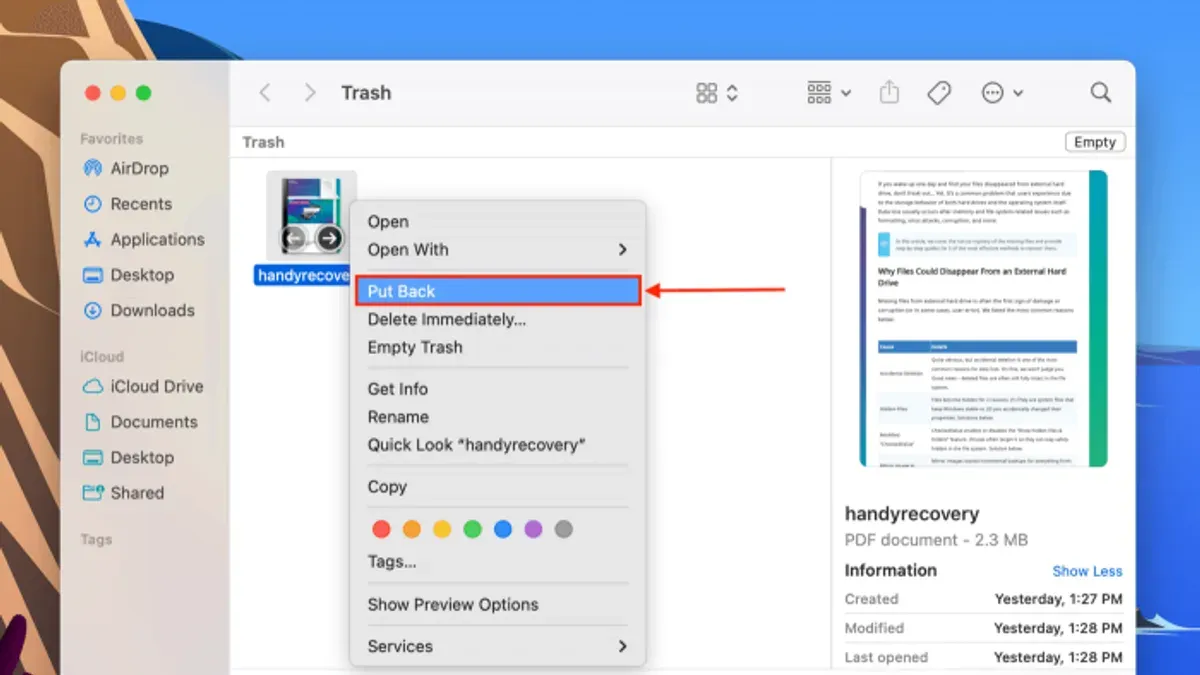
Accidentally deleting a file on your Mac can be stressful, but macOS Finder offers a straightforward way to recover it. Knowing how to put back a file from Trash in Finder ensures you can restore lost files without data loss or permission issues.
Understanding the Trash Folder in Finder
Trash in macOS Finder is a temporary holding place for deleted files. When you delete a file, it moves to Trash instead of being immediately removed, giving you a chance to recover it if needed. Files remain in Trash until you empty it manually or the system needs space.
- Storage location: Trash folders are stored differently depending on the volume. For internal drives, the path is typically
~/.Trash. External drives have their own Trash located at.Trashes/<UserID>. - Internal vs external drives: Files deleted from external drives go to that drive’s Trash if the volume supports it. If not, files are permanently deleted immediately.
- File permissions and metadata: When files move to Trash, their permissions and metadata such as creation and modification dates are preserved, enabling accurate restoration.
Example Trash folder paths include /Users/username/.Trash for the startup disk and /Volumes/ExternalDrive/.Trashes/501 for external disks. Files remain until manually emptied or system cleanup occurs.
Step-by-Step: How to Put Back a File from Trash in Finder
Follow these steps to restore files safely:
- Open Trash: Click the Trash icon in your Dock or select Trash from the Finder sidebar.
- Select files: Click a single file or hold
Commandand click to select multiple files. - Use the 'Put Back' option: Right-click any selected file and choose Put Back. This moves the file to its original location. Note that the Put Back option only appears if the file was deleted normally and the original location still exists.
- Alternative methods: You can drag files from Trash to any folder manually, but this bypasses the original location and folder structure. Alternatively, select files and press
Command + Deleteto send them back.
The Put Back option restores files to their exact original path, preserving folder structure. Dragging files manually requires you to remember or choose the destination.
Troubleshooting Common Issues When Restoring Files
Sometimes the Put Back option is grayed out or errors appear. Here’s how to address common problems:
- Disabled 'Put Back': If you moved or copied the file within Trash, Finder loses track of the original location. Only files deleted normally show the Put Back option.
- Locked file errors: Locked files cannot be moved. Select the file, press
Command + I, and uncheck Locked under General. Then try again. - Original location missing: If the original folder was deleted, Put Back cannot restore the file there. Instead, drag the file from Trash to a new or existing folder manually.
Terminal fallback: Use Terminal to restore files when Finder fails. For example, to move a file from Trash back to Desktop:
mv ~/.Trash/filename ~/Desktop/Replace filename with your file’s actual name. This method requires familiarity with Terminal and exact file paths.
Best Practices to Avoid Data Loss When Using Trash
To minimize accidental permanent deletion and simplify recovery:
- Enable Finder preferences to confirm before emptying Trash by checking "Show warning before emptying the Trash" in Finder > Preferences > Advanced.
- Use Time Machine or other backup solutions regularly to recover files lost from Trash or deleted permanently.
- Always review Trash contents before emptying to avoid deleting important files.
- Understand that emptying Trash removes files permanently; macOS does not retain deleted files after this action.
Following these habits reduces the risk of losing irreplaceable data.
When Not to Rely on Finder’s Trash for File Recovery
Trash recovery has limits under certain conditions:

- Files deleted from some external drives or network shares may bypass Trash and be removed immediately.
- Files deleted via command line tools or third-party apps often do not go to Trash.
- Physically damaged drives or severe file system corruption require professional recovery services.
Understanding these exceptions helps set realistic expectations when recovering files.
Frequently Asked Questions
Can I restore files from Trash after emptying it?
No, emptying Trash deletes files permanently. Recovery requires backups or specialized software, which may not always succeed.
What happens if the original folder was deleted before I put a file back?
Finder cannot restore the file to a missing folder. You must manually move the file from Trash to an existing folder.
Why is the 'Put Back' option missing or grayed out?
This occurs if the file was moved or copied into Trash rather than deleted normally, or if the original location is unknown or missing.
Is there a way to recover files deleted from Trash on an external drive?
If the external drive supports Trash, files remain until emptied. Otherwise, deletion is immediate. Use backups or recovery tools for files deleted permanently.
Related reading
- How to Pin a Folder to the Sidebar in Finder: Quick Access TipsThis guide explains how to pin a folder to the sidebar in Finder on macOS 2026 for quick and easy access to your important directories.
- How to Show File Extensions in Finder on Your MacDiscover how to show file extensions in Finder on your Mac to improve file identification and security.
- How to Calculate Folder Size in Finder on macOS AccuratelyDiscover accurate ways to calculate folder size in Finder on macOS, helping you manage disk space with ease and precision.