
How to Use Speak Selection on Mac: A Clear Step-by-Step Guide
Discover how to enable and use Speak Selection on Mac to listen to highlighted text aloud for easier reading and multitasking.
You’re reading an article but want to hear the text aloud instead of straining your eyes. Or maybe you prefer listening to written content while multitasking. Mac offers a feature called Speak Selection that reads highlighted text aloud, helping with accessibility and convenience.
This article explains how to use Speak Selection on Mac, guiding you through enabling, using, and disabling the feature. It also clarifies how Speak Selection differs from other speech options and provides troubleshooting tips to ensure smooth operation.
Key takeaways
- Enable Speak Selection via System Settings under Accessibility > Spoken Content.
- Select any text and press the chosen keyboard shortcut or right-click to hear it spoken aloud.
- Use Voice settings to customize speaking rate and voice options.
- Turn off Speak Selection easily through the same Accessibility panel when no longer needed.
- Understand the difference between Speak Selection and Select to Speak to choose the best tool for your needs.
Before you start: what you need for Speak Selection on Mac
Speak Selection is a built-in Mac feature that reads aloud highlighted text using your system's speech capabilities. To use it effectively, your Mac must be running macOS versions starting from macOS Sierra (10.12) or later, as earlier versions may not support this functionality.
You should have a basic familiarity with navigating your Mac’s System Preferences or System Settings, since enabling and adjusting Speak Selection requires accessing accessibility and speech-related menus.
While Speak Selection works with your Mac’s internal speakers, using external speakers or headphones can improve audio clarity, especially in noisy environments.
It’s important to distinguish Speak Selection from VoiceOver and other accessibility features. Speak Selection only reads selected text aloud upon your command, whereas VoiceOver provides a full-screen reader with keyboard navigation focused on accessibility.
Before enabling Speak Selection, check that your Mac meets these prerequisites:
- Verify your macOS version by clicking the Apple menu > About This Mac. You should see macOS Sierra (10.12) or newer.
- Ensure your Mac’s audio output device is working properly; go to System Preferences (or System Settings) > Sound > Output to confirm.
- Have a text document or web page ready where you can select text to test the feature once enabled.
Meeting these basic requirements will help you use Speak Selection smoothly and avoid common setup issues.
How to use Speak Selection on MacBook
- Open the Apple menu and select System Settings. This opens the main configuration panel for your MacBook.
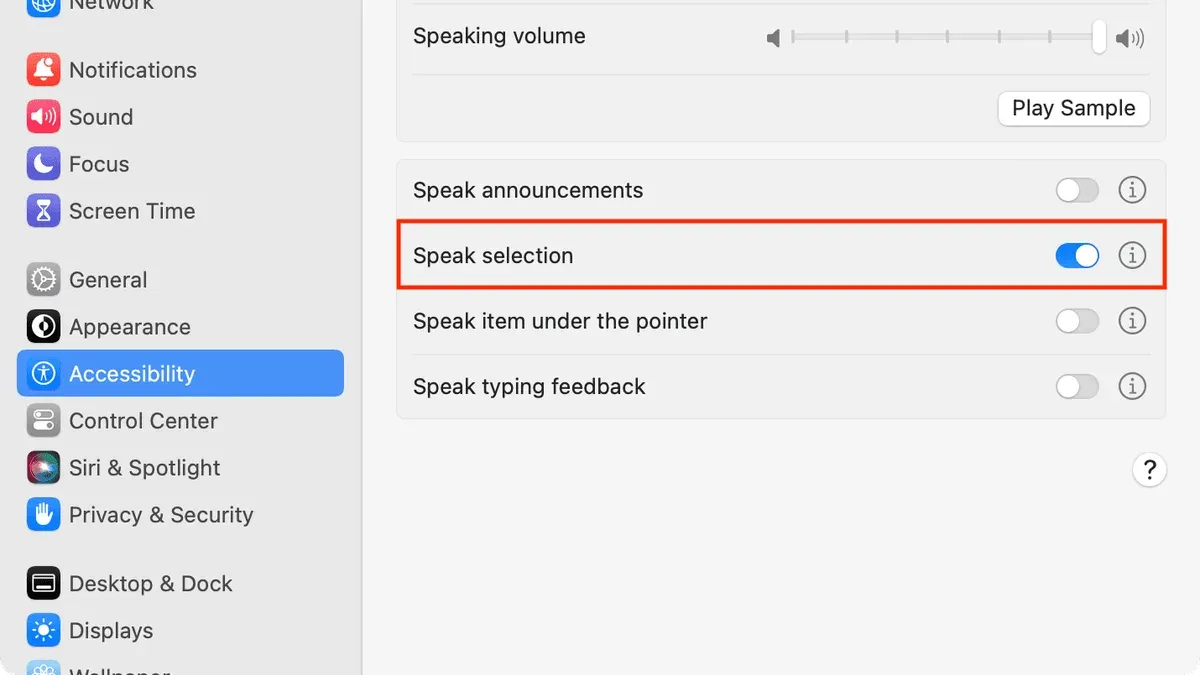
- In System Settings, go to Accessibility located in the sidebar. This section controls features for users with different needs.
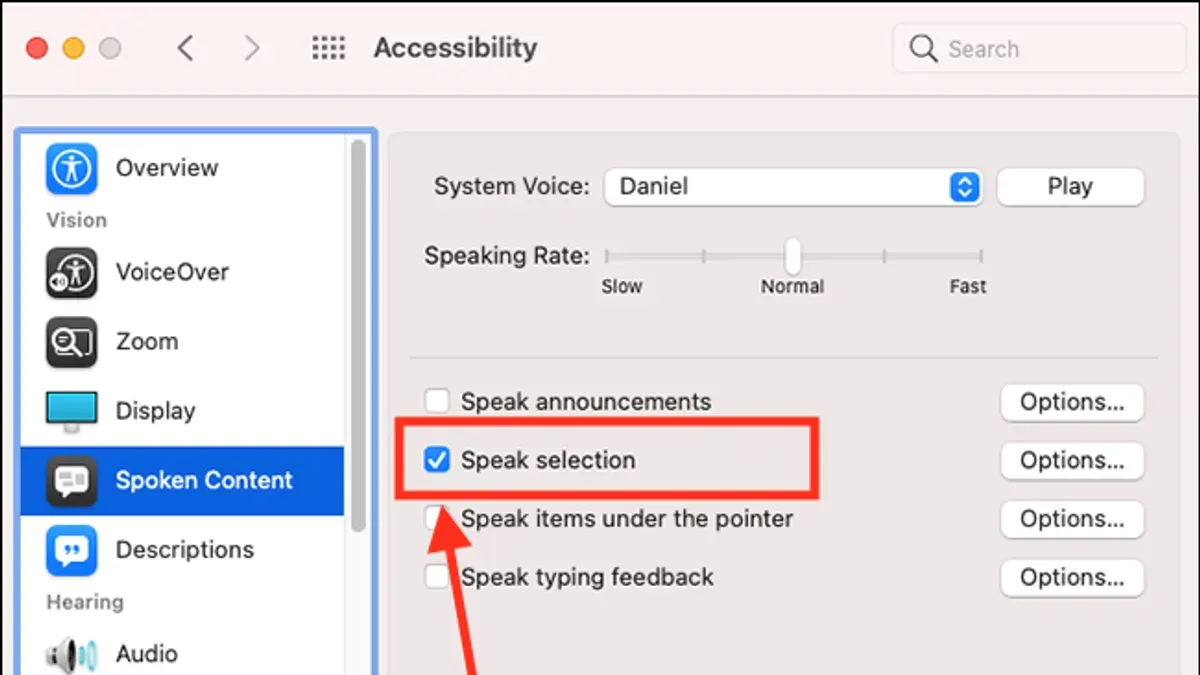
- Scroll down to find and click Spoken Content. This area manages speech-related options, including Speak Selection.
- Enable the toggle for Speak selection. When active, this allows your MacBook to read aloud any selected text.
- To choose the voice and adjust speech speed, click System Voice and Speaking Rate. Pick a voice from the dropdown and move the slider to set a comfortable reading speed.
- Close System Settings and open any document or webpage where you want to use Speak Selection.
- Select a paragraph or text block by clicking and dragging your cursor over it. You should see the text highlighted.
- Right-click the selected text and choose Speech > Start Speaking from the context menu. Your MacBook will begin reading the text aloud using the voice and speed you set.
- Alternatively, after enabling Speak Selection, you can press the default keyboard shortcut Option + Esc to start reading the selected text. Adjust this shortcut in Accessibility settings if needed.
- To stop speech before it finishes, click anywhere or press the keyboard shortcut again.
This step-by-step process ensures you can quickly enable and use Speak Selection on your MacBook to have any text read aloud, with control over voice and speed settings for a personalized experience.
How to select text on Mac
Selecting text on Mac is essential for using Speak Selection and other text-based functions. You can use various methods depending on your preference and the app you're working in.
Using the trackpad or mouse
Click and drag your cursor over the text to highlight it. This method is intuitive and works across almost all apps like Safari, Pages, and Word. However, it may be less precise for selecting large blocks of text or multiple paragraphs.
Keyboard shortcuts for selecting text
Keyboard shortcuts offer faster, more precise text selection without needing to switch between input devices. Here are some common shortcuts:
- Shift + Arrow keys: Select characters or lines one at a time.
- Option + Shift + Arrow keys: Select word by word horizontally or paragraph by paragraph vertically.
- Command + Shift + Left/Right Arrow: Select from the cursor to the beginning or end of the line.
- Command + A: Select all text in the current document or text field.
These shortcuts work in most apps, including Safari, Pages, and Word, providing greater control especially when selecting precise text ranges.
Selecting text in different apps
While basic selection methods are consistent, some apps offer additional features. For example, in Pages, double-clicking a word selects it, and triple-clicking selects a paragraph. Safari supports click-and-drag and keyboard shortcuts similarly, but selecting text within certain web elements may be limited. Microsoft Word supports all standard Mac shortcuts plus click options and allows selecting entire sentences by holding Command and clicking.
Touch Bar and gesture options
If your Mac has a Touch Bar, it may display word suggestions and editing controls to assist with text selection. Some trackpads support gestures like double-tap and drag to select text more quickly. These options can speed up selection but require familiarity and are not available on all models.
- Place your cursor at the start of the text you want to select. You should see the cursor blinking at that point.
- Use click and drag on your trackpad or mouse to highlight the desired text. The text should become visibly highlighted.
- Alternatively, hold Shift and use arrow keys to extend the selection. The highlighted text should expand accordingly.
- Try double-clicking a word or triple-clicking a paragraph to select quickly. The selected section should highlight immediately.
- If available, use Touch Bar controls or gestures to refine your selection. You should notice faster or more precise selection.
How to turn off Speak Selection
If you want to stop Mac from reading selected text aloud, disabling Speak Selection is the direct approach. This avoids the need to mute your sound or pause speech temporarily.
- Open System Settings and navigate to Accessibility.
- Scroll down and select Spoken Content (or Speech in some macOS versions).
- Locate the option labeled Speak Selection and toggle it off. You should see the switch move to the off position, indicating Speak Selection is disabled.
- To remove keyboard shortcuts for Speak Selection, stay in Accessibility and go to Keyboard settings.
- Find the shortcuts related to speech or Speak Selection and uncheck or delete them to prevent accidental activation.
- Check context menus by right-clicking selected text; if Speak Selection still appears, disabling it in Accessibility should remove this option automatically.
Turning Speak Selection off is preferable when you want to fully stop the feature rather than just muting or pausing speech temporarily. Muting affects all audio, while pausing may require restarting the speech.
Disabling Speak Selection does not affect other speech features such as VoiceOver or Dictation. These operate independently and will continue to function unless turned off separately.
Commonly, users disable Speak Selection when they no longer need on-demand text reading or want to avoid accidental speech triggers. After disabling, selecting text will no longer prompt speech.
How to use voice on Mac for speech and text
Mac offers multiple voice-related features that serve different purposes: Speak Selection reads aloud selected text, dictation converts your spoken words into text, and VoiceOver provides a full screen-reader experience for navigating the interface.
Dictation lets you speak instead of typing, enhancing productivity in emails, documents, and messages. To activate dictation, open System Preferences > Keyboard > Dictation, then turn it on. You can start dictation by pressing the Fn key twice or by customizing a shortcut. When dictation is active, you will see a microphone icon indicating it is listening, and your spoken words will appear as text.
Unlike Speak Selection, which reads text aloud after you select it, dictation is for input. VoiceOver, accessible under System Preferences > Accessibility > VoiceOver, reads all screen elements aloud and is designed for full navigation without sight. It is more comprehensive but also more complex to use.
Here is a comparison of the main voice features on Mac:
| Feature | Purpose | How to activate | Typical use case |
|---|---|---|---|
| Speak Selection | Reads selected text aloud | Accessibility > Spoken Content > Speak Selection | Listening to emails, articles, or documents |
| Dictation (Speech-to-text) | Converts speech into typed text | Keyboard > Dictation, then press Fn twice | Writing messages, notes, or documents hands-free |
| VoiceOver | Full screen reader for navigation | Accessibility > VoiceOver or Cmd + F5 | Accessing Mac without sight |
- To use dictation, enable it in System Preferences as described above. When active, speak clearly into your Mac’s microphone.
- Use Speak Selection by selecting any text, then right-click and choose “Speak” or use the assigned shortcut to hear the text read aloud.
- To toggle VoiceOver, press Command + F5; it will read interface elements and provide spoken feedback for navigation.
Each feature complements the others: dictation helps create text by voice, Speak Selection assists with listening, and VoiceOver supports full screen interaction. Customize voices and languages in Accessibility settings under Spoken Content and Dictation for a tailored experience.
What is Select to Speak and its relation to Speak Selection
Select to Speak is an accessibility feature commonly found on platforms like Android, Windows PCs, and Kindle Fire devices. It allows users to select any text on the screen and have it read aloud, similar in purpose to Speak Selection on Mac. However, the implementation and control options differ across these platforms.
On Android, Select to Speak can be enabled in Settings under Accessibility. Once activated, you tap the Select to Speak icon and then highlight text to hear it spoken. Windows PCs offer similar functionality through Narrator or third-party apps, where users select text or screen areas to be read aloud. Kindle Fire devices also include a Select to Speak feature accessible via Accessibility settings, tailored for reading e-books or screen content aloud.
Compared to Speak Selection on Mac, which activates speech by selecting text and using keyboard shortcuts or context menus, Select to Speak features often require tapping an icon before selecting text. Both features share the goal of making text accessible audibly but differ in activation methods and platform integration.
| Feature | Mac Speak Selection | Select to Speak (Android/PC/Kindle) |
|---|---|---|
| Activation | Select text + shortcut or context menu | Tap icon + select text |
| Platform Integration | Built into macOS Accessibility | Built-in or app-based, varies by device |
| Voice Options | Adjustable voices and rate | Varies; often fewer options |
| Additional Features | Part of broader speech settings | May include screen reading modes |
On Mac, there is no direct "Select to Speak" named feature, but Speak Selection effectively provides similar functionality within macOS. For users seeking comparable experiences on PCs or Android, various apps and browser extensions like Read Aloud or NaturalReader can replicate Select to Speak capabilities.
For official details, consult Android Accessibility documentation, Microsoft Narrator guides, or Amazon Kindle Fire support, which outline how Select to Speak functions on those platforms.
Troubleshooting Speak Selection on Mac
When Speak Selection does not read selected text, the problem often lies in incorrect settings or conflicts with other accessibility features. Ensure that "Speak selected text when the key is pressed" is enabled under System Preferences > Accessibility > Spoken Content. If this option is off, Speak Selection won’t activate.
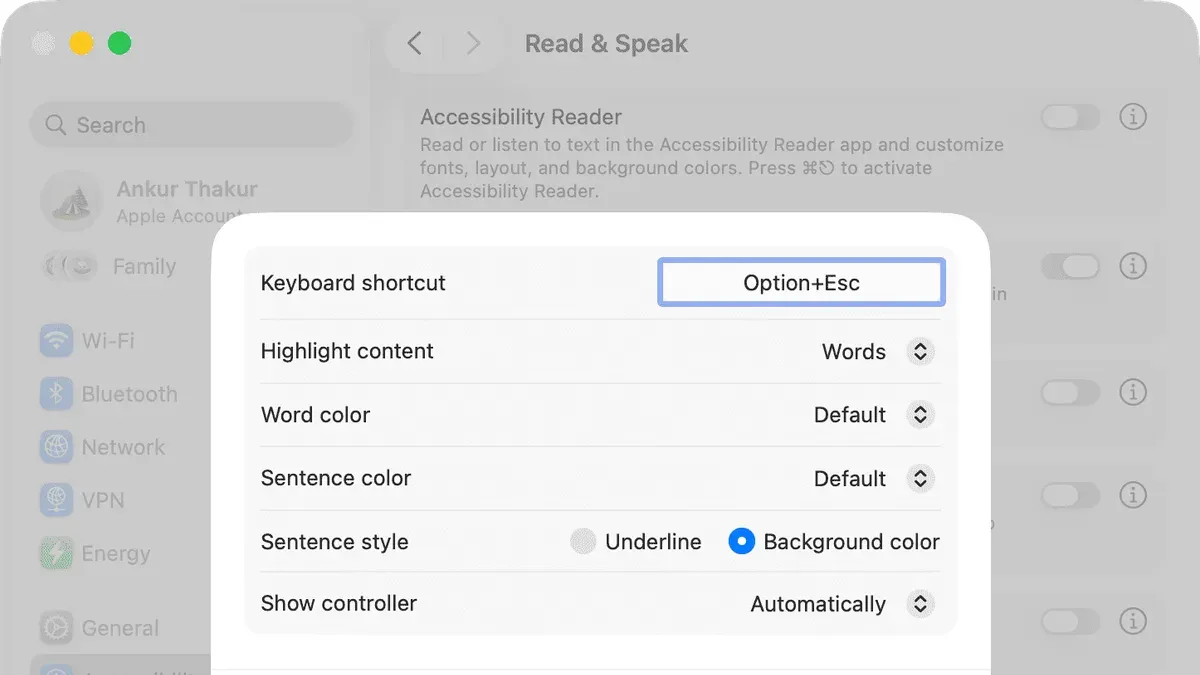
If the voice sounds robotic or does not sound at all, check the voice settings in the same Spoken Content pane. Try changing the voice to a different one and adjust the speaking rate to a moderate speed to improve clarity.
Keyboard shortcuts for Speak Selection may not work if they conflict with other system or app shortcuts. To resolve this, go to System Preferences > Keyboard > Shortcuts > Accessibility and verify that the shortcut for "Speak selected text" is unique. You can customize it here if needed.
Conflicts can also arise if VoiceOver or other speech features are active simultaneously. Disable VoiceOver in Accessibility > VoiceOver to test if Speak Selection works without interference.
To reset speech settings if Speak Selection remains unresponsive, follow these steps:
- Open System Preferences and navigate to Accessibility > Spoken Content.
- Turn off "Speak selected text when the key is pressed."
- Restart your Mac.
- Return to the Spoken Content pane and enable "Speak selected text when the key is pressed" again.
- Test Speak Selection by selecting text and using the keyboard shortcut; you should hear the text read aloud.
If error messages like "No speech available" appear, installing additional voices from System Preferences > Accessibility > Spoken Content > System Voice > Customize may help.
Following these steps resolves the most common issues and restores Speak Selection functionality on your Mac.
- How to Use VoiceOver on Mac: A Complete Step-by-Step Guide
- How to Turn On Zoom Accessibility on Mac: Step-by-Step Guide
- How to Enable and Use Sticky Keys on Mac: A Step-by-Step Guide
- How to Enable and Use Type to Siri on Your Mac
Frequently asked questions
How to select on mac?
To select text on a Mac, click and hold the left mouse button or trackpad, then drag over the text you want to highlight. You can also double-click a word to select it or triple-click to select an entire paragraph. For precise selection, use the Shift key with arrow keys on your keyboard.
How to speak to text on macbook?
To speak to text on your MacBook, enable Dictation in System Settings under Keyboard. Press the designated shortcut (usually the Fn key twice) to start speaking, and your words will convert to text in any text field. Make sure your microphone is active and you have a stable internet connection if using enhanced dictation.
How to use mac speech to text?
Mac's speech-to-text feature is accessed through Dictation in System Settings > Keyboard. Enable Dictation, then activate it with the set shortcut to convert spoken words into text. You can customize language and shortcut preferences for smoother use.
How to use speak selection on Kindle Fire
Speak Selection is not a feature available on Kindle Fire devices. Instead, Kindle Fire offers text-to-speech through the Accessibility settings by enabling VoiceView or using third-party apps to read aloud content.
How to speak to text on MacBook
To use speech-to-text on your MacBook, turn on Dictation in System Settings > Keyboard. Use the shortcut (usually pressing the Fn key twice) to start dictating. Speak clearly, and your Mac will transcribe your speech into text in supported apps.
What this guide does not cover
This guide does not cover advanced accessibility tools like VoiceOver in depth, nor does it address third-party speech apps that may offer different or enhanced features. If you require comprehensive screen reading capabilities or specialized voice control beyond Speak Selection, exploring dedicated accessibility settings or apps is recommended.
For users seeking detailed customization of speech synthesis voices or integration with other assistive technologies, Apple’s Accessibility section or professional assistive technology consultants can provide tailored support.
Next step to improve your Mac experience
After setting up and familiarizing yourself with Speak Selection, explore the System Preferences > Accessibility > Spoken Content panel to customize voice options, speaking rate, and keyboard shortcuts. Adjusting these settings helps tailor the feature to your reading pace and voice preference, enhancing usability and comfort during text-to-speech interactions.



