How to Clear Font Cache in Mac Terminal: Step-by-Step Guide
Learn how to clear the font cache in Mac Terminal to fix font display issues and refresh your system’s font data effectively.
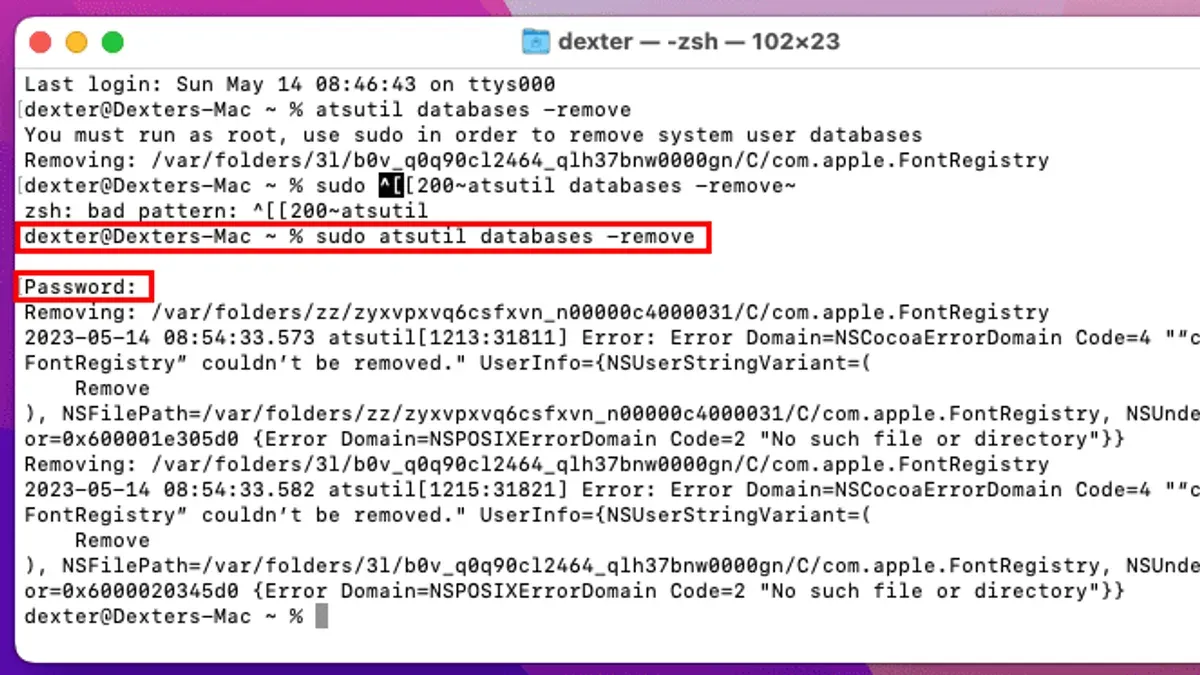
Fonts on your Mac suddenly look distorted or fail to display correctly, disrupting your workflow. This issue often stems from a corrupted font cache, which can be cleared safely using built-in Terminal commands.
This article explains how to clear font cache in Mac Terminal, guiding you through precise steps to refresh your system’s font data. You’ll also learn how general cache clearing works on Mac, plus a brief comparison with font cache management on Windows to clarify common cross-platform questions.
Key takeaways
- Use the Terminal command sudo atsutil databases -remove to clear font caches on Mac.
- Restart your Mac after clearing font caches to ensure changes take effect.
- General cache clearing involves deleting files from ~/Library/Caches but requires care to avoid system issues.
- Windows font cache clearing differs, typically involving the Font Cache Service and deleting specific.dat files.
- Font cache clearing can resolve display glitches but should be done only when font issues persist.
Before you start: What you need to clear font cache on Mac
Font cache is a system feature that stores font data to speed up rendering on your Mac. Clearing it can resolve issues like incorrect font display, missing characters, or sluggish font loading. The cache files are stored in system directories such as /Library/Caches/com.apple.FontRegistry and other related locations.
Before proceeding, ensure you have basic familiarity with the Mac Terminal app and possess administrator (sudo) access, as clearing the font cache requires elevated permissions. Without these, the commands won’t work properly.
It’s advisable to back up any important work and close all applications that use fonts, including browsers and design tools, to prevent conflicts during the cache clearing process.
Keep in mind this operation affects system font rendering; after clearing, font loading might be temporarily slower until macOS rebuilds the cache.
- Verify you can open Terminal (found in Applications > Utilities) and run commands with
sudo. Successful sudo use requires your administrator password and confirmation. - Save and close all apps that use fonts to avoid locking font files or cache data.
- Ensure you have a recent backup of your important files or a Time Machine snapshot, as a precaution against unintended effects.
How to clear font cache using Mac Terminal
- Open the Terminal app. You can find it in Applications > Utilities or by searching with Spotlight. Once open, you will see a command prompt ready for input.
- Type sudo atsutil databases -remove and press Enter. This command removes the font cache files stored by the Apple Type Services system. You will be prompted to enter your administrator password. After successful execution, no output appears, indicating the caches were deleted.
- Next, restart the font services by entering sudo atsutil server -shutdown and pressing Enter. This shuts down the font server to ensure that cached data is cleared. Then type sudo atsutil server -ping and press Enter to restart the font server. You should see "ping response received", confirming the service is running again.
- Finally, restart your Mac. A full reboot allows the system to rebuild font caches correctly, preventing persistent display issues.
Each command targets different aspects of font caching: atsutil databases -remove deletes cached font data, while atsutil server commands restart the font management service to apply changes immediately. Restarting your Mac ensures all font cache files are refreshed system-wide.
How to clear cache files in Mac generally
Font cache is just one type of cache on your Mac. Other caches include user caches, which store temporary data for apps, and system caches, which support macOS processes. These caches are found in different locations and serve distinct purposes, so clearing them indiscriminately can cause unexpected behavior.
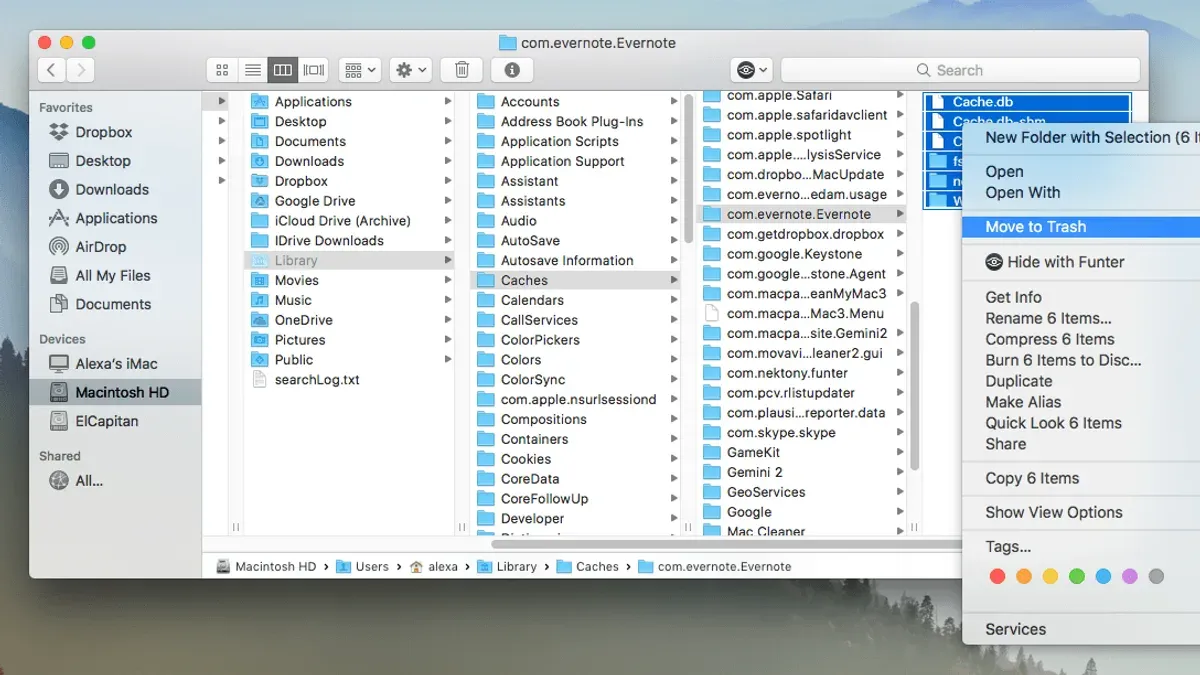
To clear general cache files safely, you can delete contents from the ~/Library/Caches folder, which holds user-level caches. Use Finder or Terminal for this task.
- Open Finder and select Go > Go to Folder from the menu bar.
- Type
~/Library/Cachesand press Enter to open the folder. - Review the folders inside and delete only those related to apps you suspect are causing issues; avoid deleting the entire directory.
- Alternatively, open Terminal and type
rm -rf ~/Library/Caches/com.example.appreplacingcom.example.appwith the specific cache folder name. - After deleting, restart your Mac to allow caches to rebuild properly.
Clearing system caches typically requires administrator access and is riskier; it is usually reserved for troubleshooting severe performance problems or corrupt system files.
Use cache clearing selectively to fix slow performance or app glitches, but avoid removing caches without cause as they speed up your Mac's operations.
How to delete font cache on Windows and Windows 11
Windows manages font caching differently from macOS, storing font cache files primarily in the %WinDir%\ServiceProfiles\LocalService\AppData\Local\FontCache directory. Unlike macOS, Windows uses a dedicated font cache service that can be stopped and restarted, allowing cache clearing without a full reboot.
- Open Command Prompt as an administrator. You should see the Command Prompt window with administrative privileges.
- Type net stop fontcache and press Enter. This stops the Windows Font Cache Service; the command prompt will confirm the service has stopped.
- Navigate to the font cache folder by entering cd %WinDir%\ServiceProfiles\LocalService\AppData\Local\FontCache and press Enter.
- Delete the font cache files by running del *.* /q. This removes all cache files silently; no files should remain in the folder.
- Restart the font cache service by typing net start fontcache and pressing Enter. You will see confirmation that the service has started.
- Optionally, restart your computer to ensure all font cache changes take effect system-wide.
Windows 11 follows the same steps, with no significant differences in font cache location or service management compared to earlier Windows versions. However, Windows 11 may have additional background processes that briefly delay cache service restart.
Because macOS uses a different file system layout and cache structure, its Terminal commands cannot be used on Windows. Likewise, Windows commands like net stop fontcache are not recognized in macOS Terminal. Each operating system requires its specific method to clear font caches safely.
Troubleshooting font cache clearing on Mac
If Terminal commands to clear font cache fail, first check for permission or syntax errors. An error like “Operation not permitted” indicates insufficient privileges; try prefixing commands with sudo and enter your administrator password. Syntax errors often result from typos—recheck command structure carefully.
To verify if font cache was cleared, check the timestamps of cache files. Use ls -l /Library/Caches/com.apple.FontRegistry before and after clearing. A recent modification date after running the commands confirms success.
If font display problems persist, boot into Safe Mode by restarting and holding Shift until the login window appears. Safe Mode disables caches and can reveal if issues are cache-related. Resetting NVRAM (restart and hold Option + Command + P + R for about 20 seconds) may also help with font loading glitches.
When problems continue despite these steps, contact Apple Support for deeper diagnostics. Alternatively, third-party font management tools like Font Book or professional utilities can offer advanced cache handling and troubleshooting.
- How to Install Oh My Zsh in Mac Terminal: A Clear Step-by-Step Guide
- How to Use Aliases in zsh on Mac Terminal: A Practical Guide
- How to Change Your Default Shell to Bash in Mac Terminal
- How to Show Hidden Files Using Mac Terminal: A Clear Step-by-Step Guide
Frequently asked questions
How to clear font cache on windows?
To clear the font cache on Windows, you typically stop the Windows Font Cache Service via Services.msc, then delete the font cache files located in the %WinDir%\ServiceProfiles\LocalService\AppData\Local\FontCache directory. After deleting, restart the service or reboot your computer to rebuild the cache.
How to clear font cache windows 11?
Clearing the font cache on Windows 11 follows the same process as other recent Windows versions. Open Services, stop the Windows Font Cache Service, delete the cache files found under the LocalService profile in AppData, then restart the service or reboot. This helps resolve font rendering issues.
How to clear cache in a mac?
To clear cache on a Mac, you can manually delete cache files from the ~/Library/Caches and /Library/Caches folders. Use Finder’s Go to Folder and enter these paths, then remove the contents carefully. Restarting your Mac afterward ensures changes apply properly.
How to clear font cache on Windows?
This duplicates the earlier question. The recommended method involves stopping the Windows Font Cache Service, deleting cache files in the LocalService AppData folder, and restarting the service or rebooting your PC to refresh font data.
How to clear font cache Windows 11?
Same as other Windows versions, Windows 11 requires stopping the font cache service, deleting font cache files from the LocalService profile’s AppData folder, then restarting the service or rebooting. This process helps fix corrupted font displays.
Limits of this advice and when to seek other help
This advice does not cover issues caused by corrupted font files or third-party font managers, which may require specialized solutions beyond simple cache clearing. If you rely on third-party font management software, consult its documentation for specific troubleshooting steps.
Users unfamiliar with Terminal commands or system administration should proceed cautiously or seek professional help to avoid unintended system changes. Incorrect commands in Terminal can affect system stability or user data.
For most font display issues, clearing the font cache via Terminal as described provides a safe and effective first step. The single most useful next step is to restart your Mac after clearing the font cache to ensure changes fully take effect. This simple action often resolves lingering display problems without further intervention.